

Introduction: A Printed Three-wheeled Smart Car Kit.


This design is based on the Freenove Three-wheeled Smart Car Kit for Arduino Uno Robot Wireless Ultrasonic kit. The only place to get these shields.
http://www.ebay.com/itm/Freenove-Three-wheeled-Sma...
I created the print files using SketchUp.
Step 1: Peices Parts.

What you need before printing car.
2x Freenove UNO
http://www.ebay.com/itm/Freenove-UNO-R3-New-Versio...
1x Freenove Smart Car Shield for Arduino UNO
http://www.ebay.com/itm/Freenove-Smart-Car-Shield-...
1x Freenove Smart Car Remote Shield for Arduino UNO
http://www.ebay.com/itm/Freenove-Smart-Car-Remote...
2x NRF24L01 Modules {Plus X2 step down voltage reg.) See note*
http://www.ebay.com/itm/NRF24L01-PA-LNA-2-4GHz-Wi...
1x USB Cable
1X HC-SR04 Ultrasonic Distance Module
http://www.ebay.com/itm/HC-SR04-Ultrasonic-Distan...
10x Jumper Wires
2x 9 gram. Servos
2x DC Speed Reduction Motors.
http://www.ebay.com/itm/Smart-Car-Auto-Rad-Reifen...
5X 22mm Bearings.
http://www.ebay.com/itm/10pcs-8-x-22-x-7mm-Skateb...
*Note: Both Freenove Shields DO NOT provide reliable power for for the wireless NRF24L01 to work properly. You will need X2 of these. http://www.yourduino.com/sunshop/index.php?l=prod... This module makes it easy to use Nrf24L01 type transceivers on 5 volt systems like Arduino. It regulates the 5 volts to 3.3V and provides bypass capacitors for reliable operation. 5V DC is required to power this module.
Step 2: Printing the Parts.
The parts are flat, and small. Any 3D printer should have no problem printing the parts needed.
The bearing holes come out small, and will require some work to get a good fit. Like with wood working it's better to have more than not enough?
PLA is fine as a filament to use, no real stresses to worry about.
I have started using a heated bed with all my prints. Even though "they" say it's not necessary with PLA . No curling of the corners at 50c or so.
Attachments


Step 3: Making It Come Together.
Steering the two motor/wheel combo's, is by a steering linkage to a 9 gram servo. Supported by X4, 22 mm bearings. They are press fitted, once together they are kept in place by the built in bearing cage. Two additional stand offs for the upper and lower body 2 in, I think?
A second servo controls the ultrasound unit sweep.
The back axial is press fit to the upper body., there is a place for a small bolt, and nut. But I found it was not needed, because of the tight fit.
You can use the printed wheel/wheel keeper. There's no real load for it to support. I've had no issues with it.
Mounting the UNO/Shield was done with 1/4 nylon stand off's, hand drilled holes. And glued for added support.
The front bumper was a add on, to help keep it together, and keep it from hanging up on objects it may run into.
I found the battery holder was not needed, Velcro is our friend.
Put some hot glue on the motors wires. At the place where the wires go into the motors for stress relief.
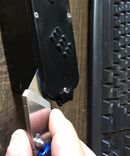
Step 4: Wires
Wiring everything together. A basic understanding of Arduino is needed. The shields are well marked as to what goes where and what it does. They do not mention that you will need 2 of these.
http://www.yourduino.com/sunshop/index.php?l=produ... This module makes it easy to use Nrf24L01 type transceivers on 5 volt systems like Arduino. It regulates the 5 volts to 3.3V and provides bypass capacitors for reliable operation. 5V DC is required to power this module.
I tried for 3 days to get it to work off the 3 volts coming directly from the UNO board.
You can see in the pictures how I used jumpers to accomplish this.
Here's a GetHub link to the code.
https://github.com/Freenove/Freenove_Three-wheeled...
Main Features: 3 working modes
Remote control mode
You can use the remote to control the car.
Automatic driving mode
The car can be driven automatically with the aid of ultrasonic distance module.
Exploration mode
You can control the car to avoid obstacles by interacting with Processing.
Note: These modes can only be used one at a time. The car Shield will have to be loaded with the code each time you want to change the mode on how it works.
Step 5: Here It Is in Motion.
In the code I had to slow it down, but it's still too fast. The ultrasound unit needs time to process the info it's getting.

Participated in the
Robotics Contest 2017

Participated in the
Design Now: In Motion Contest


