

Introduction: A "Simple" Multi-material 3D Printed Ornament Using Proto-pasta, TinkerCAD, and the Printrbot Simple Metal


'Tis the season for making and 3D Printing is a great way to celebrate! Explore the intersection of art and craft with this straightforward but technique-critical method for making multi-material prints from a single hot end system. Design to finished print can take as little as 30 minutes! It's as easy as 1, 2, 3!!!
Attachments
Step 1: Draw Your Model Using Tinkercad, Fusion 360, or Other CAD Program


If you don't already have an Autodesk ID (login), get one. This gives you access to many great "free" tools for creating 3D Printable models. You can use this to sign in to TinkerCAD, a super-easy-to-use cloud-based CAD software that runs right in your internet browser!
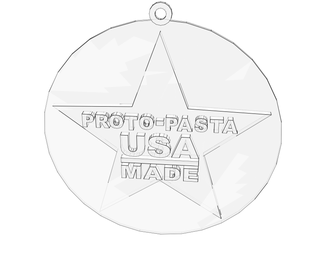
After logging in, click "Create new design". On the right-hand side of the screen, you will have several categories with various shapes to choose from. I started with the "Geometry" category and drug a "cylinder" from the right menu to the modeling space on the left. I then adjusted the size of the cylinder to get the desired diameter and height. In this case, I made a 140 mm diameter by 1 mm tall cylinder.
Repeat the process to create a "tube" and a "star". I made sure the star was taller (by 2 mm) than the cylinder. I repeated the same technique again in the "Letters" menu. I worked with one word at a time. You can select multiple features at once by holding down the shift button. I adjusted the size and height for "PROTO-PASTA" making sure it was 2 mm taller than the star.
When you are finished modeling, "save" your design and "Download for 3D Printing". Choose STL format to later import into your machine prep software. You can also share your design on Thingiverse. This model can be found at http://www.thingiverse.com/thing:539149
Step 2: Prepare for 3DPrinting Using Cura or Other Machine Prep Software

Now that you have an STL file, you can prepare your machine platform both digitally and physically!
Digitally, you will need to open your machine prep software, such as Cura. Cura is a common software used to generate g-code for our Printrbot simple Metal and other 3D Printers. You can see our chosen machine settings on the left hand side. We use a moderate resolution and are able to build a 3 color ornament in just 20 minutes. After loading your part onto the platform, you must save the g-code to send to the printer.
We also need to prepare the printer, making sure the hot end and platform and clean and free of debris. We also put plenty of blue painters tape on the platform to ensure the ideal build height. Rather than adjust the first layer height, we did 2 layers of tape to get a good first layer. Experienced Layer Geeks know that a good first layer is the most critical part of the print.
Now its time to start the printer...
Step 3: 3D Print Your Model on a Printrbot Simple Metal or Your Favorite 3D Printer!


So normally you would print a basic file like this in a single material, and with a good preparation and quality filament (like Proto-pasta), its a breeze. Changing filaments mid-print definitely increases your risk for failure. No risk, no fun, right? This is where the technique comes in, and I will give you some tips.
I start the print with one color. While that cross-section (the cylinder) is printing, I straighten out the filament for my next color. I also make sure it has a clean, perpendicular cut. When the cylinder transitions to the star cross-section, I immediately clip the filament and feed the new, straightened one in. Its a bit tricky to hold the new filament in place until the machine grips it. Alignment is also critical or the new will slide past the old and jam or stop feeding.
Repeat again for the lettering. When you can nail this technique, you've got it! Don't worry if it takes a couple tries. The filament usage is tiny and the whole print only takes 20 minutes! I had fun trying different color combinations and I hope you do too!!!
Have fun, hang them on your tree, and HAPPY HOLIDAYS from the entire PROTO-PASTA TEAM :-)
Participated in the
3D Printed Ornament Design Challenge


