

Introduction: A New Take on the Classic Engagement Ring


First of all I found a wonderful young lady that not only puts up with my projecting, random engineery 'stuff' all over the house and my affinity for robots but actually finds them endearing. Win. She mans our Maker Faire stands, caters our project evenings with sausages, and even helps me man handle my Mini engine around my garage... So I decided to propose.
But this left a quandary: Katya doesn't like gold or gems, and the traditional engagement ring is as far from what she would wear as I could imagine, so what could I do?
I decided to make the ring as then even if she didn't want to wear it much, it held some 'I'd made it' value. I chose white gold and diamond to make it definitely an engagement ring, but I had to decide on a design. I decided to move away from the cut diamond look as it is not Katya's (or my) cup of tea and the idea of the diamond being as found seems more romantic somehow. The following steps detail how I designed and made it...
N.B. It is worth saying that both proposal and ring were to be a surprise, and to avoid any photos popping up if Katya looked at my phone, no photos were taken until the proposal. So, sorry all the photos are post completion.
Step 1: Think Up a Concept

As I have said, I decided to go with an uncut diamond on a gold ring. I knew my partner would prefer white gold so that was easy. Next I had to decide the design concept.
Having toyed with the idea of an octahedral crystal shape I decided it was difficult to set it in an attractive way. I then found that some uncut diamonds are found with a natural triangular shape. While this form doesn't have the twinkling facets of a cut diamond, it does catch the light in a very appealing way and I find it a pretty attractive shape.
The shape of the triangular stone also allows for a very shallow setting, meaning the stone won't stick out very far, allowing the design to be less overstated. I decided on a simple band and simple 3 claw setting at the surface of the band to give the low-key 'rustic' look to the ring that I thought would appeal to its recipient.
Step 2: Find a Stone

Next up is the task of finding a stone. I decided to get the stone before any detailed design as it could affect the design significantly.
Somehow the importance of 'the stone' seems to be the focus for most people. They are, after all, very expensive and it is common that people are talked into buying certain stones because trained diamond merchants using magnifying lenses can tell they are 'slightly more perfect'.
In the uncut market there is less pressure though and I had 3 key drivers for selection:
Inclusions/clarity/colour: I wanted a clear colourless stone with no inclusions or imperfections visible to the naked eye.
Shape and size: I wanted an appealingly shaped stone, roughly equilateral, of a suitable size for my design. The shape affects the lensing and how light is caught, so it is worth looking carefully.
Responsibly sourced: Buying diamonds as an individual it is very easy to buy a diamond with no paperwork or history. We all know about conflict diamonds so I think it is important to buy a stone with a history. I sourced mine from Antwerp so it had been through the anti conflict diamond filter process they have for traded diamond. It is also of some importance your stone is mostly carbon (not fake). Had I not gone for an uncut stone I would have gone for a lab grown diamond. As a scientist I find the interest of the production process outweighs any marketing from the lab=fake crowd, but I am uncomfortable with the working conditions of miners and definitely don't want to be funding war paying through the nose for slightly sparkly rock*.
*Diamonds are actually pretty awesome. Not only are they REALLY hard, they are also incredibly thermally conductive (despite being electrically insulative). I have cut through ice cubes using a sheet of lab grown diamond just using the conduction of heat from my hand to melt the way through.
Step 3: Design Setting / Claws

Start by having a look at the stone. Decide which way up and which way around you want it. I chose the side that caught the light better to face up, and the most symmetrical axis to cross the band perpendicularly to make the ring look symmetrical.
Measure the stone carefully and in every way you can. The more accurately you can model it, the better your claws will fit... which makes things a lot easier later.
I measured the stone in seven different directions: tip to tip for each of the 3 sides, tip to far side for each tip, and then thickness. I then modelled the stone in SolidWorks. The claw position and design needs to be precise. To constrain a triangle with three claws they need to be positioned correctly and tightly, but the curved sides of this stone leave even more scope for any looseness to allow the stone to rotate and slide and possibly rattle free. Using the CAD I positioned the claws such that they look quite symmetrical while also ensuring that any rotation or translation of the stone in the design makes all 3 claws interfere. The stone is constrained from front-back motion or rocking by the interplay between the surface behind the stone and the way the claws are bent over the front of the stone, once fitted. Consideration should be taken of how far the edge of the stone will sit from the front of the ring to avoid leaving big empty arches under the stone.
I chose claws 1.1mm wide as a good trade-off between too thick to bend and too thin to be strong enough. This design does leave corners of the stone exposed so needs to be robust to catching it on things. At the same time 14k white gold, my chosen material, is quite hard and less ductile than other gold grades. It also has a much higher melting point so I needed to cold form the claws to set the stone. Supporting fillets strengthen the claws under the stone, and everything is rounded with minimal stress concentrations.
As designed, the claws are left straight to allow fitting of the stone. I 3D printed a few test prints in ABS. This is right on the limit for the UP plus v2 I was using so each print needed measuring to check its dimensions before testing the fit of the stone.
Step 4: Find the Right Ring Size in a Suitably Surreptitious Manner

Given both ring and proposal were to be a surprise, I needed to surreptitiously work out what size the ring needed to be. There was luckily one ring that my grandmother had given to her that I knew fitted the correct finger. I didn't want this to be noticed as missing so at an opportune moment I scanned it along with a steel rule in our scanner. From this I could take accurate virtual measurements. I had to make allowances for the less than circular ring, and the fact it is much thinner, but by gut feel I managed to get it pretty much spot on as it turns out!
Step 5: Design Ring

The look I was going for was a simple rustic aesthetic, with a low profile setting for the stone. Once the setting was designed I turned my attention to the rest of the ring. I revolved a rounded rectangle to form the ring itself, giving a simple squarish form, being sure to make the internal diameter right for the target finger.
The setting was moved to the surface of this ring such that the back of the stone would be held against the front of the ring. The fillets on the claws were carefully designed to reach maximum clearance where the edge of the stone would lie while blending neatly into the surface. Due to the slight asymmetry of the stone, these fillets were not continuous circular profiles, but weren't too hard to make match.
It is also very easy to forget how small the features you are working on are. I suspect many of the changes I made were small enough they didn't make a difference once manufacture is taken into account.
The design was then saved as an STL, ready for 3D printing in wax (don't worry, we'll get onto the gold in a minute!).
I also printed the design in ABS with the modelled stone in as a first look of my design in the physical world.
Step 6: 3D Print & Lost Wax Cast

Now there is a finished CAD model, and it has been checked for fit for both finger and stone, the next thing to do is make it.
To go from 3D CAD to a physical gold ring, the simplest way is 3D printing in castable wax and then investment casting into gold. Investment casting is a process that has been used for donkey's years by jewellers, but the relatively new ability to print the wax makes the process of making exactly what you want really easy, without the need for any carving skills.
There are plenty of instructables on investment casting such as this and this. If you fancy having a go at investment casting you can get castable wax printed on shapeways. Alternatively you may be able to print the wax to cast yourself.
However for a combination of reasons I decided to concede on making this part and used i.materialise.com. My reasons for deciding to get materialise to do the casting were as follows:
- Secrecy: Setting up a furnace and casting gold without my partner noticing would have been challenging.
- Quality and longevity: As it would be my first go at investment casting, I couldn't guarantee a decent result, and even if it looked good, a hidden bubble might mean the ring doesn't last, so I couldn't gamble for an engagement ring.
- Time: I wanted to get on with the ring as quickly as possible because I wanted to propose (keeping the secret would have made me explode if I'd had to wait much longer).
So there we go, I chickened out slightly:(
Step 7: Design and Make Setting Tools


It may have occurred to you that I'm not a jeweller and this may not be the proper way of doing things. I am however a mechanical engineer so I can generally work out a way of doing things. So without a clue of how to do things properly I decided to start making some tools to help me set the stone.
I printed 3 jigs out of ABS that could hold the ring aligned flat to each of the 3 claw positions.
Mark, who assists me with a lot of projects, ground a large nail to have a mostly rounded wedge end narrow enough to fit between the opposing claws. The tip was just angled enough to form a slight notch at the point where the stone should sit.
Other than a hand press, these are all the tools required.
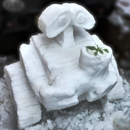
Step 8: Set the Stone


I placed the ring in each of the jigs with the appropriate claw downwards and, using a hand press on the nail tool, gently notched each claw to encourage them to fold tightly around the stone. I then clipped the claws to length and filed and sanded the tips to a fine grade. Also the nail tool now needed rounding to avoid leaving marks.
I then sat the ring alternately in the two angled jigs (this time with the appropriate claw up) bending the claws in enough to support the stone while still allowing it to be removed. It is most important to keep these symmetrical, so I kept alternating. Also keep sliding in the stone to ensure it fits against the 3rd claw. There comes a point where the claws are bent in at 30ish degrees and the stone becomes impossible to remove, and being careful up to this point means the stone is well centred in the setting.
Now start bending in the third claw, again using the press to make small adjustments at a time. Gradually go around the claws until they are all gripping the stone well, then gently squash the ends down into the face of the stone. At this point you may need to polish out any marks left, although I found that the white gold claws were surprisingly hard and showed little sign of the tool work.
I was pretty happy with the result.
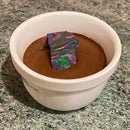
Step 9: Make the Box


Once again, my project buddy Mark assisted me with this step. I'd recently taken Katya to see The festival of the spoken nerd, and they had shown, among other things some crazy shapes of constant width (they even sell them in their shop). These shapes are interesting in that at any angle, when put between parallel surfaces, they maintain a constant separation. So while they would be bumpy if used as wheels, they would work just great as rollers as if they were cylinders.
Regular shapes of constant width (SOCW) are quite aesthetically pleasing so Mark CNC routed two halves of a ring box from oak, with an external 5 pointed SOCW, and an internal 3 pointed SOCW (or reuleaux triangle as it is called).
I chose to keep the box finish unpolished, with just a bit of sanding and a coating of tung oil. I bought some really nice dense creamy white silk duchess satin to trim the box, which went well with the tung oiled wood. To line the box I used the silk to make a triangular cushion (filled with polyester stuffing) that was taller in one corner to angle the ring, and a pocket of silk with a decorative seam along the edge to keep the ring from moving when in the box.
To hinge the box I dug out a piece of scrap sheet stainless spring steel of the right width, and cut an appropriate length. The sheet must be curved in the correct direction to avoid a snap-through occurring as the box is opened. Also precurving the spring hinge helps keep the box closed when left to sit. To attach the hinge I made two holes at either end of the spring steel and stapled it to the wood. I then carefully removed the hinge from the wood, wrapped it in silk, allowing the staples to project through the silk, and then firmly pressed the staples back into their holes. I added decorative seams to the hinge cover silk, but all joins were hidden underneath the attachment.
Step 10: Propose!


With the ring and box finished, I could finally propose.
Katya walks home from work, so I went along just before she was due to leave work tying sunflowers with ribbons to lamp posts along her route home. When she got to our house I was waiting ready to pop the question.
And the best bit is...
She said yes!
I hope you have enjoyed this, please vote for me in the ring contest!
First Prize in the
Rings Challenge


