

Introduction: A Potrait Drawing of Usher From His Album - Looking for Myself

This instructable is going to teach you how to draw a portrait of usher in his Album(looking for myself) with the right materials.
Step 1: What You Will Need.


Figure 1 and 2 are pencils - The pencils are used to draw or sketch on a paper or flat surface.
Figure 3 is a sharpener - The sharpener is used to sharpen the pencils.
Figure 4 is an eraser - This is used to clean or erase any mistake.
Figure 5 and 6 is a sheet of paper and a sketch pad - this is where your drawing is expressed, you are to use a pencil on a sketch pad or a sheet of paper.
Step 2: The Pencil to Use and Why?


The only way to draw an item or anything is to use the right pencil.
The first pencils to use are H or HB, which is also called a Number 2 pencil.
The reason why you should use a number 2 pencil is because it will be the easiest to erase, and you can notice your error faster.
Note: You have to avoid making a mistake.
Step 3: Examine the Work.


The word examine is to study, inspect in detail to determine the nature or condition.
The picture is right in front of you, so you have all the time in the world to look at it, and examine it.
The reason for examining is to know how to plan, where to start and where to end.
Step 4: Concentration

The word concentration is what you need because if you don't concentrate, how will you accomplish the work or see your work to be done.
Note:Before you start the work, you have to be ready to concentrate, you have to have a mindset
Step 5: Prepare Your Outline.


An outline is a sketch depicting the outer edges of a person or object, without interior details or shading, you begin your work with a H, HB or a number 2 pencil on your sheet of paper or sketch pad. I drew different Parts of his face separate in order to know what I'm going to draw, then I put them together to form an outline. This drawing is in front of you, its not imaginary, so you should have taken your time to examine it, you can create your own particular kind of outline.
I drew different Parts of his face separate in order to know what I'm going to draw, then I put them together to form an outline.
Note: use of the Number 2 pencil is to make an outline.
This is a picture you are drawing, which is in front of you, not imaginary, so you should have taken your time to examine it, you can create your own particular kind of outline.
Note: This can be used on any other drawing.
Step 6: Outline Is Done

Now you are done with your outline, take your time and check if you have made a mistake because this will be the best time to correct yourself, and the pencil you used is light, which will be easier to erase or clear.Take an outline as a guide.
An outline presents a picture of the main ideas of the drawing, For any other drawing, an outline will show a basic overview and important details.
Take an outline as a guide.
Step 7: Detail the Outline.


This is where you have to take your time because when you are detailing your work, you have a good chance of making a mistake, because you have draw the hair, inner ear, nose, and the lips, this is what you have to do before the shading will begin.
The outline is complete, now take your time and go over the outline, look at the portrait you are drawing to see if you made any mistake, this is where you might have problem but the good part is that it will be easy to erase.
Step 8: Shade Your Work.


Now you have to do the final work which is shade.
Now you have to consider doing the shading, this is a technique which requires darkening your work, this is the final step of drawing. The process of shading is used in drawing for depicting levels of darkness on paper by applying media more densely or with a darker shade for darker areas, and less densely or with a lighter shade for lighter areas.
Shading is simply darkening your art work.
A drawing is not complete without shading it. Shading completes the work.
Step 9: Make Sure There Are No Errors.

There are always errors made if you do not take a look at the work
An error is a condition of being wrong, so you could have made an error but you won't know because you didn't take your time to look at the work.
when you're done with the steps I have given you, you have to take a look once more. because, you could have made a mistake.
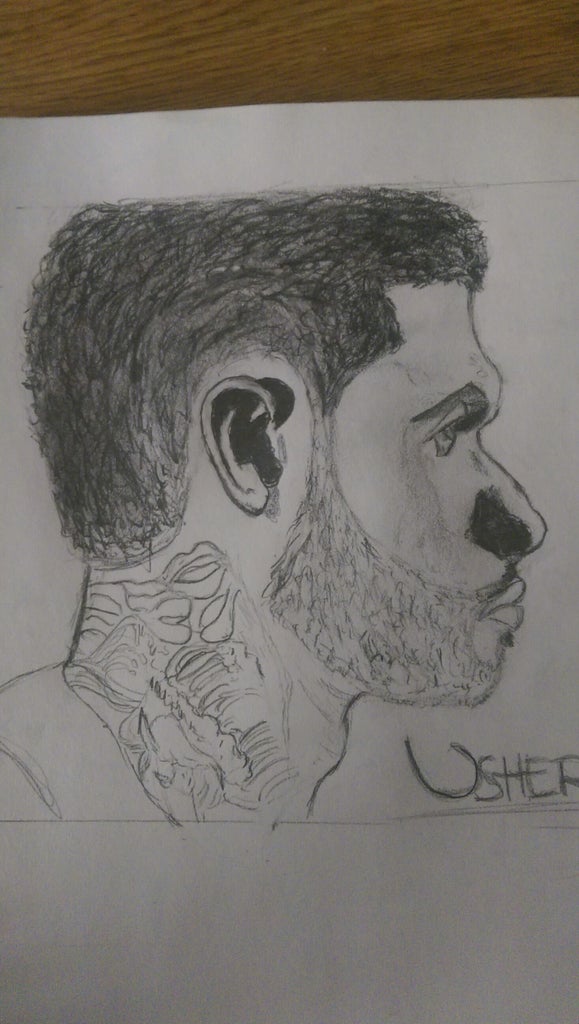
Step 10: Final.


Now you have done it.
The outline, details and the shading is complete. you can now try to draw someone or something else.


