

Introduction: A Small REX, (or Bar Billiards) Game - Without Balls


Rex is the game you can know as 'bar billiard' (http://en.wikipedia.org/wiki/Bar_billiards), with some variants. The name 'rex' is the name of this game in Hungary, playing it with only one mushroom, and five (or sometimes seven) white and one red balls. We play it in hotels and other resort places, beaches, pubs or cantins; two decades ago this game was very popular, but nowadays the people rather play pool or 8-balls billiard in pubs. :-(
The original playing table is large enough, (but the normal billiard table is even bigger than the bar billiard table); its size is normally cca: 180-190 cm x 80-90 cm. I think this table desn't fit in a smaller room, but you can't decrease the dimensions because of the balls and the cueing-aiming way of this game.
I made a portable table in a smaller size, and tried to solve the aiming problems with the same method whitch works at the button soccer: don't roll the balls, but rather slip them on a surface: lesser 'ball' diameter, smaller distances to run, slower moving and smaller playing area. The ball-to-ball collisions remain the same, you can play 'mandiner' at the wall collisions too, but you can start the 'balls' without a cue, it's enough to flick them. And without rolling the 'ball' will loose one dimension, and may be a simple coin, plastic disk, or even a bottle cap. (in this theme you can see my other 'bottle cap project' here: (https://www.instructables.com/id/Table-soccer-game-with-bottle-caps/).
Step 1: Materials and Tools


Let's look, what materials you need for a small and portable bar (or simple) billiard table:
-A laminated board (cca: 40 x 80 cm)
-3 pcs of side boards (lenght is the same of the main board, the height is 10-15 cm)
-1 pcs of the front wall board (with the width of the main board and the lenght of it) -some screws and any of the edge stripe to cover the raw cut edges.
-7 white tokens (button, coin, plastic disc, roulette token) and 1 white one. Or any else colours, in 7+1 system.
-A stick (cca 4-5 cm long, 1 cm diameter) and a larger bottle cap to make a pretty mushroom. Its cap may be made of wooden material, too.
-A cardboard slab
And some tools:
-saw to cut (I ordered the cuttings by size when bought the laminated material)
-ironing tool to fix the edge stripes
-drill to make holes
-and a circle cutter for the big holes
-sandpaper to form the big holes smoothly
-some marking tool to mark
Step 2: Plans, Cutting, Assembling


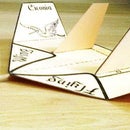
Plans:
Here you can find a plan with metric measure. But modify, if you want, the smaller tokens require smaller playfield, proportionally. I have cca D=2,5 cm tokens. The pockets should be a bit larger in diameter than the tokens.
When cut the elements, mark the assembling points accurately, don't forget that the horizontal main board must be leveled perfectly (even if not so as it would be used with balls, because of the bigger friction on the surface).
Now mark he 'pocket' holes accurately, and cut them carefully. Use high speed to avoid the unwanted damage on the surface at the cutting edge. Use sandpaper to smooth the inner edge of the cut holes.
Assemble the main board and the frame. Use screws, and work carefully. The inner side of the frame will be the reflecting side, but never mind that the material is solid; the reflection will caused by the plastic token.
Make the mushroom: cut a piece of stick (lenght: 4-5 cm, diameter: 0,7-1 cm), and glue a cardboard cap on its top, if you want, but I use it without any cap - only a stick.
And this is the all. To return the pocketed tokens, you may cut a cardboard slab under the main board, and pull it out when a cap fell into a hole to use it again. Or you can glue cardboard bottoms at the other side of the table where the 'pockets' (the holes) are - so you can simply grab the pocketed tokens from it. And mark the place of the mushroom, if you want. Mark the starting pont, too (you can see it on the image), and draw a line behind it as base line (cca. 15 cm from the edge of the table). The rules are written in the Web, but I explain our local rule for one mushroom:
Step 3: Rules (optionally)


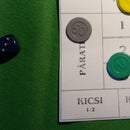
The points of the holes, from the upper line:
12-20-30-20-10
-------100--------
50------M-----50 (mushroom)
--------------------
--------b------- (ball)
--------c------- (cue ball)
Cue ball may be started only from the starting point. The red ball (token, of course) must be on the playfield whenever possible; the aiming is always done with it, and when fell into a hole, immediately must put it back at the next aiming. Its point value doubles the hole value when pocketed. The player is in game while he (or she) can pocket tokens. When the player wants to go out from the current round WITH his points, it is possible only that case, if makes a contact without pocketing - in this case the opponent comes to play. The goal is to be the first who collected the necessary points (this is subject of an agreement, we normally determine it in 250). When a player in his(her) round has pocketed but didn't manage to make a contact at the end, his points in THAT round are perished. When hits the mushroom and it tips up, ALL of the the player's points are perished! When someone can't make a contact, and hasn't pocketed any in a round, he must finish that round, and the opponent comes. When somebody wants to go out with the required winning points, it is possible, when he (or she) can make a final contact. In some companies this final knock is only valid with using the red ball. When all of the balls are on the table, the player has to pick up the closest ball from the starting point to aim. When a ball comes back behind the base line, the player losts its points in THAT round.
Step 4: Final Words
If you like this small board, you can put it into a bag, and carry it where you want. And, if you have smaller coins or tokens, you can make it even smaller - the only important factor is the friction - try the slipping ability of the tokens, and plan the board for it.
And, of couse, if you prefer the simple billiard, using this method you can build a normal billiard board, too, with a small modification; in that case leave open the corners and the middle of the longer side when assemble the sides. And don't make mushroom...:-)


