

Introduction: A7_3D Printed Automoton


A7 by Dave Cortes built at Pier 9
Step 1: A7 Model Render
Some time ago I had the urge to design and model a robot. I wanted to give myself some restrictions and I wanted the design to feel light and delicate. I imagined windows that would reveal the inner workings incorporated into the design, but also functional. I wanted to be far from anything popular at the moment, like Transformers or Ironman-like designs. I imagined gears, but I didn't want it to be steam punk either, so I settled on a pre-steam design, something that would work like a clock with gears, springs and pulleys, but also with some modern shapes in the bronze casted armature. This led into a narrative that grew into a movie in my head where 7 robots, one for each sin, all unique in design have been uncovered after more than 500 years. Lost automotons by an unknown artist. I wanted the meticulous design to hint at obsession, who was this created by and what was its purpose? Here we get a glimpse of Lust, this digital render reveals the finished digital model in color.
Step 2: Making the Digital Model


I usually begin all my base work for a model in Maya. I set up simple shapes to start constructing the silhouette.
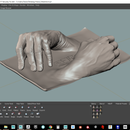
Step 3: Export Low Poly Meshes for Detailing


Once all the base meshes are created I then export all geometry as obj's to refine and detail in Mudbox or Zbrush.
Step 4: Finishing the Model


After all the parts have been detailed they are now ready to reduce/decimate (see my instructable on CAM for Fusion for steps on reducing your file). All the parts were exported as obj's then imported into Netfaab for fixing, scaling and booleans.
Step 5: Time to Print


I printed the skeleton on the Fortus printer. The Fortus has a large print bed and the material is affordable, at 36" tall I decided to split the printing between the Fortus and Connex. The more detailed external pieces will go on the connex machine. I attempted to print the feathers on the Mcor paper printer, but the detailed feathers made it difficult to release the supports, destroying the piece in the process.
Step 6: Fitting the Parts


Some parts needed further modifications. I did as much as I could to reduce collision on parts, but I still missed a few places. The Fortus FDM print material is great for sanding, drilling and Dremeling if needed. Once the skeleton was fitted I moved onto the Connex printer to start building the plates and the head.
Step 7: Making a Base


I knew I wanted to play with some kind of wood base, but needed it hollow to fit the servos in. Movement on the sculpture was an afterthought and I didn't want it to dominate the aesthetic of the piece so I thought I'd use a veneer to create the illusion of a solid piece of wood where I can hide the electronics. I will later learn that the base was way too small, but I still kept the veneer on a larger round base.
Step 8: Stepping Into VR
Take a sneak peak at a WIP VR scene of the dungeon workshop. More to come.


