

Introduction: ARDUINO MENU DESIGN With OLED-UI(USER INTERFACE)


Hey all!
In this tutorial i will try tıo explain how to make ARDUINO MENU DESIGN by using i2c OLED Screen. It is also know as UI(User Interface). It has been using for many project but it must be familiar with you from 3d printers :)
Here also video about this project. You can have a look at this video and see how it worked.
Well, honestly if you make your own menu design by yourself it will contribute your coding and algorithm skills a lot . I took my almost 4 hour to creat such a simple menu desgin. This is why i try to make it %100 myself. Of course i took some help in some parts.Such as what kind of menu i should design etc...(But most of algorithms belongs to me )
Note that : If you want to make your own menu design you have to start with from most basic step i.e. try this : when the button is pressed selection sign i.e. ">" must go downwards....
Step 1: Required Hardware
x1 Arduino (Uno ,nano ,mega .... etc)
x1 OLED SCREEN (i have used i2c modeule which is very good due to low connection pin number but you can use any screen you want however you have to make some changes on code ofcourse!)
x3 Button
x3 10k resistor
x1 Breadboard
Enough Jumper
Step 2: Circuit Connection
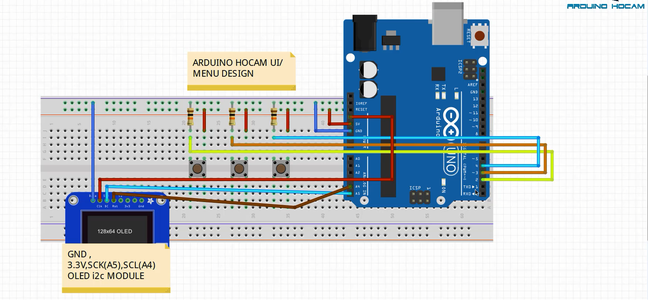
Well, we have very simple connection here. As i mentioned before, if you have different type of screen (5110,16x2....) you can make changes according to what you have.
Note that : Be carefull about button and Pull-Down resistors connection. Make connection just like in the diagram below. Wrong resistor connection may cause errors. In this configuration when the button is pressed we get 1 (HIGH) .
Step 3: Source Code
Ok dear makers :) we have source code here. As you may know, i preapare my project for my YouTube Channel in Turkish. However, i try to translate or add explanations just beside the almost every line. This project is kind of semi - english/turkish prepared. For those who does not know turkish i have added explanations.
Still if you have any problem about that please let me know and ask your question from here or Youtube Channel.
I am sure that you guys quite clever and will not face any problem about that language difference. Do not let the language block you :)
Attachments

Step 4: Subscribe My Channel If You Like
You can have a look at the video how this project works .
If you like my project, you can have a look at others on my channel and you can support me . Don't worry about the language , mostly i prepare my codes with english explanation. If any question, you can either ask your questions from here or Youtube channel.
My Youtube Channel :Youtube Channel
Please Let me know if you face any problem without any doubt!
Have fun!


