

Introduction: ARDUINO PIANO


Hello all in this post i will show you how to make an arduino piano and play your first song in it.
Arduino is an open-source platform used for building electronics projects. Arduino consists of both a physical programmable circuit board (often referred to as a microcontroller) and a piece of software, or IDE (Integrated Development Environment) that runs on your computer, used to write and upload computer code to the physical board.
The Arduino platform has become quite popular with people just starting out with electronics, and for good reason. Unlike most previous programmable circuit boards, the Arduino does not need a separate piece of hardware (called a programmer) in order to load new code onto the board – you can simply use a USB cable. Additionally, the Arduino IDE uses a simplified version of C++, making it easier to learn to program. Finally, Arduino provides a standard form factor that breaks out the functions of the micro-controller into a more accessible package.
Components needed
- Arduino UNO -1
- Male to Male jumper wires -104x4
- Keypad -14ohm
- Speakers - 1A
- PC or Laptop
Connect the circuit as shown in the diagram :
Step 1: CONNECTION DIAGRAM
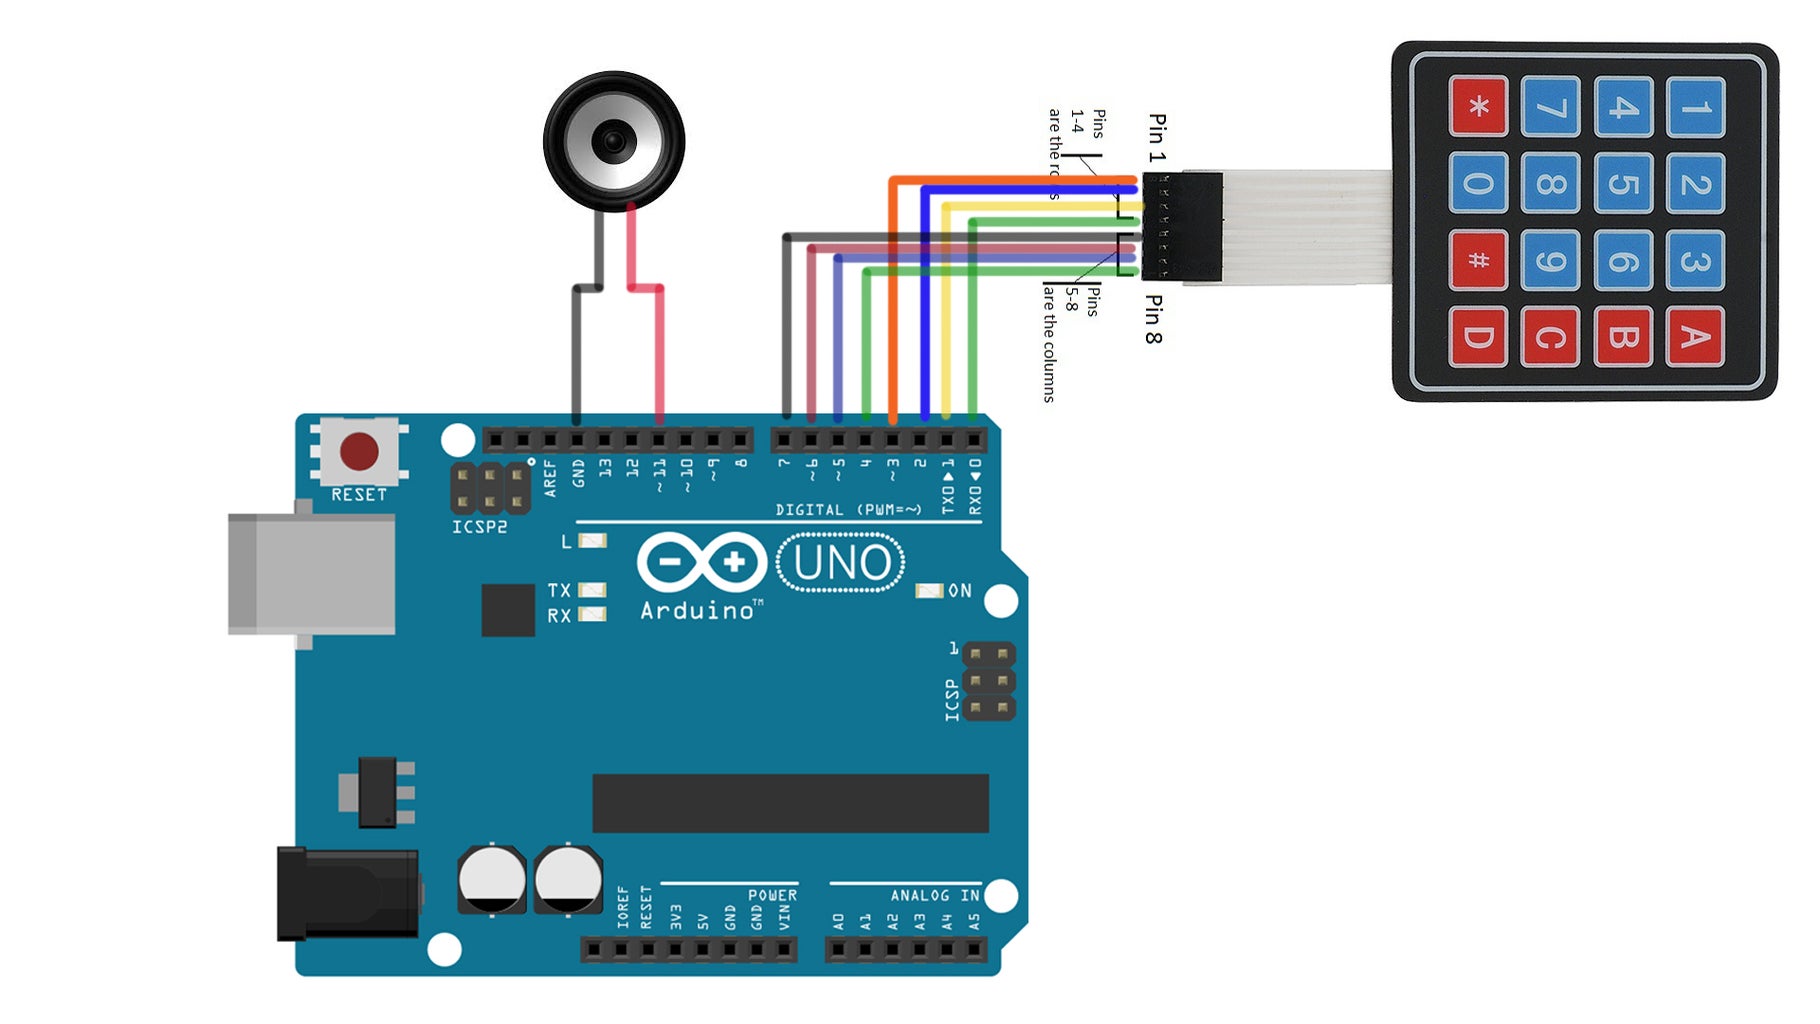
Connect Keypad row line to 3 2 8 0 pins of ARDUINO and column lines to 7 6 5 4 pins of ARDUINO.
Connect Speaker Lead wires to 11 and Ground Pin.
HOW TO SET UP THE HARDWARE :
the piano keys... The piano keypad switches were connected using jumper wires.The main sketch defines which music note frequencies are associated with each piano key. For this project, I used C4, D4, E4, F4, G4, A4,B4,C5, D5, E5, F5, G5, A5, & B5 with C4 being switch '0', D4 being switch '1' and so on... Change the frequency values, or add additional switches to fully customize your own project! the SPEAKER.. To integrate the Speaker, simply connect one end to the Arduino pin 11, and the other side to ground . The "tone" function in the code will look for this pin in order to play the note called.
Step 2: WORKING CODE :
Paste this code in the Arduino IDE and upload it to the Hardware.
Press reset if any thing goes wrong:
you need to download and install Arduino Keypad library for this and This is available in the Arduino.cc website.
#include<Keypad.h>
#include "pitches.h" #
define GND 12
const byte ROWS = 4; //four rows
const byte COLS = 4; //four columns
const int SPEAKER=11;
//define the symbols on the buttons of the keypads
char hexaKeys[ROWS][COLS] = {
{'0','1','2','3'},
{'4','5','6','7'},
{'8','9','A','B'},
{'C','D','E','F'} };
byte rowPins[ROWS] = {3, 2, 8, 0}; //connect to the row pinouts of the keypad
byte colPins[COLS] = {7, 6, 5, 4}; //connect to the column pinouts of the keypad
//initialize an instance of class NewKeypad
Keypad customKeypad = Keypad( makeKeymap(hexaKeys), rowPins, colPins, ROWS, COLS);
void setup()
{
Serial.begin(9600);
pinMode(GND,OUTPUT);
digitalWrite(GND,LOW);
}
void loop()
{
char customKey = customKeypad.getKey();
if (customKey=='0')
{
Serial.println(customKey);
tone(SPEAKER,NOTE_C4,350);
}
if (customKey=='1')
{
    Serial.println(customKey);
    tone(SPEAKER,NOTE_D4,350);
 }
if (customKey=='2')
{
    Serial.println(customKey);
    tone(SPEAKER,NOTE_E4,350);
  }
  if (customKey=='3')
{
    Serial.println(customKey);
    tone(SPEAKER,NOTE_F4,350);
  }
  if (customKey=='4')
{
    Serial.println(customKey);
    tone(SPEAKER,NOTE_G4,350);
  }
if (customKey=='5')
{
    Serial.println(customKey);
    tone(SPEAKER,NOTE_A4,350);
  }
  if (customKey=='6')
{
    Serial.println(customKey);
    tone(SPEAKER,NOTE_B4,350);
  }
  if (customKey=='7')
{
    Serial.println(customKey);
    tone(SPEAKER,NOTE_C5,350);
  }
  if (customKey=='8')
{
    Serial.println(customKey);
    tone(SPEAKER,NOTE_D5,350);
  }
  if (customKey=='9')
{
    Serial.println(customKey);
    tone(SPEAKER,NOTE_E5,350);
  }
  if (customKey=='A')
{
    Serial.println(customKey);
    tone(SPEAKER,NOTE_F5,350);
  }
  if (customKey=='B')
{
    Serial.println(customKey);
    tone(SPEAKER,NOTE_G5,350);
  }
  if (customKey=='C')
{
    Serial.println(customKey);
    tone(SPEAKER,NOTE_A5,350);
  }
  if (customKey=='D')
{
    Serial.println(customKey);
    tone(SPEAKER,NOTE_B5,350);
  }
  if (customKey=='E')
{
    Serial.println(customKey);
    tone(SPEAKER,NOTE_C6,350);
  }
  if (customKey=='F  ')
{
    Serial.println(customKey);
    tone(SPEAKER,NOTE_D6,350);
  }
}
Step 3: How Code Works?
HOW THE CODE WORKS
The sketch begins by importing the "Keypad.h" and "pitches.h" libraries so we can reference various items from them later on in the code Next, the code is set up by defining the number of ROWS and COLUMNS determining which pins are inputs vs. outputs, and setting the SPEAKER pin as 11th pin of ARDUINO. Next we define the value of each keys in MATRIX form and assign which pin we need to connect the rows and columns(In this project i have used 3,2,8,0 pins as ROWS and 7,6,5,4 as columns).
the main loop...
We are storing each key value to 'customkey' variable and also printing the value in the serial monitor of ARDUINO IDE.Next ,we are comparing each custom key and sending SPEAKER pin NOTE and DURATION to the tone function.
Extract this to libraries in th ARDUINO folder
in Arduino IDE
go to : Files >Example>Keypad>Custom Keypad
(Optional :: To change values of Keypad )
Step 4: Playing HAPPY BIRTH DAY Song on Keypad
NOTE: SPEAKER should be only connected to any PWM pins of ARDUINO else the setup will not works HAPPY BIRTHDAY NOTES ON KEYPAD:
4 4 5 4 B 6 4 4 5 4 7 B
4 4 C 8 B 6 5
9 9 9 B 7 B
Enjoy your play.....
Step 5:
Please Check my Unboxing video of Soil Moisture Sensor that i Bought from Aliexpress.com
visit my site :
for more projects.


