

Introduction: AVATARIZE YOURSELF!


Do you LOVE James Cameron's movie, Avatar? Have you always wondered what you would look like as a Na'vi? Then THIS is the tutorial for YOU!!
Step 1: FIND a PICTURE!

This Instructable uses Adobe Photoshop. I used version CS5 for this tutorial but most versions should work similarly. The first step is finding the perfect photograph!! It doesn't matter if you are using a photograph of yourself or of a friend, or even a celebrity, there are just a few rules that make the process easier...
1) Photos that are "straight on" views are easier that faces at an angle.
2) Faces with no teeth showing work best.
3) Higher resolution pictures turn out better than low resolution pictures.
Once you've picked out your picture, you are ready to start!
Step 2: SELECT YOUR SKIN!


Select the face, neck, and any other skin showing with the lasso tool (you can also use the quick mask mode and paintbrush to get a more exact selection).
Step 3: BLUE SKIN ANYONE?


To make your skin a nice Pandoran blue, go to Image > Adjustments > Hue/Saturation.
Move the Hue slider all the way to the right (if the blue is too intense, you can adjust to your liking).
Step 4: SMOOTH THAT NOSE!


The Na'vi have very unique noses, so there are a few steps we need to take in order to reconstruct our noses to look like theirs.
Use the patch tool on the side of the nose and drag the selected area to the cheek or forehead. (This is going to smooth out the sides of the nose.)
Repeat on the opposite side of the nose.
Step 5: NOSE JOB, ANYONE?


Now we are going to add a new shadowing style to your nose.
Select the sides of the nose with the lasso tool.
Copy and paste into a new layer.
Change the blend mode to “multiply”.
Step 6: NOSE SHADOWS!


And even more nose-work!
Go to Filter > Blur > Gaussian Blur
Change the radius to 6.8
Repeat Gaussian Blur
Step 7: SELECT THAT NOSE AND LIPS!


The Na'vi also have a pinkish tint to the end of their noses and their lips.
Click the lasso tool and change the feathering to 10 px.
Select the tip of the nose and the lips.
Copy and paste into a new layer.
Step 8: PINK LIPS AND NOSE TIPS!


Change the hue/saturation so that the area is a pinkish color.
Change the opacity of the nose/lips layer to 60%.
Flatten the image.
Step 9: MORE NOSE RECONSTRUCTION!


And now for major nose surgery!!
Go to Filter > Liquify
Using the forward warp tool, stretch the nose until it is wider at the top, narrower toward the nostrils, and looks flattened.
Step 10: BUG-EYED!

The Na'vi have very large eyes as well!
Still under the Liquify menu, use the Bloat tool and set at a brush size that encompasses the entire eye.
Make the eyes bigger!
Click ok.
Step 11: GOLDEN EYE!


Find some avatar eyes on Google Images that you like. This is the one I used.
Adjust the hue/saturation of the eye so that the skin around the eye is closer to your picture’s blue skin
Step 12: MORE GOLDEN EYE!


Erase the area around the avatar eye and adjust the size and rotation so it fits with your eye.
Edit > transform > flip horizontally and adjust for your other eye.
Step 13: PLASTIC SURGERY AND FAKE EYELASHES!


Use the healing brush, clone stamp, or other tools to blend the edge of the eye with your face.
Use Filter > Liquify and use the Pucker tool to make your eyebrows thinner
Use the brush tool with a black color to draw in extra eyelashes (optional)
Flatten the image.
Step 14: FACE STRIPES!


The Na'vi have zebra-like stripes on their skin.
Copy and paste this zebra print (or find your own semi-symmetrical zebra print) in a new layer on top and re-size so that it covers all skin on the face.
Position so that the center of the zebra print is on top of the nose.
Change the zebra layer opacity to 20% and the blend mode to Soft Light.
Erase the areas of the zebra print that are not over the face. (If it does not let you erase, please right click on the zebra layer in the layers palette and click rasterize).
Step 15: NECK STRIPES!


Add another layer of zebra print to the picture, move/re-size so that it is overlapping the rest of the skin (neck, chest, arms, etc.) and change the layer opacity to 15% and the blend mode to soft light.
Erase the zebra print not in the area of the neck or chest.
Step 16: LEATHER SKIN!


Google images of leather texture for your Avatar's skin… I used this one.
Place the leather texture on top, resize and position on top of any skin.
Change opacity of leather layer to 25% and the blend mode to Overlay.
Erase any leather texture that is not over the skin.
Step 17: ALL EARS!


The Na'vi also have unique ears.
Google images of Avatar ears, I used this one.
Pick the type of ear you like, erase background, place ear where you like it. (if your ears are showing in your picture, place the ear directly over yours. If they are hidden like in my picture, place somewhere above where your ears actually are)
Copy and paste ear layer, and go to Edit > Transform > Flip Horizontal and place the ear wherever it looks correct.
My ears looked a little off sitting in my hair, so I erased a little bit of the bottom to make them look more natural.
Flatten the image.
Step 18: GLOWING DOTS!


Now for the awesome glowing dots on your Avatar's skin!
Make a new layer and click on the brush tool.
Make sure the foreground color is set to white and the brush shape is round with a soft edge.
Paint dots of different sizes in a symmetrical pattern across the face.
I looked at pictures of the Na’vi on Google for inspiration.
Go to Layer > Layer Style > Outer Glow.
Step 19: MORE GLOW!


Change the Blend Mode to Luminosity, the color to a medium blue, technique to Softer, Spread to 5% and Size to 5 px.
Click ok, and then change the blend mode of that layer to Luminosity.
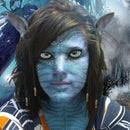
Step 20: DONE!!
If you’re really ambitious, you can add a Pandoran background by copying and pasting a background from Google, and then erasing the area that covers up your newly Avatarized self!
You can also add braids into your hair, or other accessories as well.
I hope you enjoyed this tutorial!
If you want to "Avatarize" yourself but don't have access to Photoshop, or aren't confident in your Photoshopping skills, I can do it for you for a small fee! You can send me an email through my contact page on www.mcmichaelart.com :)
I am in no way affiliated with the movie Avatar, or Adobe Photoshop, nor do I take credit for the "look" of the Na'vi character portrayed in the film and in this project.

Participated in the
The Photography Contest

Participated in the
ThinkGeek Sci-Fi Contest

Participated in the
Instructables Design Competition


