

Introduction: Airgun With EXplosive Air-Release Valve


This instructable shows you how to make what I call the XRV (explosive release valve), which can be attached to a bicycle pump. This in turn allows you to turn an ordinary blowgun or pea-shooter into something a bit more serious.
The video does a lot of explaining, but for more detail including how it works, see the next steps.
Step 1: Materials and Tools


To make the XRV, you need a handful of easy-to-find components:
Materials
1. Flexible bike pump hose - comes with most bicycle pumps)
2. Brass or aluminium tubing (about 1-2mm) - available from hobby stores
3. O-Rings (tiny) - available from hardware stores
4. Small spring - also from hardware stores
5. Tiny screw that fits into the end of the 1-2mm tubing
6. Tiny nut or washer that fits onto the brass tubing (see video)
Tools
1. Hand drill & very small drill bit
2. Fine file
3. Blade
4. Precision screwdriver
5. Pliers or multi-grips (pictured)
6. Hand clamp
7. Superglue
Step 2: The Valve Housing


We need the valve to attach conveniently to any bicycle pump, so cut the MALE connector out of your bike pump's flexible hose.
Step 3: The Valve Shaft

Now you need to find a piece of brass or aluminium tubing that fits nicely inside the housing. It is absolutely necessary that this tube slides freely through the housing, while being a snug fit.
Step 4: Valve Air Flow


Air will explode through this small tube, but we need to drill tiny holes to allow this to happen.
With a tiny drill bit, carefully drill two or three small holes into the shaft.
File any rough edges smooth so the tube glides through the housing without sticking at all.
Step 5: Plugging Up the Shaft


The end of the shaft must be blocked off, so that the only escape for the air is through the tiny holes we've just drilled.
I found that a tiny screw works best, so you'll need to hunt for the perfect screw. The head of the screw MUST be very slightly larger than the shaft itself. The screw must also be very short (we don't want to obstruct the holes). I found the perfect screw inside a dead clock-radio - - old electronic components are a great source of tiny screws!
Drop a bit of super glue onto the screw and turn it in to the end of the tube. If the screw is a bit too small for the tube, you could very carefully crimp the tube a bit with pliers. Then the screw should be a tighter fit.
Step 6: Add a Nut to the Shaft

A nut, washer or bush of some kind needs to be added to the shaft, so find something that fits and glue it about halfway along. Once the glue has dried, this valve will be difficult to disassemble, so be sure everything's in place before you apply the glue.
Step 7: Important! Allow the Glue to Dry

Allowing the glue to dry deserves its own step because in the next step we're going to add a spring that holds the valve closed. If your glue isn't dry when you add the spring, then you'll glue the valve shut!
Go have a coffee or climb a tree. When you get back and the glue's dry, scrape off any excess with a blade. Again, this valve shaft must be very smooth and glide through the housing without any sticking or catching.
Step 8: Spring Loading

See the distance between the housing and the nut? You need to find a spring that's about 1.5 times as long. This will ensure that the spring is always holding the valve shut.
If your spring is a little too short, you can always stretch it a little (that's why mine looks a little irregular in the image).
To how to turn the spring onto the shaft, look at the video in the Intro of this instructable.
Step 9: Seal It Off

The final step is to make the valve air tight. To do this, you'll need a very small O-Ring.
Now you can see why the head of the screw needed to be larger than the shaft. The head of the screw stops the O-Ring from slipping off.
And with that, the XRV is complete!
The spring is always holding the valve closed so air will not escape.
You can test this with your mouth. Seal your lips around the housing of the valve and blow.. build up a little air pressure in your cheeks then pull the washer/nut backwards (don't push it down your throat!) The air should escape through the tube.
Note: if air is leaking through the valve, then it could be that your O-Ring isn't sealing it too well. Try adding a second O-Ring.
Step 10: How It Works
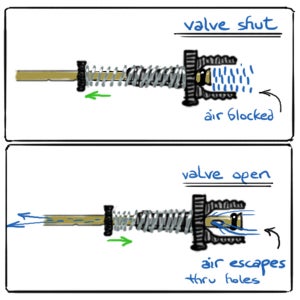
The spring constantly keeps the valve shut.
When the valve is shut, the O-Ring seals off any escape.
Air cannot escape unless the O-Ring fails.
Pulling back on the nut (green arrow) opens the valve by exposing the holes in the shaft.
Once the holes are exposed, the compressed air explodes through the shaft.
Step 11: Attaching to a Bicycle Pump


As we made the XRV from a male connector, it will attach perfectly to any bicycle pump.
You will however, need a bicycle pump that doesn't allow air to go backwards. In other words, it needs to have its own built-in one-way valve. If you don't have this, you won't be able to compress more than one plunge of the pump.
Many pumps (bicycle pumps, sports ball pumps) come fitted with a one-way valve, but the 'BBB Airshock' pump that I use has a one-way valve PLUS a reinforced hose. When the end of this hose is blocked (with my XRV), it acts as a small air tank. Air will be compressed in that tiny space and will only be released when I open the XRV.
Opening the XRV into any type of blowgun (simple pea-shooter or deadly ninja blowgun) is the aim of the whole exercise :D
First Prize in the
The Instructables Book Contest


