

Introduction: DIY Stacked Leather Handle Bowie Knife


Hi fellow DIYers!
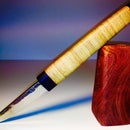
It has been a while since I posted anything, but I hope that this Americana styled Bowie knife has been worth the wait. Warm season here in Lusaka now, so it has been a challenge to start any project because of the heat!
I am not an american, but I do have a friend that is. Since I like the idea of the Americana style (within limits), I decided to make this as a surprise present for him. He liked it!
This instbl shows an overview of the different steps that go in to making a stacked leather handle on a pre-made knife blade. The cost of the project is around 70 USD and it takes approximately 6 hours (excluding drying time).
I have yet to make an instbl on the present box and the leather sheath. If there is interest I will do this shorthly.
OK-let's go!
Step 1: Material and Tools Needed


You will need;
Material:
- One pre-made knife blade. I should be the type of blade in the photo, preferably including a brass guard and a screw on brass pommel that fits the knife. You can normally order this from your knife blade supplier online.
- Thick and stiff leather (1-3 mm thick) in different colors
- Plastic material (1-2 mm thick)
- PVA glue (non toxic wood glue)
Tools:
- Carpet knife
- "Hole puncher" for leather (this needs to make holes that will approximately fit the knife's tang - you will see later)
- Hammer
- Standing belt sander or rotary sander (any stationary sanding machine will do really)
- Sand paper with different grit (100, 200, 400, 600 and 1000)
- Leather wax, wood wax or any sealer really
- Possibly a figure saw (for cutting strips of leather - but not necessary)
Step 2: Cutting Leather Into Pieces


Depending on the width of your handle you will cut the leather into squares of approx. 35x35 mm (1.4x1.4 inches). Then punch a hole in the middle using a special tool that you can get at leather dealers. You can also drill it, but that will take ages... The number you need depends on the thickness of the leather and the length of you handle. So just divide the length by the leather thickness and you should get the number needed (I probably didn't need to explain that).
Also cut any plastic material that you want to use for stripes on you handle. Cut this into same dimensions as above.
Step 3: Stacking the Leather on the Handle


I normally mount all the pieces without glue first - to make sure everything fits well. Remember to start with the brass guard in front!. Then add the plastic stripes of your choice - red, white and blue in this case.
Start adding the different colored leather pieces. You may do this in any pattern you like (or randomly).
Nearing the end of the handle add another set of colored strips and then mount the pommel (that brass end piece of your handle) using the threaded bolt.
By now, your project should look terrible! That's OK. If everything fits - take all the pieces off and redo the process - but now gently dip every piece (on one side) in some PVA glue before mounting. Finally screw on the pommel and let dry.
Step 4: Saw, Sand and Polish


When dry, use a saw (band saw or figure saw) to cut of excess leather. If you don't have one - start sanding on a sanding machine of choice using 100 grit paper. Keep rotating the knife while sanding. Note that I took the photo of me holding the knife to the sander afterwards (and using a different knife)
When you have a somewhat rounded handle shape - start using pieces of sandpaper to get the final shape. Gradually work yourself up to 1000 grit to get a very smooth surface
Step 5: Finishing Polishing


I normally use hard (soap shaped) Karnuba wax for the final polishing. Add wax to a rotating polishing tool (it melts down on the cloth by the heat from friction) of your choice and apply and polish wax until the result is satisfying!


