

Introduction: Android Talks to Arduino


Functionality: Android talks to Arduino
1. Run the Android "Bluetooth Chat" sample app (after we modify the app in this instructable). Type a message in the app's text box and press the "send" button. The message you typed echoes on the app display.
2. Message travels through the air from the built-in Android Bluetooth modem to the Bluetooth modem connected to the Arduino Uno.
3. Arduino Uno receives the typed message.
4. The Arduino Uno prints the typed message on the LCD.
Functionality: Arduino talks to Android
1. Every 30 seconds, the Arduino sends a message ("hello from Arduino") to the Android phone via Bluetooth.
2. The Arduino message appears on the Android "Bluetooth Chat" sample app display.
Why? Just an easy way to test the Arduino's ability to not only receive messages from, but send messages to the Android phone. You can take the example sketch and change it however you want.
Here's the full video instruction that we'll break out into steps:
Step 1: Hardware List
Hardware
- Arduino Uno (328, 16MHz, 5V).
- Bluetooth Modem: BlueSMiRF Gold, aka FireFly (Sparkfun sku: WRL-00582).
- Parallel LCD (Sparkfun sku: LCD-09051 but you can use pretty much any parallel LCD).
- 10k Potentiometer.
- Wires to connect electronic components.
- Computer and FTDI chip (to change BAUD rate).
- Android Phone (I used a Motorola Droid - operating system v2.2.2 - but Google has sample code for all versions).
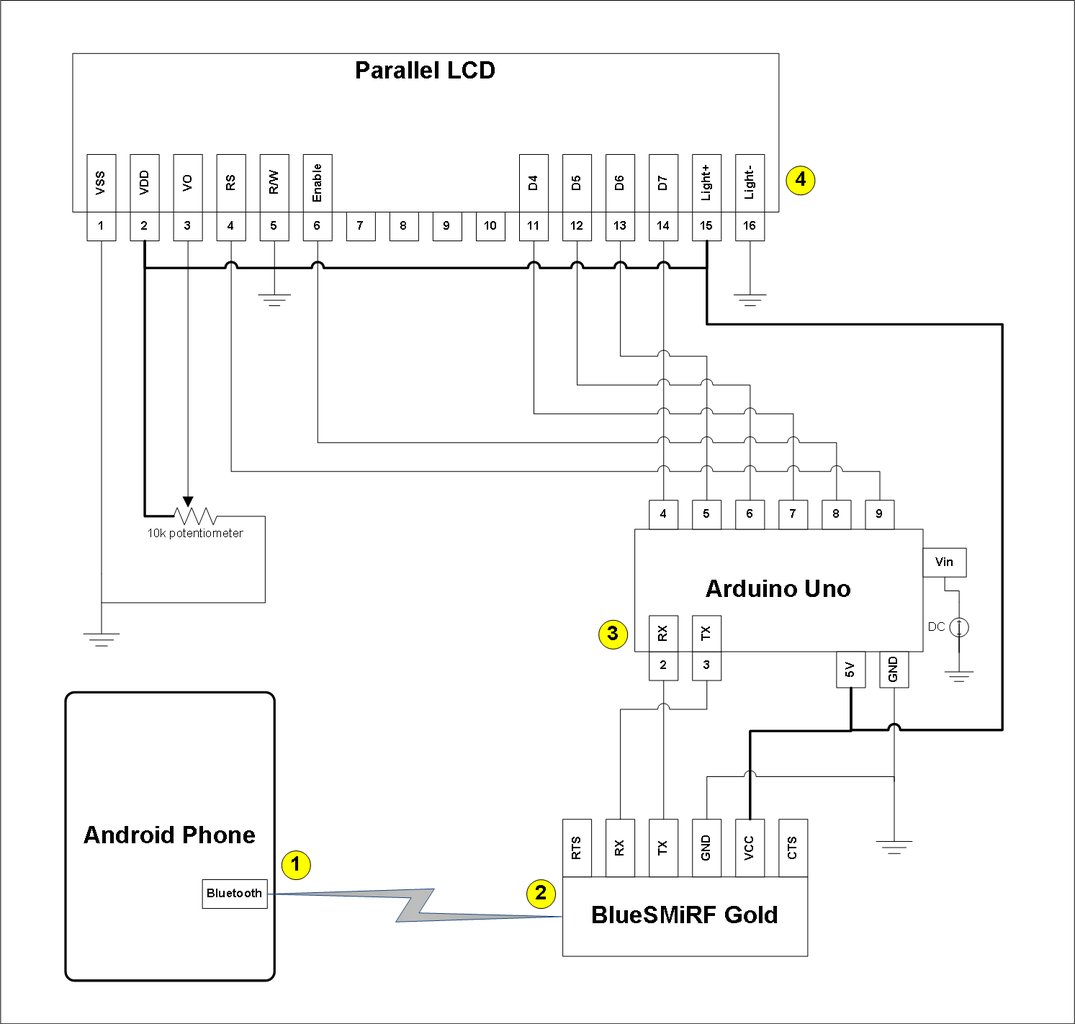
Assemble your circuit as shown in the diagram. You don't have to assemble anything between circle #1 and circle #2: that is the message going through the air from Android to the Bluetooth modem. Hey, I'm an Arduino beginner so I'm not assuming anything. :)
Step 2: Software List
Software
- Arduino Source code from this project (bluetooth_chat_LCD.pde attached below)
- NewSoftSerial library from Mikal Hart: http://arduiniana.org/libraries/newsoftserial/
- Eclipse
- Android Development Kit (explicitly follow all of Google's installation instructions)
- "Bluetooth Chat" Android sample code from Google: http://developer.android.com/resources/samples/BluetoothChat/index.html
- Hyperterminal or TeraTerm to change BAUD rate
Android Beginners (like me):
Make sure you do at least a couple tests before you execute the rest of this instructable:
- Create a "hello, world" app (lots of examples out there) to make sure you have Android/Eclipse setup correctly to run an app on a virtual device.
- Plug in your Android phone and ensure that you can copy the "hello, world" app to your phone. Make sure your phone has debugging turned on. Settings --> Applications --> Development --> USB debugging (turn it on)
After you successfully copy an Android app to your actual phone, you can proceed with this instructable. Keep in mind that you are not going to be able to run this instructable on a virtual device; you have to have a real phone to deploy the "Bluetooth Chat" code.
Attachments

Step 3: Change BAUD Rate on BlueSMiRF Gold

Change the BAUD rate from the default 115.2k to 57.6k. If you leave the BAUD at 115.2k, the parallel LCD will display gibberish when you send a message from Android to Arduino. If you set the BAUD below 57.6k, the Android phone will "cut up" the message that the Arduino sketch sends every 30 seconds. So 57.6k BAUD is just right.
*Commands to set BAUD: http://www.sparkfun.com/datasheets/Wireless/Bluetooth/rn-bluetooth-um.pdf
*Video instructions on how to change BAUD:
https://www.instructables.com/id/Change-BAUD-rate-on-BlueSMiRF-Gold/
FTDI Basic chip: http://www.sparkfun.com/products/9716
Step 4: Change Android "Bluetooth Chat" Sample App

Eclipse:
Modify the Android app. Make sure you watch the instructional video at the beginning of this instructable because I have recorded video of how to create a project from an existing sample app and where to change the code.
1. Open the "Bluetooth Chat" project.
2. Open the BluetoothChatService class, find the following declaration for MY_UUID, and replace with the code below:
//Actual Unique UUID for this application generated by Android: fa87c0d0-afac-11de-8a39-0800200c9a66
//common machine UUID that we need to communicate with FireFly Bluetooth module: 00001101-0000-1000-8000-00805F9B34FB
private static final UUID MY_UUID = UUID.fromString("00001101-0000-1000-8000-00805F9B34FB");
3. Attach your Android phone to your computer and, again, make sure your phone has debugging turned on. Settings --> Applications --> Development --> USB debugging (turn it on)
4. Run your project within Eclipse and the program will deploy to your Android phone.
Step 5: Run the "Bluetooth Chat" Android App

Showtime :
Run the Android app, then type messages to send from Android to Arduino (and Arduino to Android will happen automatically from the Arduino sketch).
1. If you just ran the app within Eclipse then you don't need to click on the app icon on your Android phone; the app will launch automatically if your Android phone is plugged in to your computer's USB port and your phone's debugging is turned on. If the app doesn't run automatically, find the "Bluetooth Chat" app icon on your phone and touch it.
2. Turn on your Arduino circuit. Your BlueSMiRF Gold bluetooth modem LED will slowly blink red.
3. Pair your Android phone to your Bluetooth modem if you haven't done that already. Do this using the Android's normal Bluetooth pairing process under "settings" --> "wireless and networks" --> "bluetooth settings" --> "Scan for devices" --> select the Firefly. You may need to type "1234" password if your FireFly requires a password.
4. After you pair the phone with the FireFly bluetooth modem, you need to connect the Android phone to the Firefly. Confusing? Maybe, but those are two separate steps: Pair the phone with the Firefly (one time) and then connect the Android "Bluetooth Chat" app to the Firefly (every time you use the app). You can do both steps at once in the "Bluetooth Chat" app if you didn't pair the device in the step above. After opening the "Bluetooth Chat" app, click on the Android menu button, click "Connect a device" --> "scan for devices" --> find the "FireFly" device, then the app will pair the phone with the Firefly. You may need to type "1234" password if your FireFly requires a password. Now you have both paired and connected and your bluetooth modem LED should turn a solid green.
Future use of the "Bluetooth Chat" app will not require you to pair the phone with the Firefly but you will always need to connect the phone with the Firefly before you can send messages from Android to Arduino and back.
5. Type a message in the "Bluetooth Chat" Android app and press "send". In the instructional video at the beginning of this instructable, I typed "hi".
6. Wait for the "Hello from Arduino" message that will display on your Android phone. This message is sent twice from the Arduino sketch code, 30 seconds after you start the Arduino sketch and then again 30 seconds later. I tried to keep this proof-of-concept as simple as possible so please customize/change this as you wish.
Have fun!


