

Introduction: Another Blimp of an Eye: Improved WiRC Remote Control


Building my first IOS/Android Remote Controlled Blimp With Video Feedback, during my Artist in Residency at Instructables (July 2013), was a great project.
But soon came the dilemma of leaving at Instructables or taking it home. Obviously the solution was building a second one.
And of course that was an occasion to improve the control of its movement.
Actually Instructables sent the first one to me after the grand inauguration of the new HQ in September. In turn I rebuilt it to serve at F.A.C.T.S October 19th and 20th (as a Borg Sphere) and at Ciné Kadee October 26th and 27th, both in Ghent, Belgium. This allowed me to optimise the concept. After that I send the new version back to Instructables HQ and made this Instructable.
The main improvement is making the control gear and "frame" lighter, allowing for higher power motors. This made deal much better with minor drafts (obviously it's still an indoor blimp).
I also changed the steering concept to a front propeller that can be swung left and right with a servo. This made flying straight out a lot easier and allowed for better control when making a turn. Adding a stabiliser fin (which can be considered as mimicking the optic nerve of the eye) made flying it accessible to the kids visiting Ciné Kadee.
Just as in the original Ible, the instructions presume a certain experience in general RC model building. The new instructable should be readable without returning to the original one, except where I explicitly refer to it (e.g. on making the iris).
If you like RC blimps, please also check out my other latest Ible in that area, a $13 blimp.
Step 1: Parts & Materials


- A Dension WIRC unit ($130 from Dension for fast delivery or $70 from Hobbyking with several weeks delivery time))
- An Engenius EUB9707 Wi-Fi Dongle - the lightest one documented by Dension to work with the WiRC (around $23).
- A Logitech C110 or C170 webcam - the lightest two documented by Dension to work) (about $20)
- An iPhone, iPod, iPad or Android device.
- Two analogue micro servos of about 16g (2 x $3.79)
- Two "high voltage" (7,2V) micro servo's (2 x $7.41)
- A small ESC for Brushed DC motors with BEC, for operation at 7,4V (2S LiPo) and around 1A, I used a Graupner 2857 Pico 2 BEC ($25)
- A 2s Lipo pack about 450mAh and suitable charger ($4,44)
- A servo extension cord about 15cm long (the one shown is far longer than needed).
- Two male and one female connectors with leads, fitting the battery and the ESC
- Two connectors fitting the WIRC sockets (the WIRC accepts Futaba or JST type servo plugs).
- A single long header pin fitting the servo connectors.
- A 3 ft. latex balloon, white (I brought mine from SF Party).
- Helium, one fill needs 0.35 Nm3. A large one-way tank would be cutting it close, not leaving any room for error or experimenting.
- Also helium in one-way tanks is usually only about 85% pure, giving less pure and it’s quite expensive. So I recommend to have the balloon filled at the balloon shop if you can transport it safely or to rent a tank.
- High-Float to treat the balloon for a better helium retention.
- Two balloon "closures" and one fitting stick as commonly used with air inflated latex balloons.
- 6 mm thick sheet extruded polystyrene foam sheet (commonly known under the brand name Depron), one piece the size of the iris, about 40 cm in diameter, another piece roughly 25 by 50 cm
- Some double sided tape (the type used for carpets).
- Some Scotch tape/selotape
- Acrylic paint, black and whatever colours you want to use for the iris.
- Some bendable metal wire (as used in packaging)
- Some string to close the balloon and holding it down when working on it.
- Some non-hardening clay (putty) as ballast to trim the buoyancy.
- Optional: some shrink tube to cover soldered connections.
- Optional: balloon shine for … keeping the balloon shiny.
Tools:
- A Phillips 0 or 00 screwdriver to hack micro servos.
- A pump or compressor to pre-inflate the balloon.
- A hot melt glue gun (I prefer the low temperature type, both for safety and for easier working on expanded polystyrene sheet)
- A hobby knife and cutting mat.
- A small paintbrush and acrylic paint
- 2 small propellers like these.
Step 2: Making the Controls Lighter


The first and easiest weight loss was achieved by choosing the lightest Wi-Fi dongle documented by Dension to work with the WiRC unit: an Engenius EUB9707 at only 4.3g.
The heaviest part, with the largest potential to lose weight is the webcam. Removing the clip brings it from 72g to about 44g. Removing the entire casing brings it to 29.6g. The camera circuit board itself weighing only 3.5g, It was clear savings had to be found in the USB cable. I eliminated the largest part of it, connecting the cable coming from the WiRC to the small circuit board connector on the camera. I was worried removing part of the cable shielding would have an influence, but I didn’t notice any, even when I did not connect through the remaining shielding wires yet.
I did not risk dismantling the WiFi dongle as high frequency systems tend to be quite delicate. So I also kept its USB connector. I did remove the cover and shielding from the female USB connector on the remaining WiRC cable. Again, I did not notice influence from eliminating a part of the shielding.
On the WiRC unit itself I removed the casing. This makes only a small difference of a couple of grams. Further gains were not obvious.
These measures bring the complete WiRC control system to only about 30g instead of a 123g originally (98g without clip). This doesn’t mean Dension made it to heavy, they just made it robust for use in for example an off-road RC car. For an indoor blimp that is not needed.
Another weight saving is in making the “frame” out of Depron (extruded PS foam). It actually isn’t a full frame as such, but a set of “patches” to be fixed to the balloon with heavy duty double sided tape (as used for carpets). One of them, to be put near the balloon closure, down in the middle, carries the WiRC unit itself.
Some savings compared to the first build also come from using a single battery. the implications of this are explained in the following steps.
Step 3: Lessons Learned From a Test Build (Borg Sphere)


As an intermediate phase I built a kind of Star Trek Borg Sphere for F.A.C.T.S. 2013. I used a black 3ft balloon and decorated it with patches of Depron, sprayed black beforehand with acrylic paint (an experiment on spraying on an inflated latex balloon made it burst)
In this intermediate build, I used the lightened gear with a rather classic propulsion setup: forward propeller, upwards propeller and tail propeller.
The forward propeller and the upward propeller were powered on 7,4V (2s LiPo) with small airplane ESC's without reverse.
That worked fine for the forwards propeller, as the blimp easily turns on the spot and a reverse is not really needed.
With the higher power a downward force was clearly noticeable. The air speeded up by the propeller and running along the underside of the balloon made it act as an upside down airplane wing. This could largely be compensated by giving the forward propeller an upward inclination. Giving a slight net upwards force to the forwards propulsion loved to be the easiest to fly. Powering down now and then keeps the blimp more ore less at the same flying altitude.
For upward propeller I relied on the blimp being trimmed slightly heavier than neutral buoyancy to bring it back down. In high hall, with drafts and air temperature differences, that was sometimes a bit tricky.
Steering was done with a hacked servo, as in the original build, but this time it was powered on 5V, coming from the BEC of one of the airplane ESC's. IMPORTANT NOTE: never connect two ESC's to one receiver unit without taking care of avoiding the two BEC's fighting on the same row of + pins. Simply take for one of ESC the + leads out of the connector and isolate it.
Steering and flying straight-out proved to be hard work. A simple gyro didn't help as the commands to the hacked servo make the tail propeller spin at low speeds only, even at the highest gain (not surprising as gyro's are intended to work with small deviations). What did help was adding a tail fin. But I still wasn't happy with the steering behaviour, so for the final build I went for a "vectored thrust" concept (see next step).
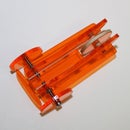
Step 4: Main Propulsion and Steering


The steering is done by swinging the forward propeller left and right. This proved to work very well. Quick correction to keep the blimp fly straight are easily dosed and taking a short turns remains possible.
A brushed DC motor from a high voltage micro servo is used as main propulsion. It gets leads and a connector fitting the output connector from the ESC. A small ESC for brushed motors and suited for 2s LiPo's is used. As it is normally used in airplanes it doesn't have reverse.
The motor is mounted on the servo horn of another high voltage micro servo (unhacked for once). A tie wrap and a screw allow it to be angled upwards (as explained in the previous step. I did not put the complete servo at an angle, because that way the motor angle would change when turning.
I first tested with a special 180° servo for the shortest turning circle, but that proved unnecessary, about 45° to each side is enough for close to "on the spot" turning.
The servo gets an extension lead to the WiRC unit.
A Depron support is glued together with low temperature hot melt glue. The base is curved to roughly fitting an 80cm diameter sphere by rolling a hard round object over it, with the foam sheet on a cushion (see my original Ible). It also holds the camera, glued in place with some metal wire (as used in packaging) that can be bent to point the camera as you want.
Finally, it gets some elastic bands to hold trimming ballast.
Step 5: Up-Down Propulsion


The up-down propulsion is made from two hacked servos. One works to, but the band at which the propeller doesn't even spin slowly is very narrow and tends to shift. Therefore I used two servo circuit boards connected to the same receiver output. One motor lead goes to the left motor lead from one circuit board and the second goes to the right motor lead of other circuit board. Trimming both potentiometers (I left the outgoing gear on for easy trimming) allows making a gap in the signal range where both leads get the same polarity, so the motor doesn't get any power. I also explained this in my Star Trek Enterprise blimp bile.
Testing this on 7,4 V showed the motor heating up when used for a long time. As the up-down propulsion is used close to continuously, this worried me. I could have upgraded the motor, but then the electronics might not hold at that voltage. And all high voltage servos I could find are digital types, which is not interesting in this case, as the digital response means no proportional control of the propeller speed. However the ESC from the forward propulsion has a BEC gives 5V, which the servos hacked are designed for is. Not to overload this BEC, only the up-down propulsion is powered by it. So the + leads of both the ESC connector running to the receiver unit and the hacked servo are not connected to the WiRC unit (running entirely on 7,4V) and taken out of the connectors and connected to each other with a single double length header pin. Obviously this connection is covered to isolate it electrically from the rest.
The support gets a cut out to fit near the balloon's closure, just in front of it (see further).
Step 6: Battery


To compensate for the weight of front propulsion setup, the battery should be placed towards the back of blimp. A support with two rubber bands (two to make sure) is prepared. Another part that can be positioned fairly freely, the WiFi dongle is also put towards the back, by gluing to the same support.
Step 7: Optic Nerve / Stabiliser Fin


The stabiliser fin is made as a long trapezium shape, more or less alluding to the optical nerve at the back of an eyeball.
It gets a support with reinforcements, attached with hot melt glue. It only gets a patch to the top side, to be stuck to the balloon, as a second one would give trouble when the balloon shrinks.
It's positioned more or less on the opposite side of the iris.
I didn't make a new iris, so for that I refer too my original Ible. As you can see on some pictures I did need to switch to better double side tape though (carpet type).
Step 8: Prepping the Balloon


The balloon is best prepped and inflated only when the gear is ready.
The 3ft latex balloons hold their helium quite well and provide enough spare lift capacity to keep flying for a couple of weeks.
The balloon is first inflated with air to its intended size, about 80 cm diameter, just fitting a common door opening. The air is released and about three spoonfuls of Hi-Float is poured in. The balloon is rubbed to spread the Hi-Float evenly over its inner surface.
After inflating the balloon with helium, it is closed with a plastic part typically used to close and keep upright air filled latex balloons. To close up the balloon real good, its filling end is wrapped once over and once under the plastic part. A knot would close the best, but the described way allows to opening up the balloon and adding helium. After about two months I had to give up, as inflating back to 80cm did not give enough lift capacity. Not only does the helium escape, there is also some inwards diffusion of air.
The plastic part gets a shortened plastic tube inserted and another of those plastic parts added. This gives a practical handle to manipulate an anchor the blimp. It also carries the main part of the ballast (non-hardening clay). It will be located in the middle, on the underside of the blimp.
Step 9: Final Assembly


The iris is stuck to the balloon, looking down just slightly, when the balloon's fill opening is held town (e.g. with some string and an anchor/ballast). The stabiliser fin is attached on the opposite side to that.
The WiRC unit and the up-down propulsion are attached to near the balloon's fill opening, respectively on the front and the backside. First by clamping the foam sheet under the plastic part and next by removing the protective paper of the double sided tape and sticking the part to the balloon. The parts can overlap a little.
The front propulsion assembly is attached at the front, in such a way that the steering servo is horizontal when the balloon's fill opening is at the bottom.
The battery and the WiFi dongle go about halfway the bottom middle and the stabiliser fin. With the battery in place non-hardening clay is added as ballast. The main amount is put in the middle (on the plastic part) till the blimp slowly sinks when no power is applied. Some of the clay can be moved to the front or the back to make the blimp hang level (again with the balloon's fill opening at the very bottom).
Step 10: Flying
Check the WiRC manual to get familiar with its general operation.
Included are the WiRC settings I used. You can unzip them and load them to your smart device with iTunes or or whatever method is used for Android devices. After that select them as settings in the app.
The steering servo is attached to channel 1 (check the pin layout on in the WiRC manual). The forward propulsion ESC is attached to channel 2 (remember: not the + lead), the up-down hacked servo to channel 3 (but not its + lead which is separately connected to the one from the ESC as explained in step 5).
The power lead for the servos is connected to whatever servo pins left on the WiRC. The other WiRC power lead is connected as shown in the manual. In al cases check the polarity.
I did not put in an on-off switch. I simply plug in or unplug the battery.
Under the four different modes you can select in the WiRC app (top of the screen, towards the right), I put different combinations of controlling the blimp wit either sliders on the screen or with for two of the three controls by tilting the smart device. You can try and see which you prefer. In the original build, with single hacked servos the tilting was unusable as it was hard to "find back" the neutral position of each control. But with the use of a "double hacked servo", a regular ESC and an unhacked servo tilting can be used. Tilting has the advantage that you risk less to lose the slider under your fingers when not looking at the screen.
Recorded video's can be uploaded to a computer with iTunes (or whatever method is used for Android devices). They can be played back or converted with VLC, but only after inserting a dot before the mjpeg extension. You will need to correct for the low frame rate (15 fps) of the recording and I'm still looking for a way to convert at a higher image quality.
Attachments


Participated in the
Supercharged Contest


