

Introduction: Arduino Bluetooth Serial Connections! - I Made It at TechShop


This is an introduction on how to setup, make a basic connection, and send data to and from an Arduino using Bluetooth!
Bluetooth is great for transmitting data over medium distances and what's more, Arduino just treats it like a serial data connection. This means that we can use the Serial Library. That's a nice thing to have.
But what to pair the bluetooth to? And how do we do that? This covers all that. What you use the new found connective abilities for is up to you.
Here are some ideas though:
Wireless programming.
Wireless switches.
Wireless custom remotes.
Pairing with Android for some real power behind it.
Simple alarm system (someone is at the door or in room X)
As always, I made this at TechShop
http://www.techshop.ws
Step 1: Materials
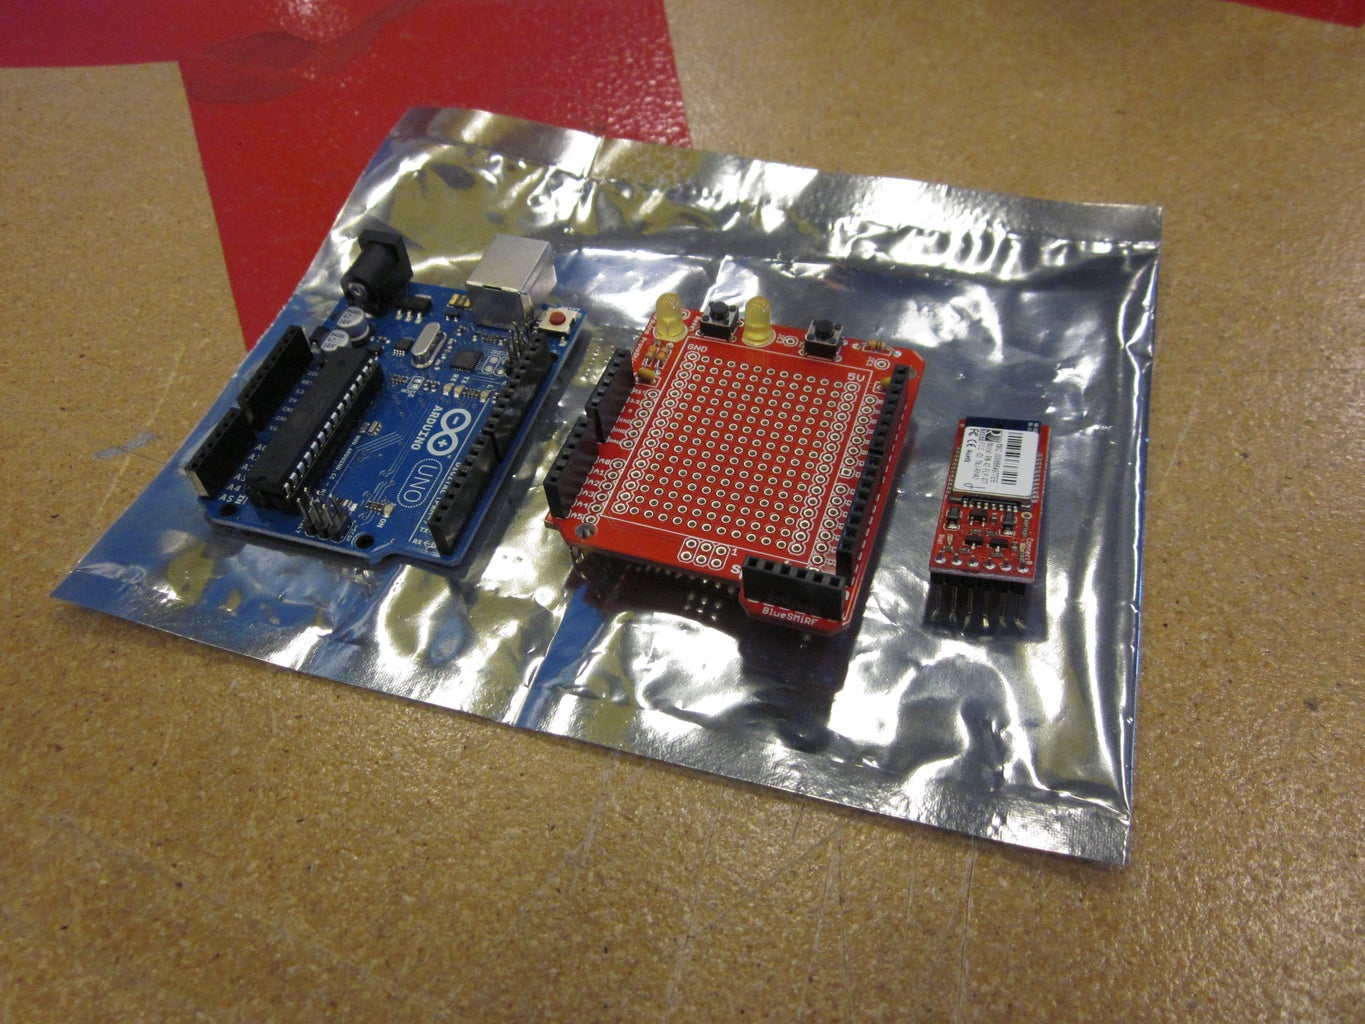
Since this is just connectivity, there are very few parts
1. Arduino Uno $40
2. Arduino Shield $10
3. Bluetooth Modem $40-60
Here's the one I'm using from sparkfun
https://www.sparkfun.com/products/10269
Step 2: Arduino Side Setup

Setting up the hardware is really easy.
Hook everything up between the shield and the modem and the uno.
Modem -> Uno
V++ V++
GND GND
RX-I TX-O
TX-O RX-I
optional Flow Control
CTS-I High tells modem when arduino is sending
RTS-O High tells arduino when bluetooth is receiving
Now load this Test Program onto the arduino
By default the baud rate is 115200 NOT 9600. Use the higher one to communicate on the bluetooth.
WHEN YOU LOAD THE PROGRAM DO NOT HAVE THE MODEM ATTACHED. You will not be able to communicate on the serial lines when the bluetooth is plugged in which means that uploading won't work and neither will the serial monitor. If you want to upload and monitor while it is in use, leave RX and TX open and either use SoftwareSerial with an Uno or another Serial Port with a Mega.
-------------------------------------------
/***********************
Bluetooth test program
***********************/
/*
Setup.
Upload this to board without the modem attached
-Make sure the baud rate is 115200 as that is what the bluetooth is (and serial port)
*/
int counter = 0;
int incomingByte;
void setup() {
Serial.begin(115200);
}
void loop() {
// see if there's incoming serial data:
if (Serial.available() > 0) {
// read the oldest byte in the serial buffer:
incomingByte = Serial.read();
// if it's a capital R, reset the counter
if (incomingByte == 'R') {
Serial.println("RESET");
counter=0;
}
}
//only count to 100 then stop aka don't count to infinity
if(counter<100){
Serial.println(counter); //displays the ACSII number/letter
//Serial.write(counter); //writes the data AS IS
counter++;
delay(250);
}
}
Step 3: Paired Device Setup - Using Mac


I'm going to be using a mac for pairing as that's what I do all my programming on and the Terminal has a nice program built in that will work for testing purposes. Setup is similar across the board. If you are using Windows, I might recommend HyperTerminal.
1. Go into bluetooth preferences and "setup new device"
(make sure your bluetooth is on!)
This works for bluetooth dongles as well.
2. Pair the device. It should be RN42-xx. Or RN41-xx if using the more powerful one. If you have trouble use the passkey "1234"
Now it is paired, but it is not connected yet.
The little LED flashes Red when it is attempting to pair or has no connection and it is Green when successfully paired and connected.
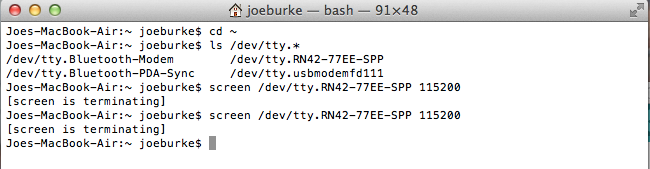
3. Open the terminal. Follow these commands
cd ~
(this goes to the root directory)
ls /dev/tty.*
(this should display a list of all the open COM ports)
the command to open a port for communication is:
screen [portname] [baudrate]
which looks like
screen /dev/tty.RN42-77EE-SPP 115200
For reference on how screen commands work, take a look at this great reference.
http://www.math.utah.edu/docs/info/screen_5.html
4. When you connect the light should change to green and communication should start. If it has turned green and you don't see anything well then try pressing "R". Remember in the code that it only counts up to 100 and then stops. If it is not counting, it is not displaying.
AND DONE. You should be able to get the arduino to reset using R from your computer. Now you can do more things.
For more information on serial communication in arduino, take a look at the Serial Library commands.
http://arduino.cc/en/Reference/Serial


