

Introduction: Arduino Dot Matrix Game Console


Smart phone & iPad gaming is great and all love Candy Crush & Angry Birds, but nothing can touch the charm of making a game console by own and play with it. It was 2003 when I got a Nokia 3310 mobile phone and I used to play Snake game of Nokia which was very popular that time. I made the game console using ATmega328P and bi-color dot matrix display and I was inspired by the game of Nokia phone. I think you will like it. So, let's start to make it.
If you like it don't forget to give a kind vote.
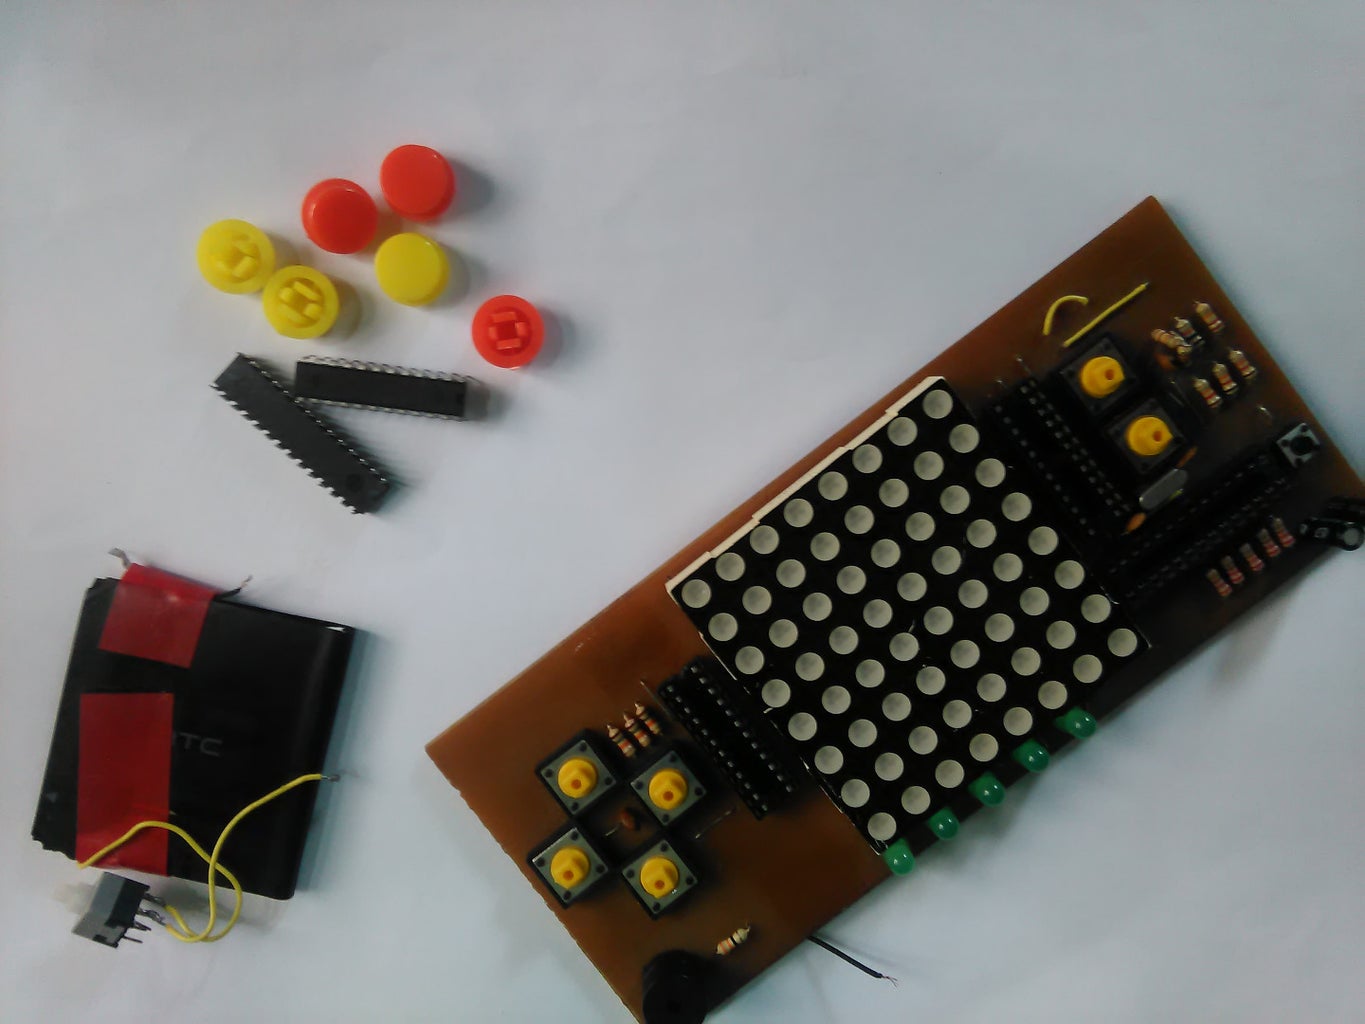
Step 1: What You Need...


Components:
- Arduino Uno (1) (sparkfun)
- ATmega328P Microcontroller (1) (sparkfun)
- MAX7219CNG (2) (sparkfun)
- 2.379" Bi-color dot matrix display (1) (sparkfun)
- Push buttons or tactile switch (7) (sparkfun)
- Buzzer (1)
- 5mm LED (5)
- Resistor (15)
- Capacitor (6)
- 165mm X 73mm PCB board
- IC base (optional)
- Li-ion battery (1) (sparkfun)
Tools:
- Soldering Iron & solder
- Glue gun
- PCB drill (for hand made pcb only)
Skills:
- Good soldering & prototyping skill is required
Arduino Uno is used to program ATmega328P. ATmega328P is the main microcontroller of Arduino Uno board and I used it alone for my project. For knowing how to use standalone ATmega328P you can follow "From Arduino to a Microcontroller on a Breadboard".
MAX7219CNG is used to drive dot-matrix display. The MAX7219CNG is a compact, serial input/output common-cathode display driver that can interface microprocessors to 7-segment numeric LED displays of up to 8 digits, bar-graph displays, or 64 individual LEDs. Included on-chip are a BCD code-B decoder, multiplex scan circuitry, segment and digit drivers, and an 8x8 static RAM that stores each digit. Communication with the MAX7219 is achieved through a convenient 4-wire serial interface (supports SPI). Individual digits may be addressed and updated without rewriting the entire display. Only one external resistor is required to set the segment current for all LEDs. The IC also includes a 150μA low-power shutdown mode, analog and digital brightness control, a scanlimit register that allows the user to display from 1 to 8 digits, and a test mode that forces all LEDs on. Details are available in the datasheet.
If you are new in soldering you can follow the instructable: How to solder - the secrets of good soldering
Sparkfun.com guide: How to Solder - Through-hole Soldering

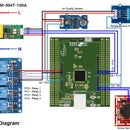
Step 2: Circuit Design


The circuit is designed using Eagle Layout Editor and schematic file is attached. Four tactile switch S2-S5 is used to control UP, DOWN, LEFT & RIGHT control. Switch S6 & S7 is used for option menu and game selector. S1 is used here as reset switch of microcontroller. Resistors R4 - R9 is used as pull up resistor any value may be 10K - 100K. Five LED LED1 -LED5 is used for indicating the level for a game and the value of series resistors connected to LEDs should be 220ohm - 330ohm. As I used bi-color dot matrix display for that I used two MAX7219CNG driver IC. You can use RGB matrix and that time three driver IC will be required. Two resistors R1 & R2 is connected to the ICs for controlling the brightness of the matrix display.

Step 3: PCB Design


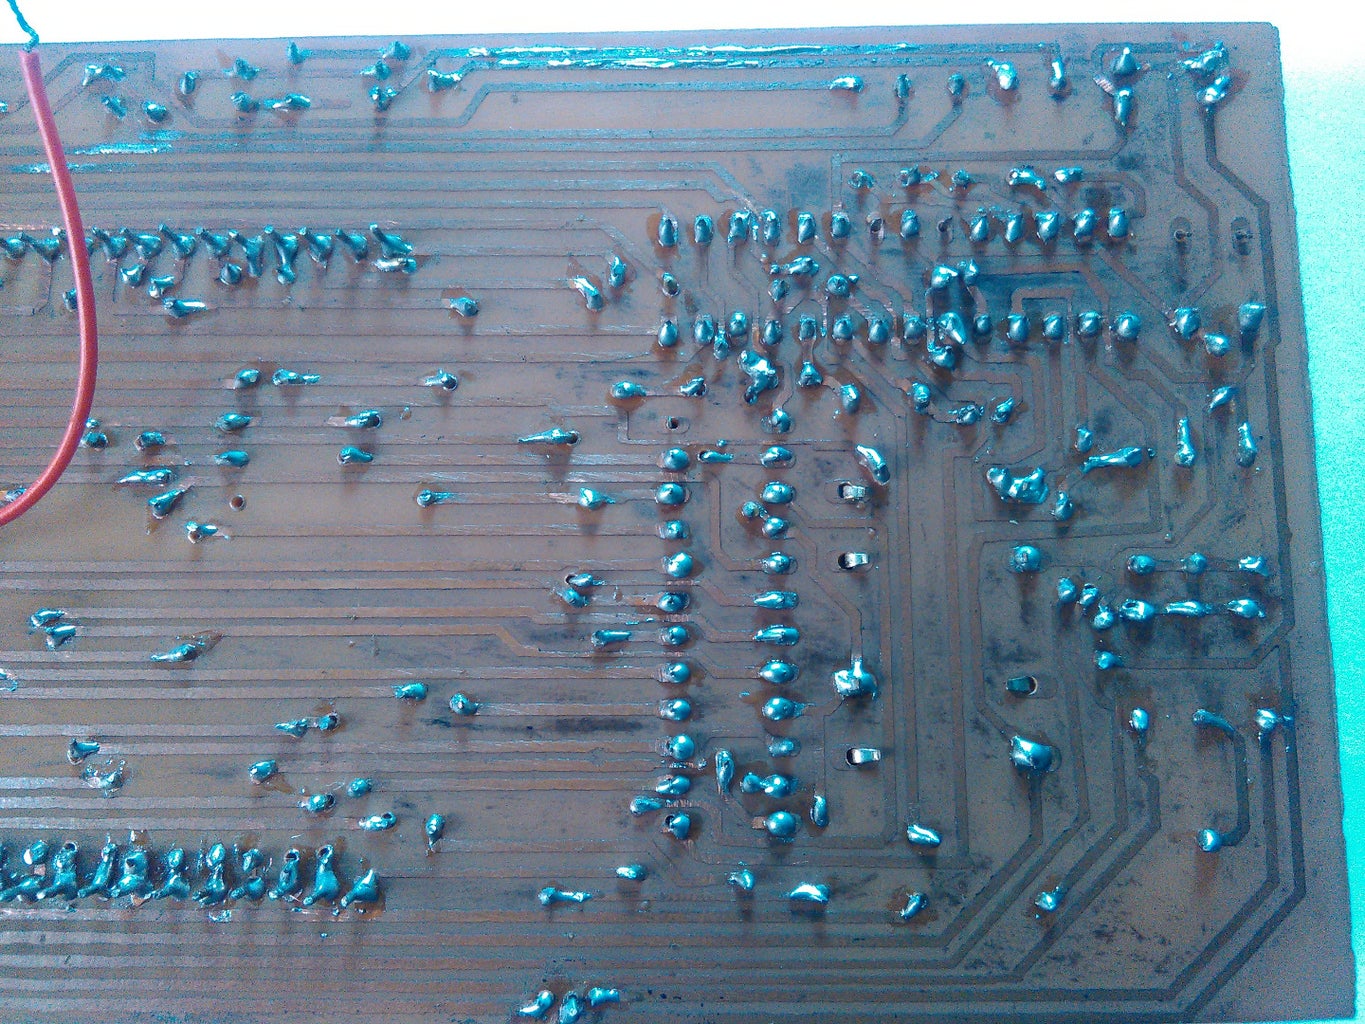
PCB is designed using Eagle and board layout is attached. You can design your own PCB or may designed it. I designed it for making my PCB using toner transfer method and for that I used 24mil trace size. For the top layer I used jumper wires because making two sided PCB using toner transfer method is not so easy but you may try it yourself. I tried to keep the board size comfortable for me but every one has his own choice.
Step 4: Programming the Console


To work the Arduino Sketch properly you need LedControl library attached in this step. I upload the complete Arduino Sketch for Snake Game of Nokia phone. You can develop your own game. To upload the sketch first add the library to your arduino environment, just upload the sketch to your arduino, remove the microcontroller from the board and put it to your game console. I will upload more game for the console in future. . Just it.
#include "LedControl.h"
// connection to MAX7219 (data, clik, load, #of dispplay)
LedControl lc = LedControl(11,13,10,1);

// direction
const int TOP    = 0;
const int RIGHT  = 1;
const int BOTTOM = 2;
const int LEFT   = 3;
// Snake length
const int MAX_SNAKE_LENGTH = 16;

// Variables
//Adafruit_8x8matrix matrix = Adafruit_8x8matrix();  // Display
int direction = RIGHT;                               // direction of movement
int snakeX[MAX_SNAKE_LENGTH];                      // X-coordinates of snake
int snakeY[MAX_SNAKE_LENGTH];                      // Y-coordinates of snake
int snakeLength = 3;
int score = 3;//
unsigned long prevTime = 0;                        // for gamedelay (ms)
unsigned long delayTime = 500;                     // Game step in ms

int fruitX, fruitY;
unsigned long fruitPrevTime = 0;
unsigned long fruitBlinkTime = 100;
unsigned long bonusTime = 0;
unsigned long bonusPrevTime = 0;
int fruitLed = true;
int bonusLed = true;
int bonusX, bonusY;


void setup(){
  ////wake up the MAX72XX from power-saving mode
  lc.shutdown(0,false);
  //set a medium brightness for the Leds
  lc.setIntensity(0, 15);
  //Switch all Leds on the display off.
  lc.clearDisplay(0);
  Serial.begin(9600);

  randomSeed(analogRead(0));
  pinMode(0,INPUT);
  //pinMode(17,INPUT);
  pinMode(1,INPUT);
  pinMode(2,INPUT);
  pinMode(3,INPUT);
  pinMode(4,INPUT);
  pinMode(5,INPUT);
  //buzzer
  pinMode(12,OUTPUT);


  snakeX[0] = 0;
  snakeY[0] = 4;
  for(int i=1; i<MAX_SNAKE_LENGTH; i++){
    snakeX[i] = snakeY[i] = -1;
  }
  makeFruit();

}

void loop(){
    delay(10);
    checkButtons();  // if any button is pressed or not

    unsigned long currentTime = millis();
    if(currentTime - prevTime >= delayTime){
    nextstep();

    prevTime = currentTime;
  }
  draw(); // make snack & food
}

void checkButtons(){
  if(digitalRead(3)==0)
     direction = TOP;
  else if(digitalRead(4)==0)
     direction = RIGHT;
  else if(digitalRead(5)==0)
     direction = LEFT;
  else if(digitalRead(2)==0)
     direction = BOTTOM;
}

void draw(){
  lc.clearDisplay(0);
  drawSnake();
  drawFruit();

}
void drawSnake(){
  for(int i=0; i<snakeLength; i++){
    lc.setLed(0,snakeX[i], snakeY[i], true);
  }
}
void drawFruit(){
  if(inPlayField(fruitX, fruitY)){
    unsigned long currenttime = millis();
    if(currenttime - fruitPrevTime >= fruitBlinkTime){
      fruitLed = (fruitLed == true) ? false : true;
      fruitPrevTime = currenttime;
    }
    lc.setLed(0,fruitX, fruitY, fruitLed);
  }
}
boolean inPlayField(int x, int y){
  return (x>=0) && (x<8) && (y>=0) && (y<8);
}
void nextstep(){
    for(int i=snakeLength-1; i>0; i--){
    if((direction == RIGHT)&&(snakeX[0]-snakeLength == 7))
    snakeX[0] = -1;
    else if((direction == LEFT)&&(snakeX[0]+ snakeLength == 0))
    snakeX[0] = 8;
    else snakeX[i] = snakeX[i-1];
    if((direction == TOP) && (snakeY[0]+snakeLength == 0))
    snakeY[0]=8;
    else if((direction == BOTTOM) && (snakeY[0]-snakeLength == 7))
    snakeY[0]=-1;
    else snakeY[i] = snakeY[i-1];
  }
  switch(direction){
    case TOP:
      snakeY[0] = snakeY[0]-1;
      break;
    case RIGHT:
      snakeX[0] = snakeX[0]+1;
      break;
    case BOTTOM:
      snakeY[0] = snakeY[0]+1;
      break;
    case LEFT:
      snakeX[0]=snakeX[0]-1;
      break;
   }
  if((snakeX[0] == fruitX) && (snakeY[0] == fruitY)){
    snakeLength++;
    score++;
    tone(12,4500,50);
    if(snakeLength < MAX_SNAKE_LENGTH){
      makeFruit();
    }
    else {
      fruitX = fruitY = -1;
    }
    if(score%8==0)
      {
        snakeLength = 3;
        delayTime = delayTime - 100;
     }
  }
  snakeItSelf();
}
void makeFruit(){
  int x, y;
  x = random(0, 8);
  y = random(0, 8);
  while(isPartOfSnake(x, y)){
    x = random(0, 8);
    y = random(0, 8);
  }
  fruitX = x;
  fruitY = y;
}

boolean isPartOfSnake(int x, int y){
  for(int i=0; i<snakeLength-1; i++){
    if((x == snakeX[i]) && (y == snakeY[i])){
      return true;
    }
  }
  return false;
}
void snakeItSelf(){  // check if snack touch itself
    for(int i=1;i<snakeLength;i++){
      if((snakeX[0] == snakeX[i]) && (snakeY[0] == snakeY[i]))
       gameOver();
     }
}
void gameOver(){
  // game over sound
  tone(12,1000,100);
  delay(100);
  tone(12,1500,200);
  delay(200);
  tone(12,2000,300);
  delay(300);
  tone(12, 494,500);
  delay(500);
  lc.clearDisplay(0);
  for(int r = 0; r < 8; r++){
        for(int c = 0; c < 8; c++){
            lc.setLed(0, r, c, HIGH);
            delay(50);
        }delay(50);
    }
  delay(300);
  score = 3;
  snakeLength = 3;
  direction = RIGHT;
  snakeX[0]=3;
  snakeY[0]=4;
  delayTime = 500;
  loop();
}

void drawBonus(){
  if(inPlayField(fruitX, fruitY)){
    unsigned long bonusTime = millis();
    if(bonusTime - bonusPrevTime >= 300){
      bonusLed = (bonusLed == true) ? false : true;
      bonusPrevTime = bonusTime;
    }
    lc.setLed(0,bonusX, bonusY, bonusLed);
  }
}
void makeBonus(){
  int x, y;
  x = random(0, 8);
  y = random(0, 8);
  while(isPartOfSnake(x, y)){
    x = random(0, 8);
    y = random(0, 8);
  }
  bonusX = x;
  bonusY = y;
}
Step 5: Assemble All the Things


Complete the PCB and assemble all the thing together. It is good practice to use IC base for prototyping board without soldering the IC directly to the PCB board. It remove the risk to burn the IC during soldering and create a way to remove IC any time without de-soldering.
Step 6: Complete Game Console


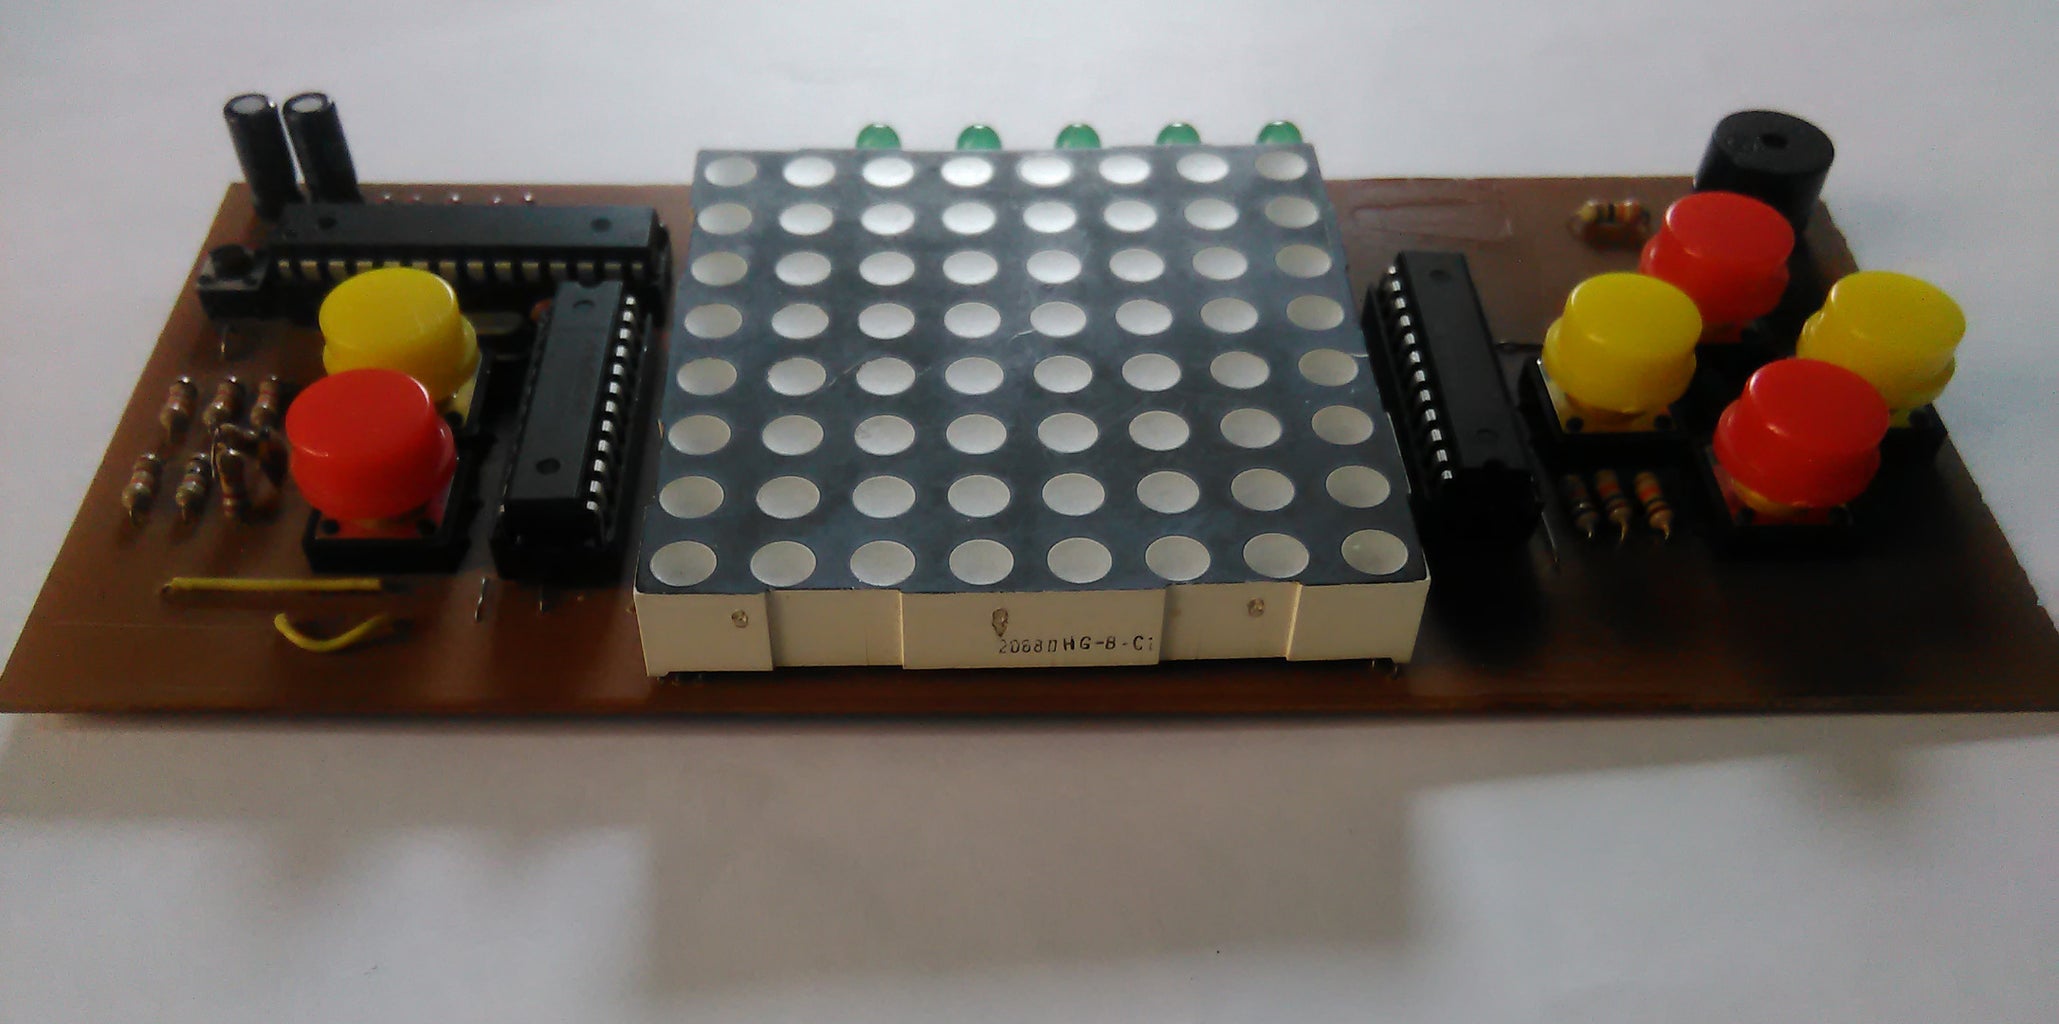
Image of my complete game console is uploaded, I apologize for the quality of the image. All images are taken by my smart phone.
Step 7: Specification


Participated in the
Arduino All The Things! Contest

Participated in the
Full Spectrum Laser Contest 2016

Participated in the
Homemade Gifts Contest 2015


