

Introduction: Arduino Mega Stepper Shield for a Rubiks Cube Solver


A while ago I was working on a machine that automatically solves any scrambled 3x3 Rubiks Cube. You can see my instructables on that here. In the project stepper drivers from polulu were used to drive six motors. In order two make connecting these drivers to the arduino mega (that controls the entire thing) easier, a custom pcb was designed. This instructables covers the process of creating a motor shield for an arduino mega for pololu a4988 drivers.
Enjoy!
Step 1: Creating the Schematic
As first step the schematic of the pcb must be entered into eagle. In addition, all the required components have to be either imported from a library or created by hand. It is easy to find the footprint and schematic for an arduino mega shield on the web. The only component that was custom built was the motor drivers themselves. However, I will not go into detail on how to do so as there are amazing instructions about the topic out there already (see here). The schematic itself is very simple as its only job is to connect the motor drivers to the corresponding Arduino pins. In addition decoupling capacitors were placed close to the vcc pin of each ic in order to ensure smooth operation. The polulu stepper drivers offer the possibility to set the micro stepping by hard wiring three of their pins to ground or vcc. Solder bridges were placed at those pins to allow for later adjustments if needed. Below you can see part of the schematic (only one of the six drivers is included here). The full schematic can obviously be downloaded at the end of this ible.

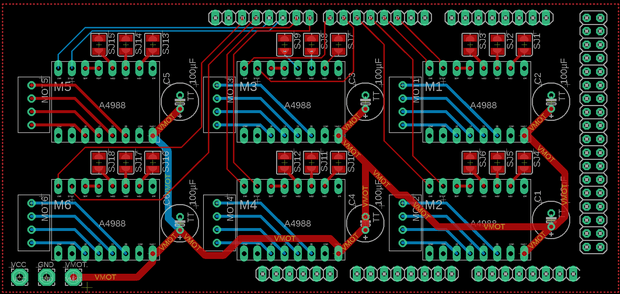
Step 2: Routing the Pcb
Routing a pcb consists of trying to arrange all the components in such a way that they can be easily connected to one another. Of course when creating more complex pcbs many things have to be taken into account when designing it. However, in this case the routing is fairly simple. All the data pins from the drivers are connected to their corresponding pins on the arduino and polygons on the top and bottom layer were used to tie all of the grounds and VCCs together.
Step 3: Ordering the Pcb
There are a lot of sites out there were pcbs can be ordered for very little money. The two sites I have used and had great experience with so far are:
https://jlcpcb.com/
https://www.pcbway.com/
It might take some time for the boards to arrive but the quality has never disappointed.
Step 4: Final Result


Participated in the
PCB Design Challenge


