

Introduction: Arduino Simon Says


First we will cover how to set up the components on a breadboard. Then we will cover the Code used and how it all works. Then i'll show you how you can modify the code to customize the game to your liking.
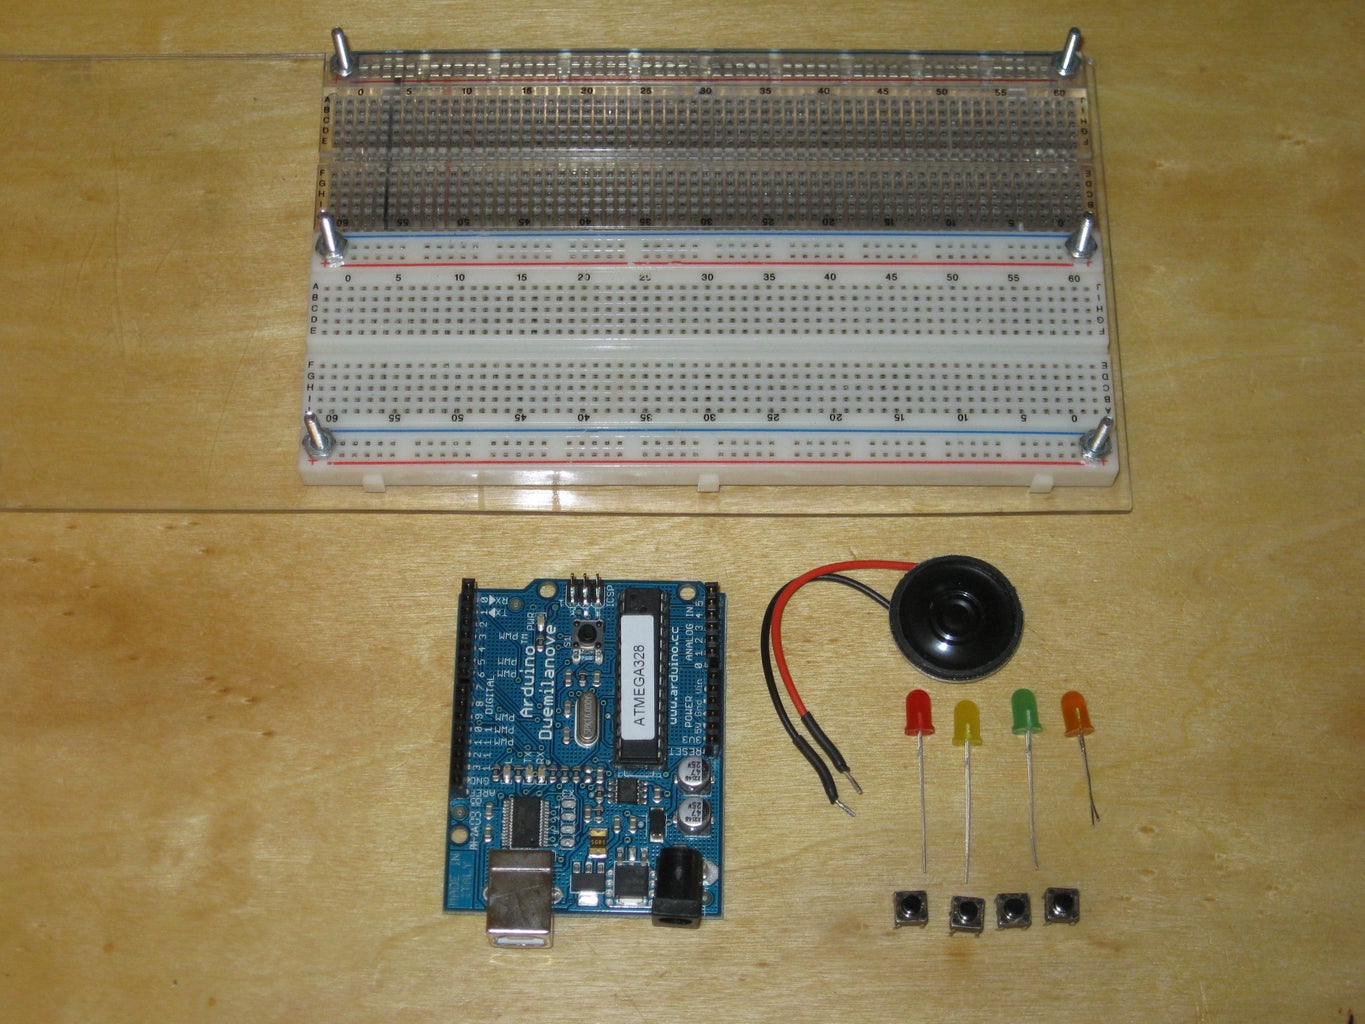
Materials Needed:
- Arduino (I used a Nove)
- Bread Board
- Jumper Wires
- 4 different colored LEDs
- 4 100 Ohm Resistors
- 4 Push Buttons
- Small Speaker
Step 1: Hardware Setup


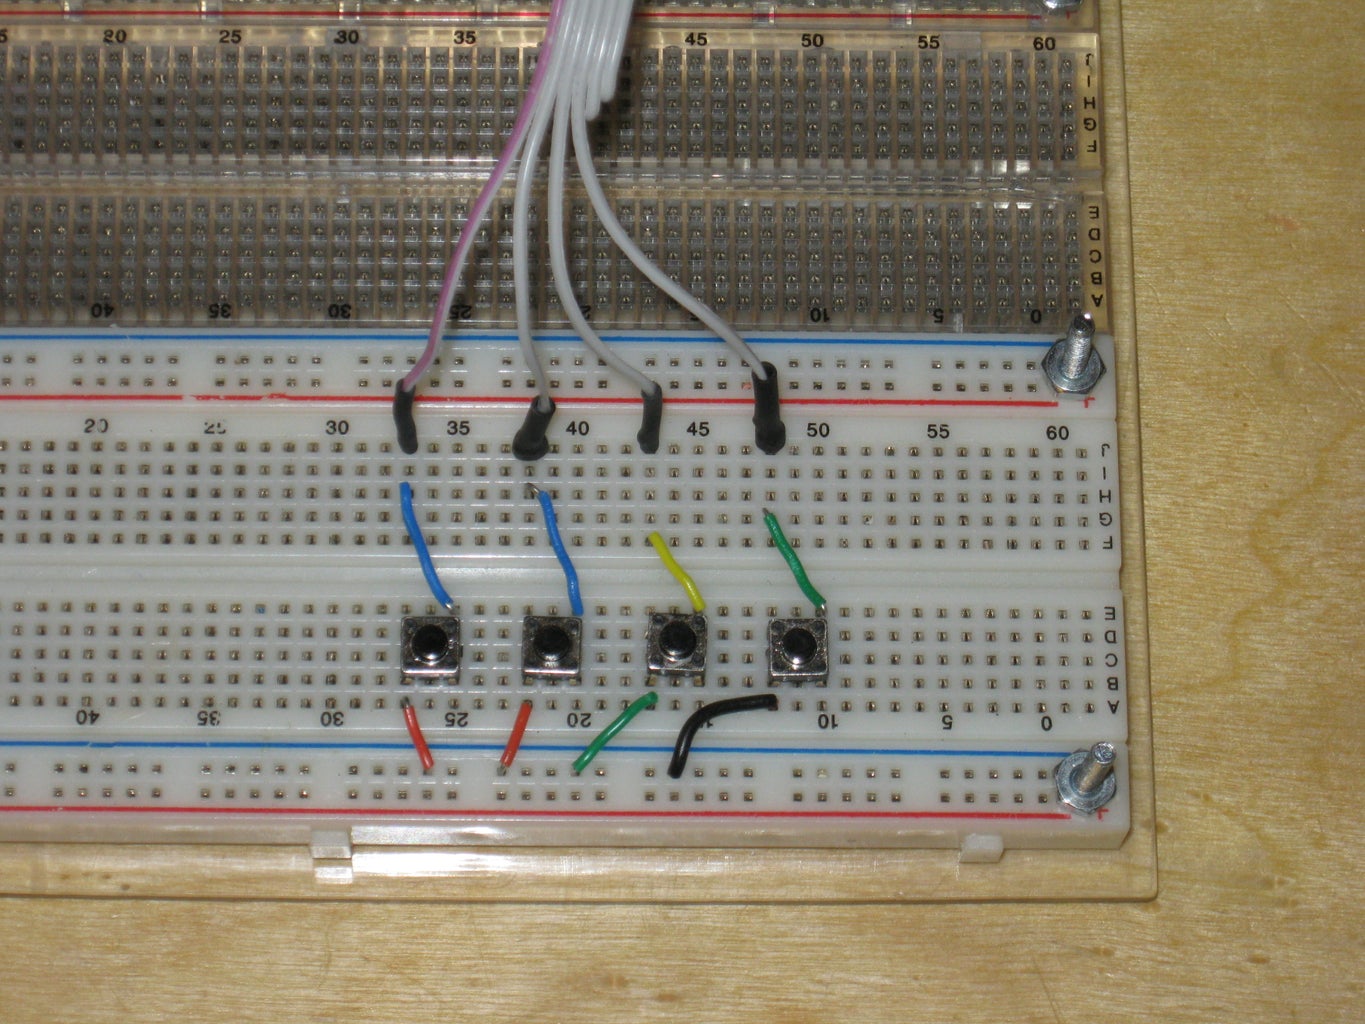

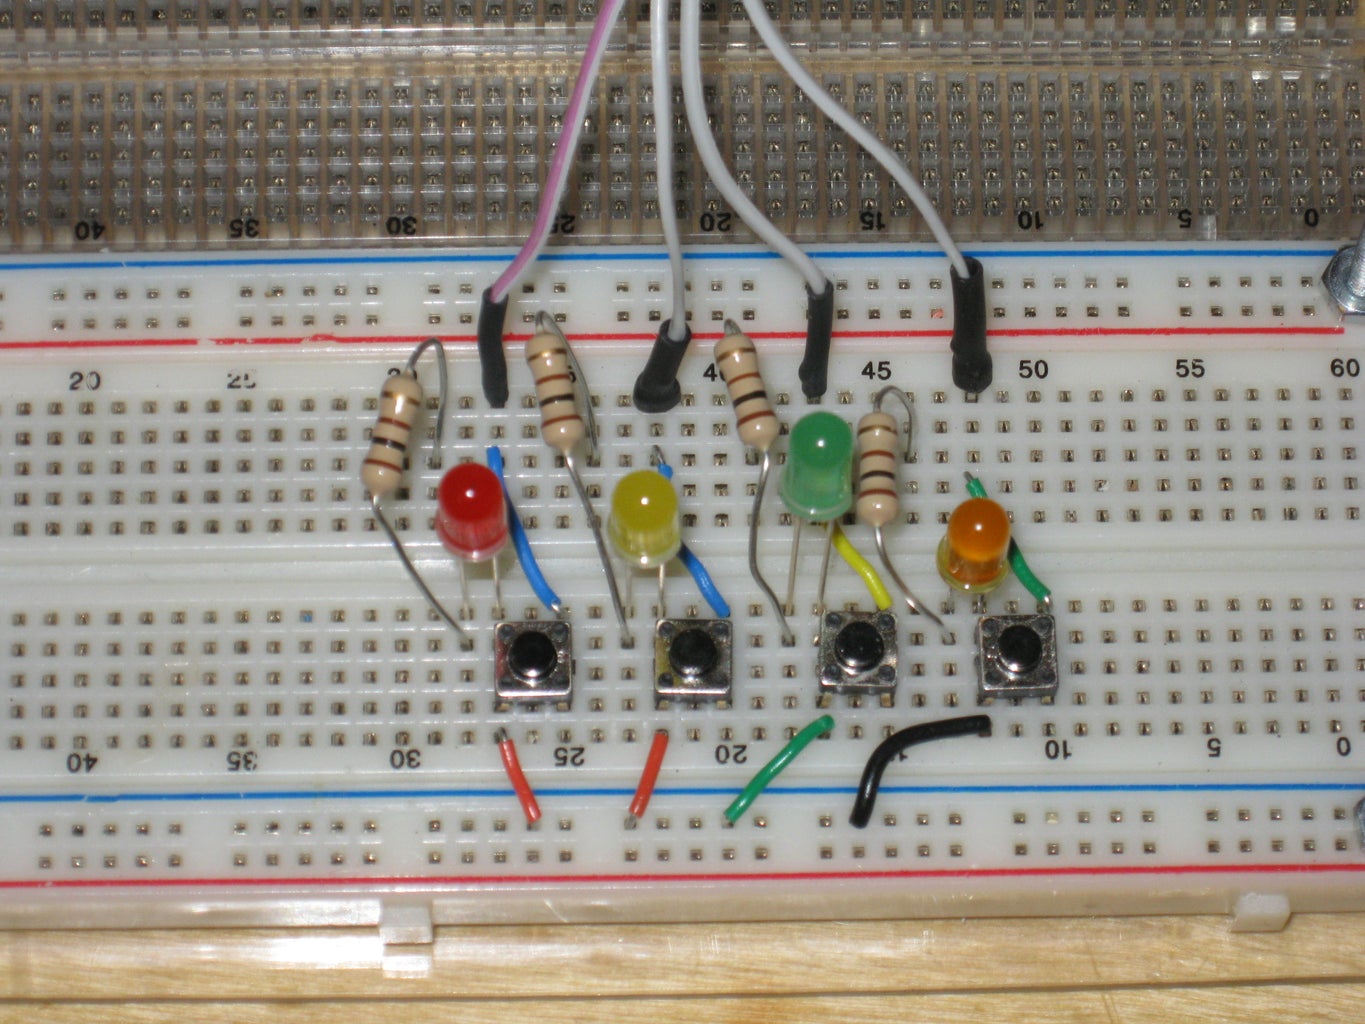


First you'll want to lay out your buttons on the bottom section of your Breadboard. We'll tie one lead of the buttons directly to ground. The other lead will be wired to the Arduino's Digital pins 2, 3, 4, and 5. I ran a wire to the top half of the board to keep the wires running from the board to the Arduino out of the way.
Now we want to lay out the LEDs above the buttons. We'll plug the LEDs in with the switches so the Cathode is on the same strip as the side of the button that is tied to ground. Well arrange it so the Anode plugs in off to the side of the button. Now we'll take out 100 Ohm resistor and put it inline with the Anodeto the top section of the breadboard. Now we can connect a wire from the resistor to the Arduino. The LEDs will be using Digital pins 8, 9, 10, and 11. So make sure the buttons and LED are lined up as follows:
- Button on pin 2 with LED on pin 8
- Button on pin 3 with LED on pin 9
- Button on pin 4 with LED on pin 10
- Button on pin 5 with LED on pin 11
Step 2: The Sketch
The sketch was originally made by Robert Spann back in 2009. I used an earlier version of his sketch since i didn't like the way he integrated sound in later versions of the sketch. To give the game sound i decided to use the Tone.h Library. The Library hasn't been updated since the release of Arduino 1.0, so i went ahead and updated it to be compatible with Arduino 1.0. In doing so i cut out any backwards compatibility with older IDEs. So if your running an older version of the IDE then used the link in the next step to download the original library. I've attached a copy of the updated library on this page. So be sure to download it and place it in your Arduino/Libraries folder or the sketch will not compile under Arduino 1.0.
Here is the Sketch. A file of the sketch is also attached. If there are any questions about it please let me know.
/*Simon Says game. Now with sound effects.
Originaly made by Robert Spann
Code trimmed and sound effects added by digimike
Buttons are to be set on there designated pins without pull down resistors
and connected to ground rather then +5.
*/
#include
Tone speakerpin;
int starttune[] = {NOTE_C4, NOTE_F4, NOTE_C4, NOTE_F4, NOTE_C4, NOTE_F4, NOTE_C4, NOTE_F4, NOTE_G4, NOTE_F4, NOTE_E4, NOTE_F4, NOTE_G4};
int duration2[] = {100, 200, 100, 200, 100, 400, 100, 100, 100, 100, 200, 100, 500};
int note[] = {NOTE_C4, NOTE_C4, NOTE_G4, NOTE_C5, NOTE_G4, NOTE_C5};
int duration[] = {100, 100, 100, 300, 100, 300};
boolean button[] = {2, 3, 4, 5}; //The four button input pins
boolean ledpin[] = {8, 9, 10, 11}; // LED pins
int turn = 0; // turn counter
int buttonstate = 0; // button state checker
int randomArray[100]; //Intentionally long to store up to 100 inputs (doubtful anyone will get this far)
int inputArray[100];
void setup()
{
Serial.begin(9600);
speakerpin.begin(12); // speaker is on pin 13
for(int x=0; x<4; x++) // LED pins are outputs
{
pinMode(ledpin[x], OUTPUT);
}
for(int x=0; x<4; x++)
{
pinMode(button[x], INPUT); // button pins are inputs
digitalWrite(button[x], HIGH); // enable internal pullup; buttons start in high position; logic reversed
}
randomSeed(analogRead(0)); //Added to generate "more randomness" with the randomArray for the output function
for (int thisNote = 0; thisNote < 13; thisNote ++) {
// play the next note:
speakerpin.play(starttune[thisNote]);
// hold the note:
if (thisNote==0 || thisNote==2 || thisNote==4 || thisNote== 6)
{
digitalWrite(ledpin[0], HIGH);
}
if (thisNote==1 || thisNote==3 || thisNote==5 || thisNote== 7 || thisNote==9 || thisNote==11)
{
digitalWrite(ledpin[1], HIGH);
}
if (thisNote==8 || thisNote==12)
{
digitalWrite(ledpin[2], HIGH);
}
if (thisNote==10)
{
digitalWrite(ledpin[3], HIGH);
}
delay(duration2[thisNote]);
// stop for the next note:
speakerpin.stop();
digitalWrite(ledpin[0], LOW);
digitalWrite(ledpin[1], LOW);
digitalWrite(ledpin[2], LOW);
digitalWrite(ledpin[3], LOW);
delay(25);
}
delay(1000);
}
void loop()
{
for (int y=0; y<=99; y++)
{
//function for generating the array to be matched by the player
digitalWrite(ledpin[0], HIGH);
digitalWrite(ledpin[1], HIGH);
digitalWrite(ledpin[2], HIGH);
digitalWrite(ledpin[3], HIGH);
for (int thisNote = 0; thisNote < 6; thisNote ++) {
// play the next note:
speakerpin.play(note[thisNote]);
// hold the note:
delay(duration[thisNote]);
// stop for the next note:
speakerpin.stop();
delay(25);
}
digitalWrite(ledpin[0], LOW);
digitalWrite(ledpin[1], LOW);
digitalWrite(ledpin[2], LOW);
digitalWrite(ledpin[3], LOW);
delay(1000);
for (int y=turn; y <= turn; y++)
{ //Limited by the turn variable
Serial.println(""); //Some serial output to follow along
Serial.print("Turn: ");
Serial.print(y);
Serial.println("");
randomArray[y] = random(1, 5); //Assigning a random number (1-4) to the randomArray[y], y being the turn count
for (int x=0; x <= turn; x++)
{
Serial.print(randomArray[x]);
for(int y=0; y<4; y++)
{
if (randomArray[x] == 1 && ledpin[y] == 8)
{ //if statements to display the stored values in the array
digitalWrite(ledpin[y], HIGH);
speakerpin.play(NOTE_G3, 100);
delay(400);
digitalWrite(ledpin[y], LOW);
delay(100);
}
if (randomArray[x] == 2 && ledpin[y] == 9)
{
digitalWrite(ledpin[y], HIGH);
speakerpin.play(NOTE_A3, 100);
delay(400);
digitalWrite(ledpin[y], LOW);
delay(100);
}
if (randomArray[x] == 3 && ledpin[y] == 10)
{
digitalWrite(ledpin[y], HIGH);
speakerpin.play(NOTE_B3, 100);
delay(400);
digitalWrite(ledpin[y], LOW);
delay(100);
}
if (randomArray[x] == 4 && ledpin[y] == 11)
{
digitalWrite(ledpin[y], HIGH);
speakerpin.play(NOTE_C4, 100);
delay(400);
digitalWrite(ledpin[y], LOW);
delay(100);
}
}
}
}
input();
}
}
void input() { //Function for allowing user input and checking input against the generated array
for (int x=0; x <= turn;)
{ //Statement controlled by turn count
for(int y=0; y<4; y++)
{
buttonstate = digitalRead(button[y]);
if (buttonstate == LOW && button[y] == 2)
{ //Checking for button push
digitalWrite(ledpin[0], HIGH);
speakerpin.play(NOTE_G3, 100);
delay(200);
digitalWrite(ledpin[0], LOW);
inputArray[x] = 1;
delay(250);
Serial.print(" ");
Serial.print(1);
if (inputArray[x] != randomArray[x]) { //Checks value input by user and checks it against
fail(); //the value in the same spot on the generated array
} //The fail function is called if it does not match
x++;
}
if (buttonstate == LOW && button[y] == 3)
{
digitalWrite(ledpin[1], HIGH);
speakerpin.play(NOTE_A3, 100);
delay(200);
digitalWrite(ledpin[1], LOW);
inputArray[x] = 2;
delay(250);
Serial.print(" ");
Serial.print(2);
if (inputArray[x] != randomArray[x]) {
fail();
}
x++;
}
if (buttonstate == LOW && button[y] == 4)
{
digitalWrite(ledpin[2], HIGH);
speakerpin.play(NOTE_B3, 100);
delay(200);
digitalWrite(ledpin[2], LOW);
inputArray[x] = 3;
delay(250);
Serial.print(" ");
Serial.print(3);
if (inputArray[x] != randomArray[x]) {
fail();
}
x++;
}
if (buttonstate == LOW && button[y] == 5)
{
digitalWrite(ledpin[3], HIGH);
speakerpin.play(NOTE_C4, 100);
delay(200);
digitalWrite(ledpin[3], LOW);
inputArray[x] = 4;
delay(250);
Serial.print(" ");
Serial.print(4);
if (inputArray[x] != randomArray[x])
{
fail();
}
x++;
}
}
}
delay(500);
turn++; //Increments the turn count, also the last action before starting the output function over again
}
void fail() { //Function used if the player fails to match the sequence
for (int y=0; y<=2; y++)
{ //Flashes lights for failure
digitalWrite(ledpin[0], HIGH);
digitalWrite(ledpin[1], HIGH);
digitalWrite(ledpin[2], HIGH);
digitalWrite(ledpin[3], HIGH);
speakerpin.play(NOTE_G3, 300);
delay(200);
digitalWrite(ledpin[0], LOW);
digitalWrite(ledpin[1], LOW);
digitalWrite(ledpin[2], LOW);
digitalWrite(ledpin[3], LOW);
speakerpin.play(NOTE_C3, 300);
delay(200);
}
delay(500);
turn = -1; //Resets turn value so the game starts over without need for a reset button
}
Attachments

Step 3: Sketch Mods

http://code.google.com/p/rogue-code/wiki/ToneLibraryDocumentation
Basically how the sounds work is the Library creates a square wave of the specified frequency. You define what notes you want played in the start of the sketch. You also need to define how long each note will be played. The picture shows what notes the library is able to generate.
In this case we define a couple of tunes, starttune[ ] and note[ ]. We also define the duration of each tune as duration[ ] and duration2[ ]. Starttune [ ] tune is the Mexican Hat Dance melody and the note [ ] tune is the charge melody.
You can change any of the Notes and duration times to create whatever bit of music you want to have played. The duration times i played around with till they sounded right to me. But the duration of 100 amounts to an 1/8 note, 200 is a quarter note, 300 is basically a dotted quarter note, 400 a half note and 500 a dotted half note. The unit plays through the tune pretty fast but you can control the speed by placing a delay in the loop that plays the tune. If you change the number of notes used in any of the tunes you'll need to update the section where the tune is played.int starttune[] = {NOTE_C4, NOTE_F4, NOTE_C4, NOTE_F4, NOTE_C4, NOTE_F4, NOTE_C4, NOTE_F4, NOTE_G4, NOTE_F4, NOTE_E4, NOTE_F4, NOTE_G4};
int duration2[] = {100, 200, 100, 200, 100, 400, 100, 100, 100, 100, 200, 100, 500};
int note[] = {NOTE_C4, NOTE_C4, NOTE_G4, NOTE_C5, NOTE_G4, NOTE_C5};
int duration[] = {100, 100, 100, 300, 100, 300};
To play these tunes we jump down to this section.
for (int thisNote = 0; thisNote < 13; thisNote ++) {
// play the next note:
speakerpin.play(starttune[thisNote]);
// hold the note:
if (thisNote==0 || thisNote==2 || thisNote==4 || thisNote== 6)
{
digitalWrite(ledpin[0], HIGH);
}
if (thisNote==1 || thisNote==3 || thisNote==5 || thisNote== 7 || thisNote==9 || thisNote==11)
{
digitalWrite(ledpin[1], HIGH);
}
if (thisNote==8 || thisNote==12)
{
digitalWrite(ledpin[2], HIGH);
}
if (thisNote==10)
{
digitalWrite(ledpin[3], HIGH);
}
delay(duration2[thisNote]);
// stop for the next note:
speakerpin.stop();
digitalWrite(ledpin[0], LOW);
digitalWrite(ledpin[1], LOW);
digitalWrite(ledpin[2], LOW);
digitalWrite(ledpin[3], LOW);
delay(25);
}
We use a For() statement to run a loop through the tune we want to play. In the "for (int thisNote = 0; thisNote < 13; thisNote ++) {" line the number 13 referes to the number of notes in the tune. The code starts at the first note and generates the tone for the specified duration. While its doing that the code is lighting a corresponding LED depending on what note it is at in the sequence. So you can go in and change which LED is lighted under what note to make the lights dance as you see fit. The delay placed after turning off the LEDs controls the tempo of the music. In this case when the 13th note has been played the program moves on.
The main body of the sketch (void loop()) is where the program reads the randomly generated array and starts blinking the LEDS and playing a note. Any notes you redefine there need to be duplicated in the void input() so the same note is played back when you hit the buttons.
The tone played when you miss the sequence i kept as a simple 2 note tone that looped a couple of times. You will find that in the void fail() section of the sketch.
Step 4: Final Results
Here is a video of the game in action.

Participated in the
Arduino Challenge


