

Introduction: Arduino Target Practice


This is an instructable for a target practice system for airsoft and nerf weapons. The system has been designed to test a shooter’s reaction times and accuracy.
Sam and I have been meaning to do this project for a while, and when the microcontroller competition opened, coinciding nicely with the end of our university exams giving us a real push to pick up the arduino and get stuck in.
This is the first project either of us has attempted on the arduino as well as instructables, so as yet are still inexperienced. On the upside we both have coding experience and both taking electronics based courses at university. So please go easy on us and we thank you in advance for your comments and advice.
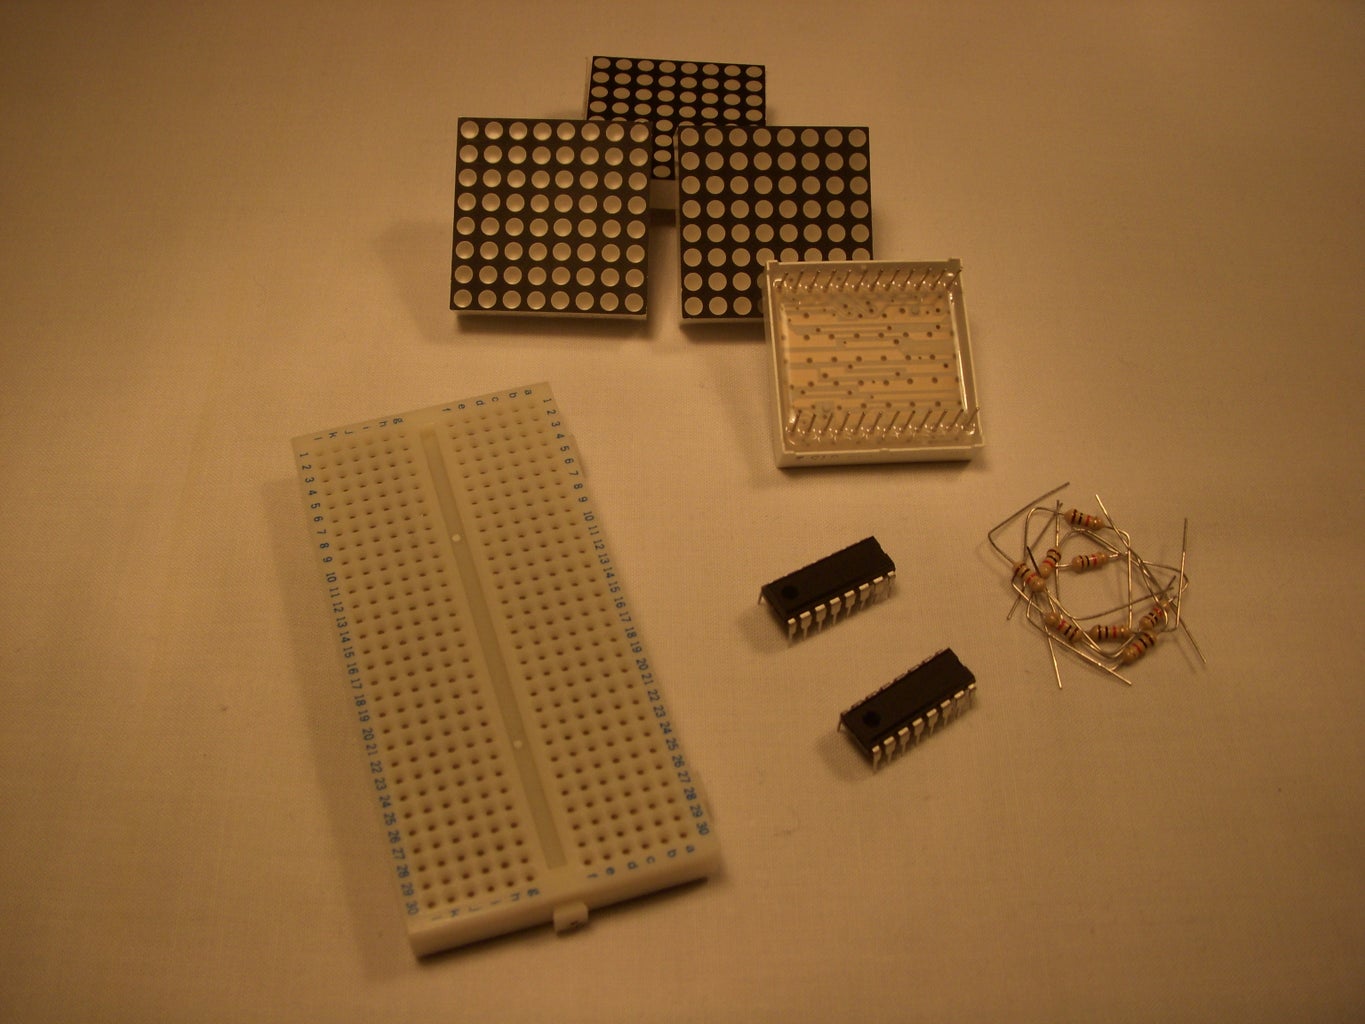
The setup is based on the arduino microcontroller and has four main parts other than the arduino itself. These are a footswitch, buzzer, targets and a display.
So here is the equipment you are going to need, seperated into their individual sections.
Arduino duelimove (or related with 14 pins, based on 4 targets)
Footswitch:
Push to make heavy duty switch, similar to those found in guitar pedals.
A door stop, the bigger the better
Buzzer:
Buzzer piezo element
Targets (per target):
Metal coat hanger
Thin plate metal, possibly aluminium, you might have another material suitable
Reed switch, a switch that is controlled by a magnetic field
Reed magnet (roughly similar size to the switch)
Resistor (10kOhm and 560Ohm)
Red Led
Green Led
Targets (all):
74HC595 Shift register (1 needed for every 4 targets)
Display:
Four 8x8 led matrices
Five 74HC595 shift registers
Misc:
Alot of wire
A number of prototyping breadboards
Tools:
Drill
Multimeter (this is for general testing of switches and shift register output testing)
Wire cutters
Wire strippers
Soldering Kit
Pliers
Sheet metal cutters
We are going to run through each section of the build separately, finally ending with a complete build and summary. We have attached a copy of the separate codes to each of the respective sections for you to follow and a complete version at the end. Don't forget to click on some of the more detailed images to enlarge them, especially the schematics.

Step 1: Footswitch


We discussed a few options for starting the target practice run and came to the conclusion that to operate any sort of hand operated switch would be difficult when you’re holding a gun. This led us to a footswitch similar to guitar pedals. As we have progressed through the project we have found that the footswitch has come in more use then we thought, not just starting the course off, we are now using it to control the display screen at the end of the project. (This is included in the final code).
Since the footswitch on its own does not really constitute a usable unit we decided to mount it on a ramp of sorts, leading us to the door stop which seems to be made for this exact purpose.
The electronic circuit for the switch is a pretty straightforward affair. It consists of a pull up resistor connecting a +5v line to an arduino pin, giving a HIGH input. The switch is then aligned such to pull the pin low when pressed.
The construction of the complete unit is shown in the pictures which are pretty self explanatory. You will need to drill/cut a hole at the top of the doorstop ramp. The closer to the top the better, as the switch will require a fair amount of force, so needs to be on a good backing. Next up is a small hole on the rear with a vertical slit to guide the cable. When soldering up be sure to check you are using the correct pins (push to make).
Onto the code, it is a pretty simple code that is integrated into a "for" loop in the main program. By doing this the main program will continuously look at the status of the footswitch as it waits for a LOW value, signalling it being pressed and you being ready to go. So the "footcheck" function is called, the value of the designated foot pin is observed and the value then returned to the calling function.
Attachments
Step 2: Buzzer

As a method of signalling the various conditions of play we decided a buzzer would be the most effective. All in all we totalled four sounds needed. These were for; the game start, enemy hit, friend hit and end of game.
I will try my best to explain the sounds we wanted:
Game start: bep bep bep bep beeeeeeep, one for each second for five seconds as a count in.
Enemy hit: beeep, keeping it simple something that says "nice, keep going"
Friend hit: bep BOOP, it says "Oh ohh"
End game: BOooop, simple really just closes it down
Of course these sounds are all really made to our design, there is nothing stopping you expanding on this and putting in some custom tunes. We did intend to put in a small death march but neither of us are much good with putting notes to music. So that’s up to you all.
A very simple electronic circuit, simply connect a buzzer to a pin and ground. The circuit works by sending a square wave of a specified frequency to the buzzer. Different frequencies give different pitches. The duration of the pulse can also be specified in the code.
I do not have much in the way of information on the exact buzzer we are using. The buzzer is taken from the OOMLOUT ARDX starter kit. It is around 15mm in diameter. Not the most powerful but it does the job.
The code for this section makes use of the tone() function. The function described is tone(pin, frequency, duration). The buzzer function is called every time a sound is needed. The code has been constructed with a switch. This takes a value sent to it by the calling function and then runs an action based on the value. There a four cases one for each sound.
Attachments
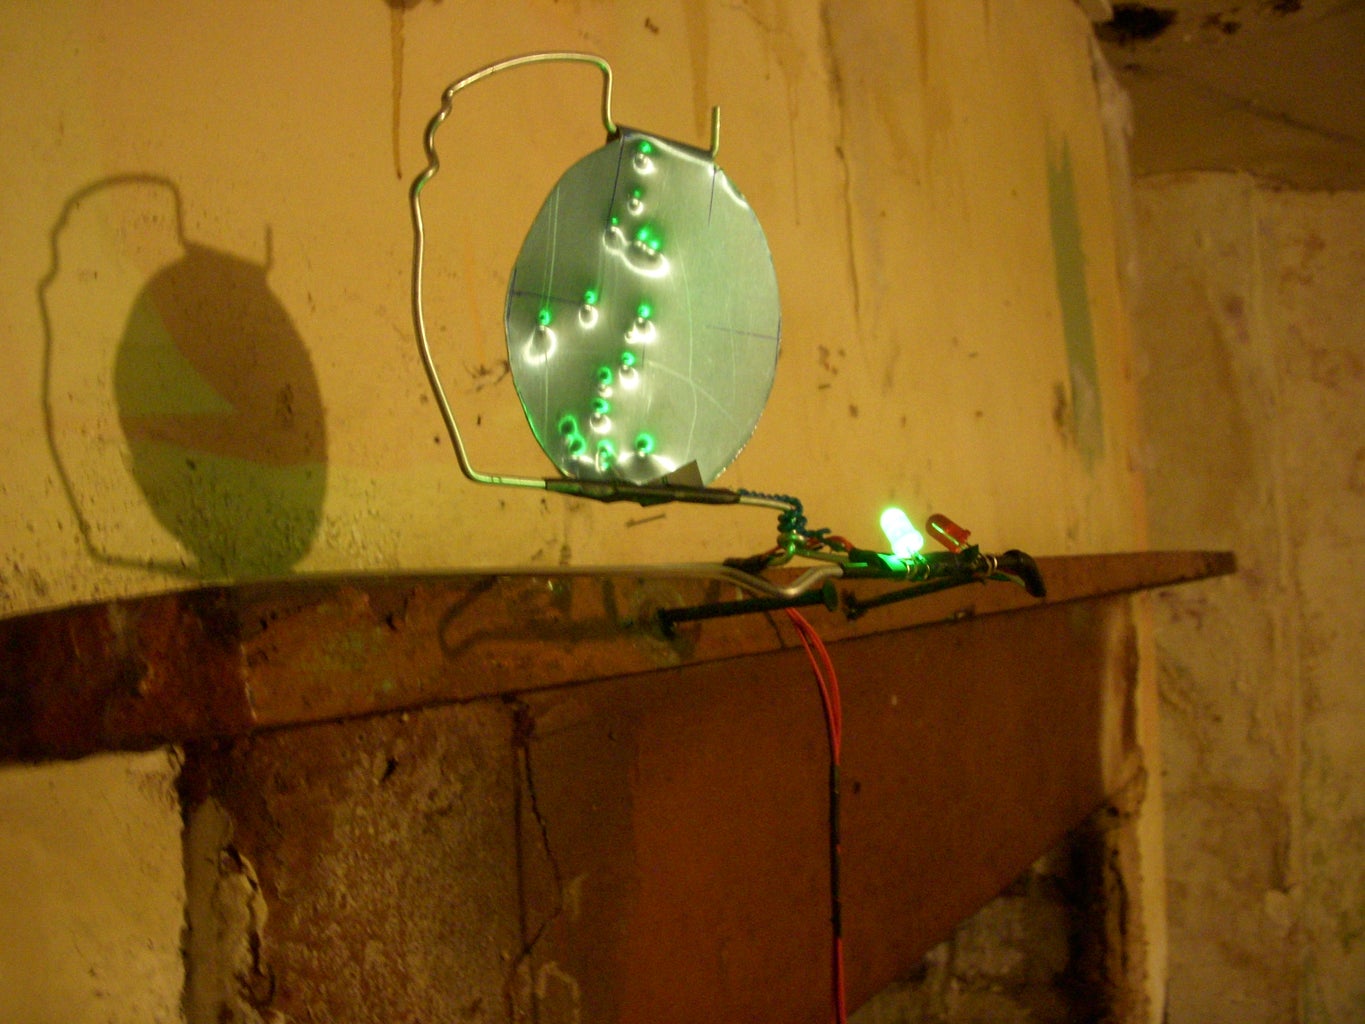
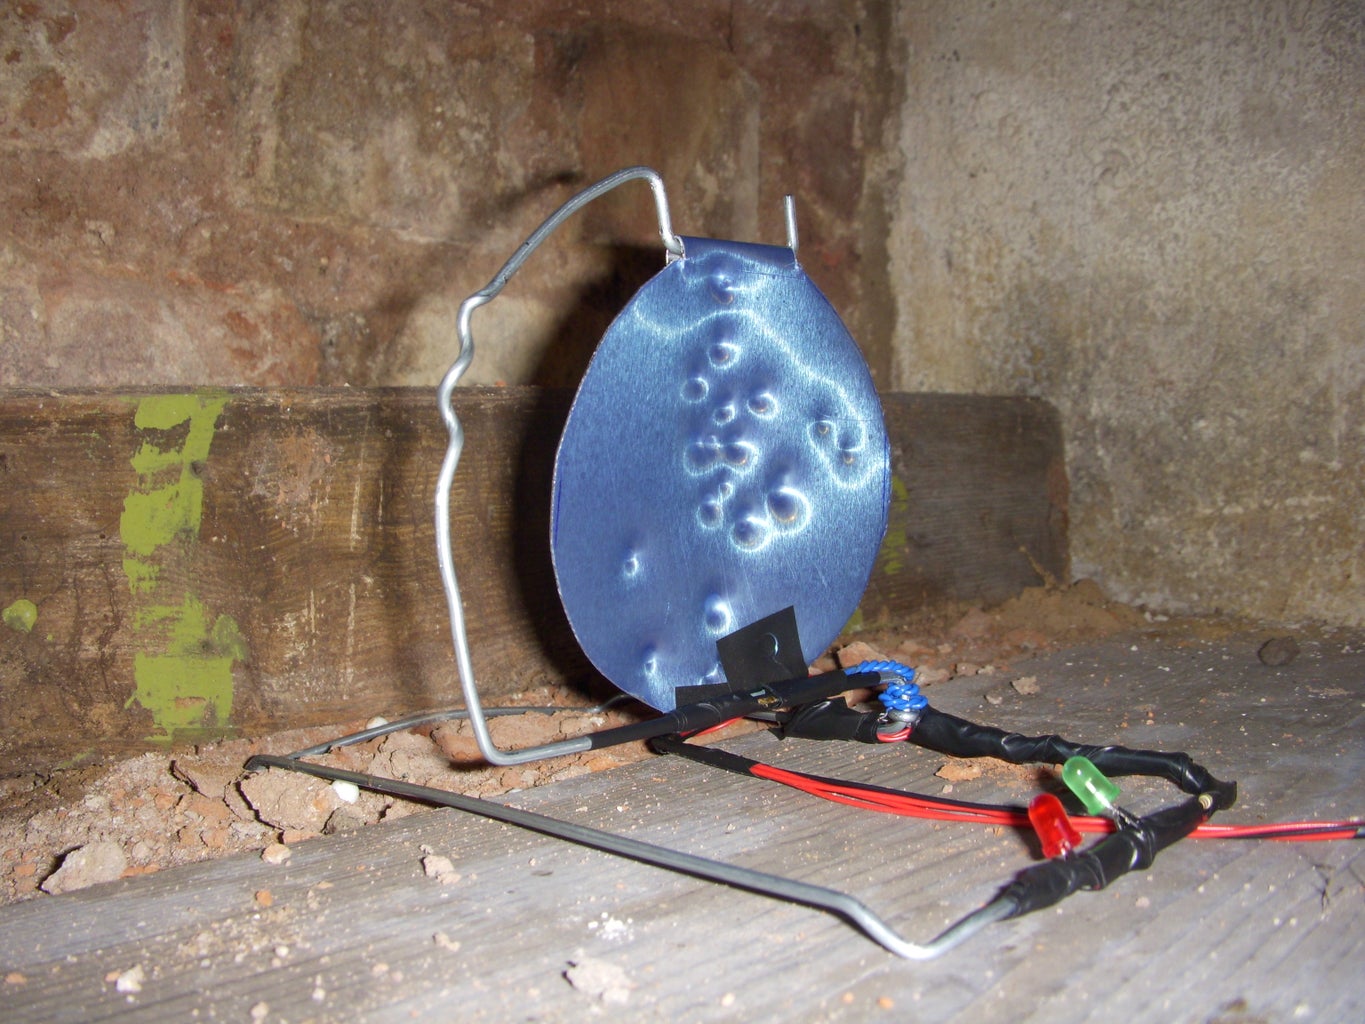
Step 3: Target


The targets themselves are one of the larger sections of the build.
We had some designs in mind and initially started out using some micro switches, but we were unsure as to how much force was needed to use them. This finally lead us to a none contact switch option, the reed switch. If you haven’t seen one of these before, they consist of two contacts within a glass seal that on bringing a magnet close to them will conduct. The most common use for them is in intruder detection systems on doors and windows.
Furthermore we were keen to add some spice to the reaction time by adding in a "friend" situation, where hitting this target will incur a penalty or void the round completely. Combining the two conditions there was a need for two different coloured LEDs to shine onto the target to notify the user of the situation.
The circuit needed is in two parts. The 74HC595 shift register controls the two LEDs that each target has, one red (enemy) and one green (friend), too four separate targets. The second part of the circuit is the reed switch and its pin connection for each. On the second schematic I have attempted to highlight the wires that will need to extend between the main circuitry and the targets.
Each target pin will give a LOW reading, as by design the magnet will be near the reed switch when the target is idle. On hitting the target the magnet is moved away, opening the switch leading to a HIGH pin reading to be interpreted by the code. The code then goes on to turn off the LED.
The build process of the target is the longest builds of all the sections, it’s up to how many targets you want, the code can be modified very simply to add more or fewer. The only restriction is the number of input pins you have.
To construct the frame, take a coat hanger and first unwind the top connection, uncurl the hook and add a small angle at the end. Measure three centimetres and angle. The curve is twelve centimetres long, bend again measure nine and bend down. This is the end of the vertical portion. Keeping the curve to the right bend outwards ten then ten then another ten to form a square. Now rotate till the curve is on the left and bend in a seven by ten by seven rectangle. You should be back at the start, twist once around the leg and cut the excess off. To end add some small bends for feet at the tips, with the curve on the left bend once again to raise the front bar off the group to allow the LEDs to be mounted off the ground.
Next up is the swinging target, this is an eight centimetre circle below a three centimetre wide tab. We decided to use aluminum plate as it is light and durable so should take some punishment, I am sure there are other materials that are better suited to this function so we will be glad to hear some suggestions.
Finally soldering, following the second schematic you will have to wire the target up such that the wires follow the frame. An important note to make is that if you solder directly onto the reed switches be sure to have a metal conductor connected between the area you are soldering and the glass to prevent the glass breaking. Align up the magnet on the rear face of the swing; you might want to check that the connection is made with a multimeter.
The code. When called the function randomly selects a target and then randomly decides whether it will be an enemy or a friend (I have set this to a one in ten chance of being a friend). Using a switch the particular target is chosen, then either the friend or foe LED is lit shining on the target. The time is recorded, on striking the target the time is checked, a buzzer sounds and the light is extinguished. The time is then calculated and returned to the calling function. In the instance of being a friend the light will be lit for a number of seconds, if struck a default time will be returned, signalling a fail.
Now if you fancy doing any testing, tryout the switch a few times, by hooking the reed switch up to a multimeter in continuity mode (beep mode). It should sound all the time until you hit the target. We came across an issue with the target not returning to its exact starting position, meaning that the circuit was not re-established. We have added more magnets and tightened the movement to counter it.
Attachments
Step 4: Display


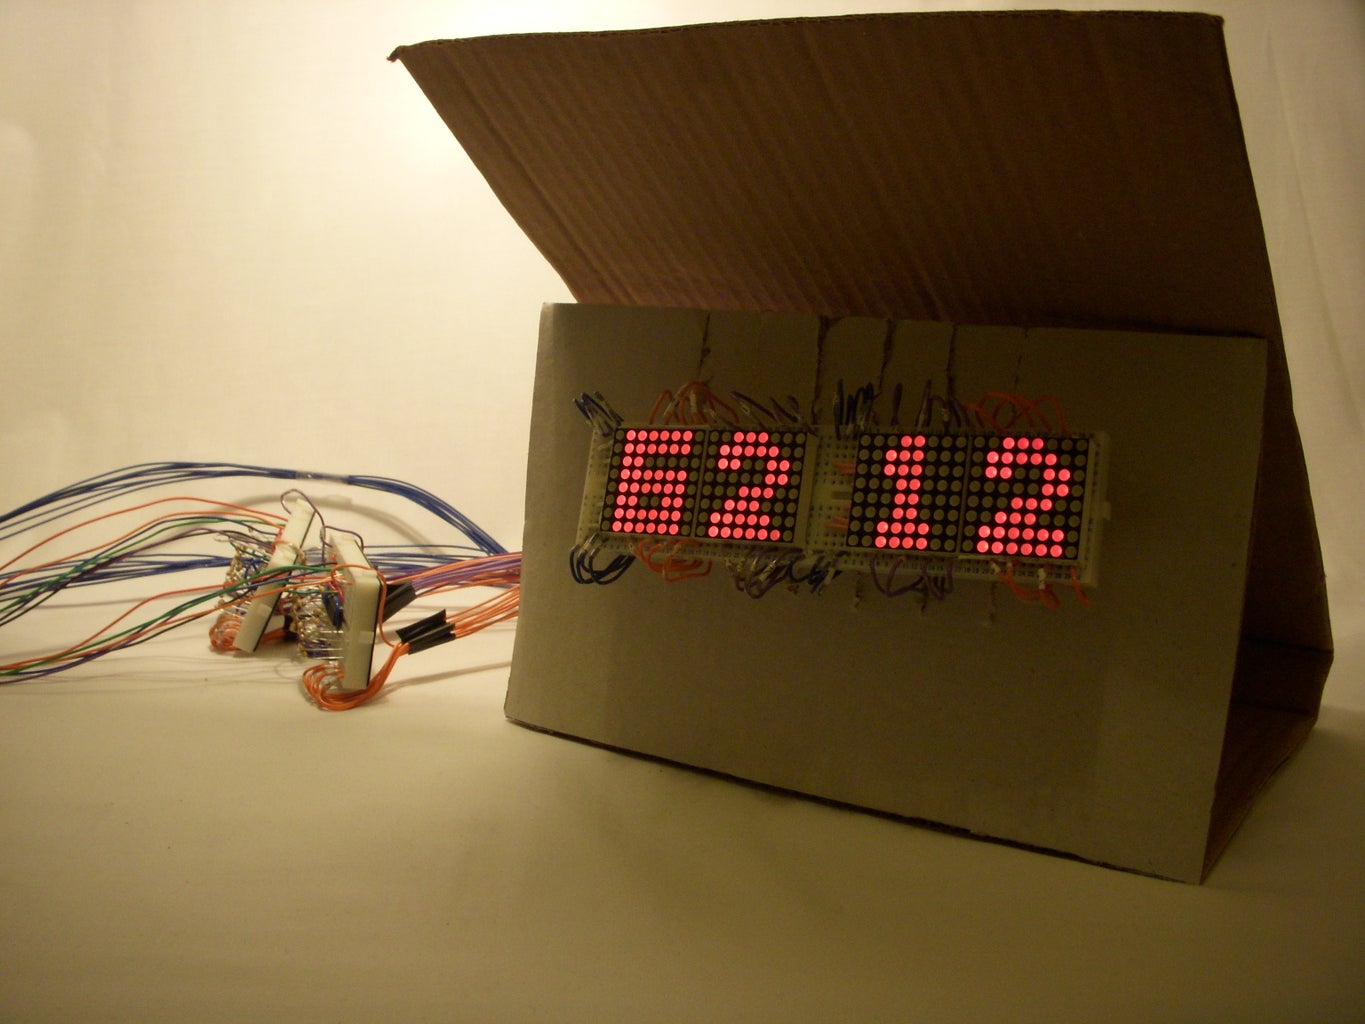
The following part is a detailed explanation of how to set up the screens used in the project.
In this section we have used four 8x8 LED matrices from OOLOUT.com. Each has 128 LEDs. That’s 512 LEDs. Relax; we only use half of these. The matrices are bi-coloured with red and green LEDs. We chose to use the red ones. Another great thing is that the rows and columns have been made common. The column rails behave as the anode and the row rails behave as cathodes. To light a single LED connect the row rail required to 5Volts via the resistor and the corresponding column rail to ground. For example light led in row 2 and column 6.
When the Matrix is turned over in one corner a tiny 1 can be found that corresponds to pin 1 on the matrix.
The "matrixone.jpg" shows the matrix, its pin numbers and where the 1 is printed below the matrix. The second schematic in the image describes which pin controls each rail. Note that we have selected the red LED’s so we are using pins 2,5,8,11,14,17,20,23 for the columns. If we were using the green LED’s we’d use pins 1,4,7,10,13,16,19,22 but the row rail remains the same.
As seen in the schematic each column and row has a designated pin. In "matrixtwo.jpg" the columns and rows have been numbered to prevent any further confusion. Hence if you wanted to light the Led in column 6 and row 2 connect the circuit in"step3.jpg".
A simple one Matrix guide is available on the OOMLOUT website. In the guide they have connected the matrix row pins via 1K resistors to the Arduino I/O pins and directly plugged the columns into the Arduino pins. In the sample program provided they have used a function called “showsprite” that turns on all the LEDs in a column one by one the turns them all off. It then repeats the process for the next column, and so on. This may seem silly but this is done to reduce the current drawn from the Arduino. Seen as it processes so fast, even though the LEDs are lit column by column, it all happens so fast that to the human eye the image appears as constant.
In the previous example, for one matrix we used a total of 16 pins, and so if we were to use 4 matrices we would use 64 pins. Which we don’t have, so the only solution is to use shift registers.
Shift registers: (74HC595) "step5.jpg"
Example programs are available on the Arduino website to get a basic understanding of how shift registers work but I will do my best to summarise it.
The shift register accepts data as a pulse train of 8 bits. To allow the shift register to accept data we send a LOW input to its latch pin. The data is sent to the data pin and then the latch is closed with a HIGH to the latch pin. In order to synchronize the Arduino and the shift register we send the Arduino’s clock to the shift registers clock pin. All of this will be covered again during the explanation of the code.
Displaying on a matrix using 2 shift registers:
Now that we can send data to a shift register we can use it to drive the matrix. From our earlier understanding we send a HIGH input to the row and a LOW input to the column to turn an LED on.
As the registers have 8 outputs each we can select a single column by setting the others to 1 and the required column to 0. Then send the data specific to that column to the row shift registers. For example if you wanted the following pattern: 10101101 (shown in the picture) you can send the pattern to the row shift register and 11011111 to the column shift register.
Now that we have looked at how the shift register works with a matrix, we can look at how to apply it to drive 4 screens. The shift register has 8 outputs and hence its output can directly be connected to the matrix.
We came up with two ways of doing this
1) Having a row and column shift register for each of the 4 screens. The data line is common to all as only one shift register will receive data at a time. The clock is common to all the shift registers as they must all be synchronised, yet they all need separate latches so that they can be activated separately. Hence we need a total of 10 pins (8 latches, 1 Clock and 1 Data).
2) The other option to reduce the number of pins used is to have a common column shift register for all the screens and have individual row registers for each matrix. This is the method we chose as it required a lesser number of pins (5 Latch pins, 1 data and 1 clock).
So essentially we can send data to each of the row register and then turn the corresponding column on, to display 1 column display each of the matrices. This process is cycled and data is displayed on each screen at high speeds and hence the image appears constant on all 4 screens.
In the Arduino programming language a special type of integer is available called a bit mask which allows you to write a number in binary, for example “int binary_integer= B11001010”. This allows you to write what each line of screen would look like. By making an array of these for each column you can define what a screen looks like for each character that needs to be displayed. To store each character and its columns we use an array of pointers that point to where in memory the character is, so that it is easier to access.
To display on a screen we need to send data to the desired shift register using the predefined Arduino function:
“digitalwrite(latchrow, LOW); // To set the required shift register’s latch low.
shiftOut(datapin, clockpin, MSBFIRST, Rowmsk1); “
The shift out function sends data to the shift register. The first input is the pin number from which data is being sent from the arduino, then the pin of the arduino that the clock is being sent on, next the format in which data is being sent, in this case it is the most significant bit first. The last input is an integer (in either normal or bitmask format) 8 bits in length which is the data sent to the shift register.
“digitalWrite(latchrowone, HIGH); //this function set the latch back to high once data has been sent.”
We need to display time taken to hit a target and hence we need to receive the time as a long integer input, convert it to string so that we can find the corresponding character to display on each screen.
This is done using the string constructor, a function available that converts a Long Integer into a string containing each digit. String “timeString = String(123456,DEC);”
makes !timeString={1,2,3,4,5,6};”.
We use a switch case to select which bit mask array to display, then send it to the display function to output it too the screen.
Step 5: Final Roundup


Taking all the separate parts and connecting them up to the arduino, make sure you select the correct pins as listed at the top of the code.
Just going to quickly explain the main void loop function in the code to cover how the entire system is working together.
We start by clearing all LEDs to get rid of any anomalies created on start-up. The player then presses the footswitch to start the game off. This is signalled by playing the first buzzer tune. Next the target loop is run; this can be set to run as many times as you want. The loop calls the target function and waits for you to hit/avoid hitting the target and then returns a time or a signal to end your game (you hit a friend). When the loop has run its course, buzzer plays end tune and depending on your performance, either a fail screen is displayed or your times, which are toggled by the footswitch.
So finally built, you should have a circuit something like the one in the pictures. We took it down to the basement to give it a proper testing, and shoot the video.
We went on to create a new stand for the display (in the video, much slicker) and with a little more time would go on to modify the design to clean up the wires. After some 6 hours of testing we have also found some points that we would modify slightly, but that is going to wait for version 2.0. Our resident airsoft guru was hooked after a few minutes and played around 15 rounds in an attempt to break the one second barrier.
We would just like to acknowledge the OOMLOUT.co.uk website and tutorial sheets that have come with the ARDX kit and also the arduino creators and community for a fantastic tool and base for helping us get some ideas out there. Thank you
Thank you also for reading this instructable, we have worked hard to get this all built and written around our university work and it’s good to know people are looking at it. We welcome feedback and advice and we hope you have enjoyed our attempt.
Seb and Sam
Participated in the
Microcontroller Contest

Participated in the
3rd Epilog Challenge


