

Introduction: Arduino and SmartThings LED Strip Lighting


I have been wanting to do this for quite some time and I finally just got around to doing it and figuring out how it all works. Samsung's SmartThings is a smart home control hub that lets you control many different aspects of your home. We started out with the Lowes Iris but at the time very few devices were compatible with it so we made the switch. Right now we have control of most of our standard lighting through some GE smart switches and we can control our thermostat as well.
SmartThings is pretty much open source where you can create your own devices and programs through several methods such as IFTT and their STAnything platform. I have been tinkering with this for a while and purchased the STAnything Arduino Shield quite some time ago. I have just gotten around to making some LED strip lights that I can control through smartthings.
This project changed gears a little bit at the very end. So this is a walk through of how to get some LED Strip lights to work on an arduino and control with smartthings. Follow along and don't forget to check the video for details on how I started and the code work.
Step 1: The Materials

As already stated I have a shelf that needs some lighting below it. Here are the materials that we used to create the smart led lighting.
For the lighting:
- 1 arduino Uno R3
- 1 Smartthings Shield
- 3 LED Strips from RadioShack (Obtained on clearance when they were closing most of their stores, I think I paid $1 each for these)
- 1 Seeed Studio Relay Shield (optional)
- 1 6amp 12v power supply.
- A few DC jacks.
- various colors and lengths of wires.
- 1 SmartThings Hub set up and installed.
Step 2: Connecting Everything.


Obviously I did this in stages of testing but here were are going to do the whole thing all together.
First take your Arduino uno and mount it to some kind of board or case that leaves the top plugs open for shields.
Next I mounted the SmartThings Shield to the Arduino and the Seeed Studio Relay Shield to the SmartThings Shield. Again the relay shield is optional but it makes it to where constant power is not supplied to the LED strips.
The SmartThings Shield by default uses pins 2 and 3 as well as Pin 13 (For LED) of the arduino and the Relay Shield uses Pins 4-7 for the relay control which works out pretty well.
After that I made a few DC jacks for our power supply and set them to the side. This was pretty simple, to power the arduino we need to use some 2.1mm dc barrel jacks with center pin positive. Take a look at the schematic picture of the DC Jacks for details. The schematic is representative because I could not find a fritzing part for a relay shield or the SmartThings Shield so I just dropped in some individual relays to kind of show how things go.
Now I connected the all of the LED strips which according to the Specs require 12v 1 amp each. This is why we chose the 12v 6 amp power supply. I could have opted to connect all of the LED strips together in a line but I wanted to put each of the strips on a sepparate pin so that they can be controlled separately later. Right now we are still controlling them all together. But this leaves some room for modifications later. I connected the green wires of the LED Strip to pins 10,11,and 12. Then then conntected each of the black grounds. After that I connected the red wire to the "Normally Open" side of a relay respectively, Relay 1,2,3 leaving the fourth open for later use.
Now that we have done that we can connect our DC Jack Pigtail to the relays and to the arduino. But nothing will work yet, we need to start doing some code and connections to smartthings.
Step 3: Download Libraries and Examples.
We need to download two libraries for the Arduino for the SmartThings Shield and for the LED Strips.
For the SmartThings Shield go to http://docs.smartthings.com/en/latest/arduino/ to download and install the library, dont forget to download and install of their examples as well. Instructions are on the link provided
For the LED strip RadioShack did have a library but in all honesty it isnt the greatest. So we went and got the Pololu LED strip library. Remember the RadioShack LED strips are three pin so we need to go pick up that Library and examples https://github.com/pololu/pololu-led-strip-arduino . Again instructions are on the link provided.
Another helpful program for the SmartThings side of things is Notepad++. With some modifications you can make the syntax highlighting work for the .groovy file we need to create for SmartThings. Or you can just use the SmartThings website which does the highlighting as well. To make it work with .groovy do a google search for ".groovy and notepad++"
Step 4: The Arduino Sketches and Groovy SmartThings.


Now we need to start connecting this thing to SmartThings. In order to do that we first need to upload a basic sketch to the arduino for the smartthings shield. Open up your arduino IDE and select the SmartThings on/off shield. Connect your arduino to the PC using the required USB cable.
We don't need to change anything just yet. Lets just upload the sketch that is there for now. Once the sketch is uploaded open up your smartthings app on your phone or tablet and add a new "thing". You can let it search for the device or you can go through the menu to find the STAnything Shield.
After it ads the device it wont really have any functionality but that is ok we will fix that shortly.
Now we need to go into the SmartThings web interface in order to create a device handler and change our Arduino device type to an on OFF Shield. Below are the steps but they are also displayed in the video in this step. The video goes through a few examples before the following steps.
- Log into graph.api.smartthings.com
- Now we need to create a new device type handler
- Go to the button that says "Device Handlers"
- Click on New Device Handler.
- In our case we want to click on the "From Code"
- Copy and Paste The "LEDStrip.groovy" file contents into the text box"
- Click Create
- Click Save
- Click "Publish" Then "For Me"
- Now we need to change the Arduino Device Type
- Click on "My Devices"
- Find your Arduino and click on it
- Click on Edit in the lower left corner
- Under the device type change to "GunGeek - LED Strip"
- Click on save
- Now we need to update the Arduino Code
- Download the attached "stLEDStrip-RelayShield.ino"
- Open it up in your Arduino IDE
- Upload it to your Arduino
- Open the SmartThings app on your phone or tablet
- Open The newly added device
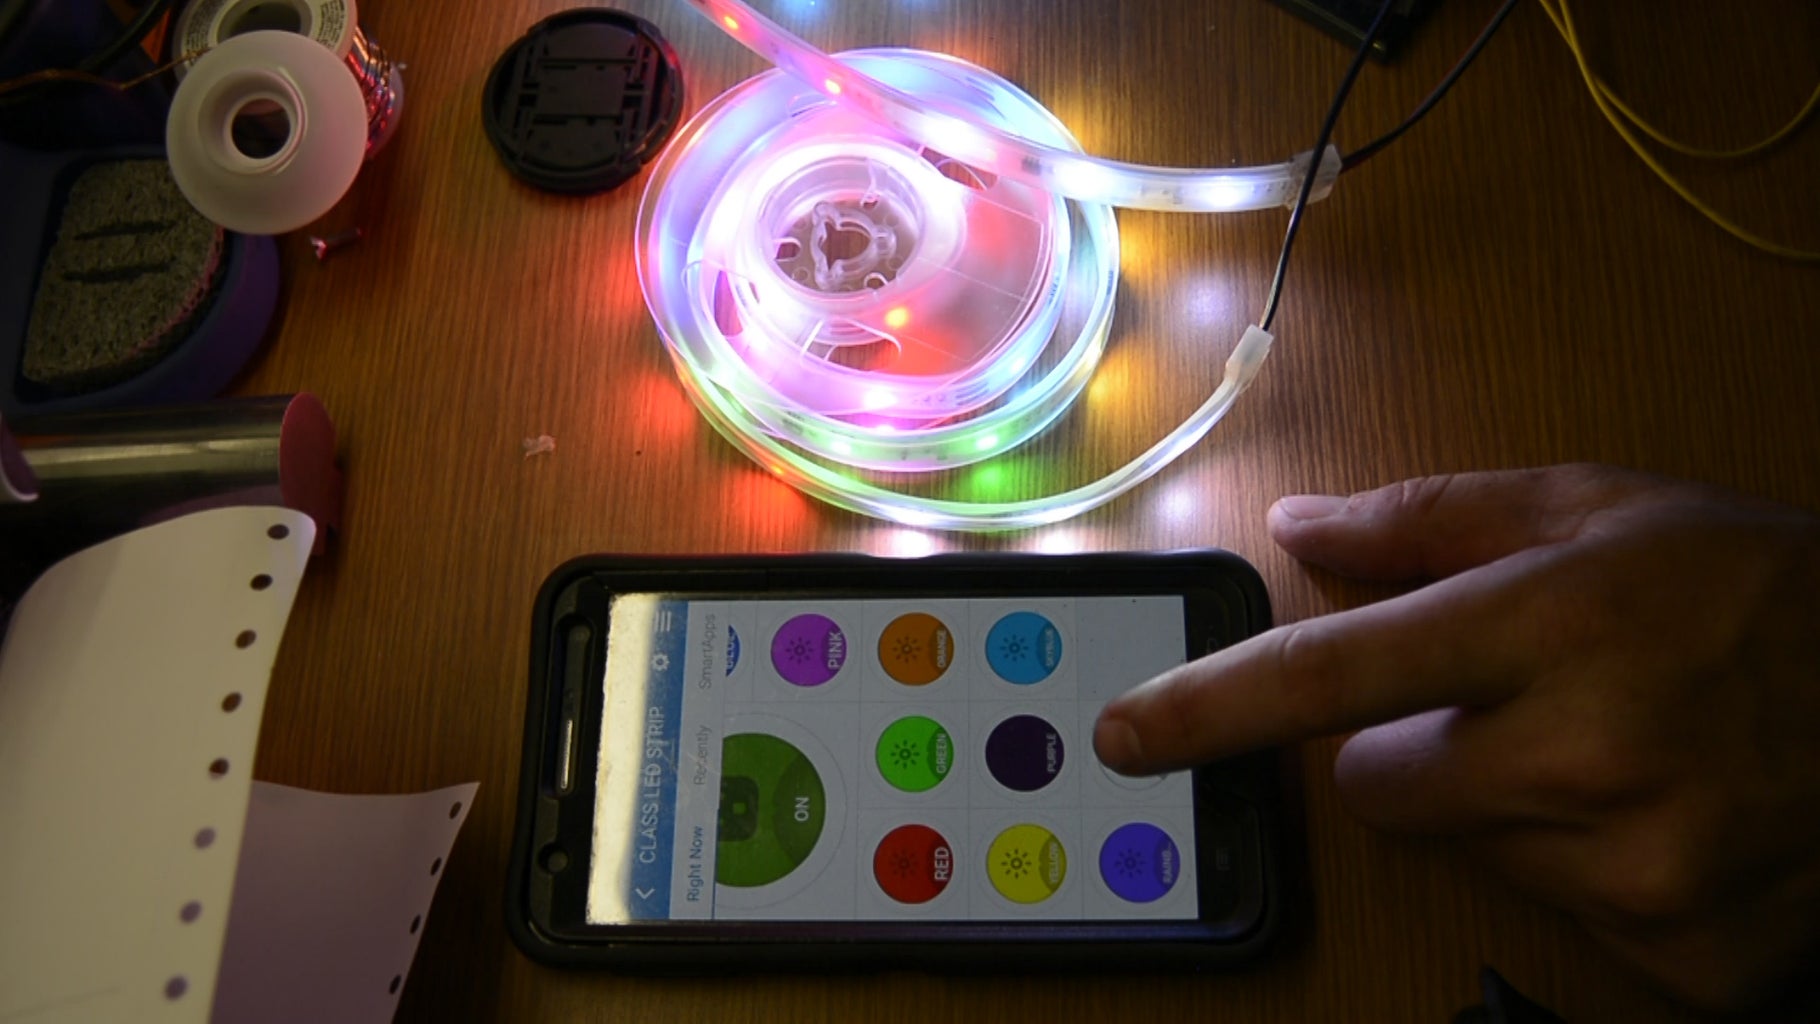
- You will see all of the colors and options.
From this point you should be able to fully control the LED Strips from the SmartThings App.

Step 5: Thank You.
Thanks for taking time to look at my instructable. This one would have been a lot longer with installation into a shelf system but my plans changed at the end of the project. I will be doing another project based on this one with a bunch of differences so keep an eye out for that.

Participated in the
IoT Builders Contest

Participated in the
Epilog Contest 8

Participated in the
Circuits Contest 2016

Participated in the
Make it Glow Contest 2016


