

Introduction: Arm Mbed Microcontroller Basics


Whilst visiting a Brsitol Pi fair, i picked up an Arm microcontroller board for free(normally cost £30+). There were two boards being given away, both of which were the new at the time LPC1768 model. I got it because at the time i had been looking for a board to perform heating automation through the web and this looked like the board to do so.
The Mbed is asimilar form factor and design to the arduino mini and micro, except i see it as far superior.
Its features include:
High performance ARM® Cortex™-M3 Core
96MHz, 32KB RAM, 512KB FLASH
Ethernet, USB Host/Device, 2xSPI, 2xI2C, 3xUART, CAN, 6xPWM, 6xADC, GPIO
Prototyping form-factor
40-pin 0.1" pitch DIP package, 54x26mm
5V USB or 4.5-9V supply
Built-in USB drag 'n' drop FLASH programmer
(I am not advertising on behalf of ARM, i simply believe that there should be an instructable on this)
Step 1: Pinouts and Design

As i mentioned previously this bears a resemblance to arduino products, dont be fooled it is different in many ways.
For example it runs of an Arm cortex processor, rather than an atmel Mega series chip.
The board itself has a total of 40 pins (downfacing headers), 4 Leds (blue), a reset button and a usb mini connector.
When you buy it you get a sturdy cardboard box, containing:
A mini usb cable
A hard plastic pinout diagram (like credit card)
A paper pinout diagram
A quickstart guide
A Sticker (blue)
And of course the Mbed
The design is intended to be put into a breadboard and run like that, although i have been tempted to solder some female headers on the top instead of the downfacing ones.
Distancing it further from the arduino is some handy built in features, that would on an arduino, be added via a shield (excluding the new arduino yun)
These include:
USB host functionality
Ethernet
I2C
3 sets of serial pins
SPI
CAN
and the ability to run off of a voltage anywhere between 4.5 and 9 volts.
Step 2: Setting Up


I found this board slightly easier to set up than my arduino, purely because i had issues with my com ports with my arduino.
To set up you will need:
Mbed
Computer
Internet connection
Mini usb lead
Web browser
1.
Plug your mbed into your computer, it should appear as a usb storage device.
2.
Navigate to your mbed using your prefered file manager.(pic1)
3.
open up your mbed and you will see one file named 'MBED.HTM', open this file.(pic2)
4.
This will then take you to the mbed website, where you will be prompted to set up an account.(pic3)
5.
Once you are signed in, click on compiler in the top right hand corner of your screen.(pic4)
6. You are now in the web IDE (pic5)
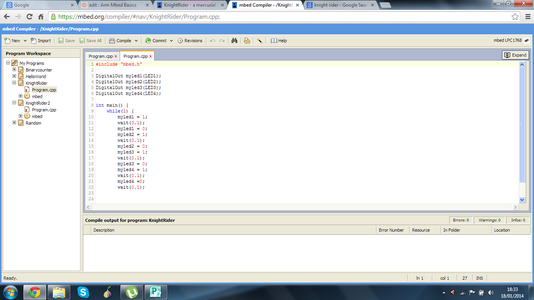
Step 3: The Compiler and Hello World.
The Compiler is laid out in a fairly basic web IDE.
The commands are very similar to arduino so it should not be hard to pick up.
There is one program already loaded in called 'Hello World', this makes use of one onboard Led and flashes it on and off, at first i played with the values for the dealy but then i decided to write my first proper program.
The program utilises the LEDs to display the a light chaser, similar to that of the tv show knight rider.
The program code can be imported to your compiler from here and V2 from here.
Step 4: Uploading to Your Board
The uploading to the Mbed is one of my only dislikes about the whole system and software.
Once you have finished your program/code, click the compile button in the center of the compiler window.
this will error check your code, compile it and then download it.
It is useful to set your browser to ask where to save things, when using the mbed as it allows for easier use.
I like to download my programs under the name 'program' directly to my mbed, by doing this it will ask me to overwrite the old program, which saves me having to delete it prior to uploading. (make sure that you dont have two sets of code on at once as the mbed can get confused)
Once downloaded to your mbed hit the nice reset button on your mbed and your new code will run.
Step 5: Resources

The Mbed website isa gold mine of information.
The cookbook and handbook include settup tutorials for things such as ethernet as well as command reference.
The questions section of the homepage is the forum where you can ask the community a question to see if anyone has an answer or a solution. Make sure to search your problem first so that there are no recurring threads.
Step 6: Feedback
Please give me feedback on my instructables as i am new, good and bad is welcome.
Feel free to inbox me if you have any specific questions, or if you think others may benefit leave them as a comment.

Participated in the
123D Circuits Contest


