

Introduction: Articulated Wing Framework


I wanted a very lightweight wing that would not tire me if I wore it all night. I chose balsa wood over aluminum tubing because it's easier to work with given the tools I have available. The basic structure could be made out of almost any stiff material, however. (My prototypes were made from popsicle sticks and foam core.) Each wing is a simple set of linkages arranged to expand and rise when opened.
Step 1: Tools & Materials


(A) 1 aluminum frame backpack
(B) 3 pc of 36" x 4" x 1/4" balsa wood
(C) 1 pc (60" length) of 1/4" wood dowel
(D) about a foot of "hanger strap" - a thin strip of metal with holes in it, mine came coiled up in a packet (found in the plumbing section)
(E) 4 nut/bolt sets, bolts of a diameter to fit through the holes in the hanger strap, and as short as you can find (they are used to fasten the hanger strap tight around the wing supports)
(F) 8 shaft collars with inside diameter 1/4"
(G) 6 pc 3/4" machine screws that fit the threadings in the dowel collars (F)
(H) 2 pc 1/2" machine screws that fit the threadings in the dowel collars (F)
(J) 4 pc 1/2" binding posts for the balsa/balsa hinges
(K) 2 pc 3/8" binding posts for the balsa/hanger strap hinges
(L) 10 pc 1/4" long nylon spacers, that the binding post (J) fit through
(M) 6 pc 1/4" long nylon spacers that the machine screws (G) will fit through (and turn; these will be some of the wing hinges)
(N) 4 nylon washers, 1/16" thick, that fit around the binding posts (J)
(P) a number of small nylon washers, 1/16" and 1/32" thick, that fit around the machine screws (G) 1
(R) 2 nylon flanges (I am not entirely sure this is the right term) to fit into the aluminum tubing of the backpack
(S) scrap leather
(T) couple inches of velcro
1 these washers are to pad the hinges created by the collars & the machine screws, so the thicknesses are determined by the actual dimensions of the hinge assemblies. I used, I think, 8 of the thicker ones and 6 of the thinner ones, but I suggest buying these later once you're ready to assemble the hinges and can take the wing parts into the hardware store and measure, or just get a bunch and use them as needed (they cost me something like 6 cents each).
Tools:
- x-acto knife
- Dremel or power drill with a cutting wheel attachment & a 1/4" metal drill bit
- tin snips (you can use the cutting wheel if you don't have tin snips)
- 2 pair needle nose pliers
- wood glue
- hot glue gun
- screw drivers appropriate for your bolts and screws
- sandpaper or fine file (I use fingernail files)
- sewing machine or needle & thread
Step 2: Prep the Backpack


Remove the pack from the frame and the inner frame from the pack. Toss the pack on your scrap heap, you don't need it for the wings. You do need the U-shaped aluminum tube that forms the pack's inner frame.
Cut the top of the backpack frame off just above the highest crossbar. I used my Dremel for this and it took about 15 minutes to cut both sides. I then sanded the raw edges smooth. These will form part of the hinges that let the wings flap.
Next cut the inner frame in half using the drill cutting wheel or metal snips or whatever seems best - the cut edge won't show so it can be messy. Bend the pieces further at the existing right-angle bends, until each is a long thin U shape and the long bits are parallel. When you're done, the cut end should fit through the nylon cap (R) into the cut edge of the main frame. These pieces will form the verticals that the wings attach to - the shoulder joint, as it were.
Step 3: Cut the Balsa Pieces


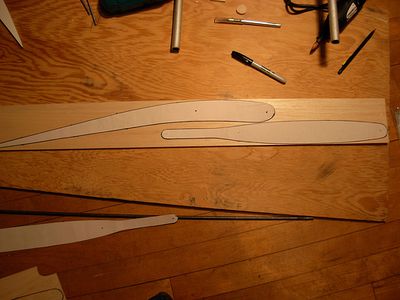


Since there are so many parts, I have labeled the first picture with how I'll refer to the bits throughout. The hardware is labeled in the Tools & Materials step.
On a large piece of paper, draw three 'bone' shapes X, Y, Z. The important dimensions are the lengths from the middles of the hinge holes. I put masking tape over the back of the paper before I cut out the patterns; this made them much easier to trace onto the balsa.
bone X:
top hole to middle hole: 12-3/8 inches
middle hole to bottom hole: 6 inches
bone Y:
top hole to middle hole: 18-3/8 inches
middle hole to bottom hole: 6 inches
bone Z: top hole to bottom hole: 6 inches
and it should be about as long, overall, as bone Y
Trace the patterns onto the balsa, two of each. You should be able to fit 2 pieces per balsa sheet if your bones are shaped like mine (or smaller). Using the Xacto knife, cut the pieces out (a very small, fine saw would probably also work but my jigsaw just tore up my test sample). A good technique for this is to trace the lines several times, cutting deeper each time. Ripcuts are very easy; crosscuts are slightly harder as the balsa tries to compress. Cut only a little deeper each time. Don't worry too much about accuracy, once the shapes are cut out in general it's easy to carve the edges down as if you were whittling.
Lay each pair of identical pieces out with the pattern on top and line them up well. Drill pilot holes where you marked the hinges.
Step 4: Hinge Prep


There are 2 kinds of hinges you'll be making, and depending on your hardware, you probably need different size holes for them. For the balsa/balsa hinges, you'll be using the nylon spacers (L), and for the balsa/dowel hinges, you'll be using nylon spacers (M). You'll glue the spacers into the balsa pieces, for strength at the stress points.
The balsa/balsa hinges are those at the tops of each of the bone segments, and the middle holes on the two bones X and Y (see the pic on the previous step). These take the spacers (L). All the lower holes on all 3 pieces are balsa/dowel hinges, and these take the spacers (M).
If you have drill bits corresponding to the outer diameter of the spacers, drill out these holes centered on the pilot holes. If you don't have drill bits, it's easy to carve them with the Xacto knife - just trace around one of the spacers, centered on the pilot hole, and gently slice along the lines. It's better if the holes are a tiny bit small than too big.
Using the wood glue, glue the spacers into the holes. This is a bit annoying because you want a tight fit, but a tight fit squishes the glue out. Do what you can. Let the glue dry thoroughly.
UPDATE: use epoxy, and spread it on thick! The wood glue turned out not to be strong enough, and several of these plastic sleeves popped out the first night I wore the wings out.
Step 5: Shoulder Hinges (upper and Lower)


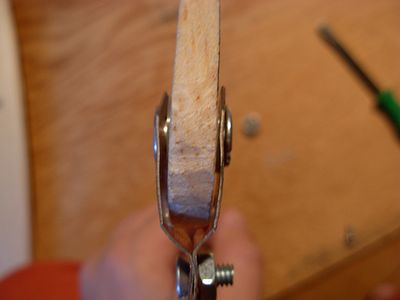


The shoulder hinges are made from the strapping bent around the pieces of the wing base tube (the pack's inner frame that you cut up in step 2). Cut an appropriate length of strapping for each hinge - for me it was 8 holes' worth for the upper and 6 for the lower hinge. I also had to drill out holes on some of the ends, as the holes were of 2 sizes and my screws did not fit through the smaller ones. Bend the pieces into the shapes as shown in the pictures. The upper hinge straps have extra bends so the balsa bone will fit between the sides when they are held together.
Fit the pieces of strapping over the wing base tube so that the centers are 9-3/4 inches apart. With the nuts & bolts (E), screw the straps tight around the tube.
Assemble the upper shoulder hinge using one balsa bone X, two nylon washers (N), and one short binding post (K). The binding post should go through the strap, one washer, the balsa bone, the other washer, and the other side of the strap. Then screw the second half of the binding post in until the hinge is closed. Verify that the bone rotates sufficiently, you may have to trim the edges down.
Cut the dowel into 4 pieces, 2 of 8-3/4 inches and two of 18-7/8. (Many of these photos show a metal dowel instead of a wooden one. The metal turned out to be too heavy for the balsa, which in retrospect was not a surprise. I had to swap them out but didn't bother to re-take all the pictures.)
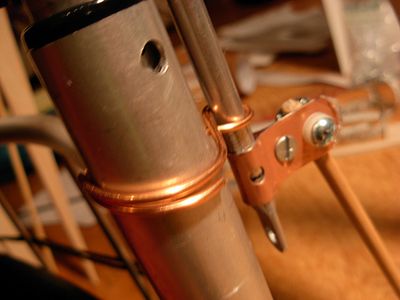
Assemble the lower shoulder hinge using one shaft collar (F), one 1/2" machine screw (H), one of the 8-3/4 inch dowel sections, and as many nylon washers (N) as needed. Fit the dowel section through the shaft collar (take out the tiny screw that comes with it). Put the screw through the lower strap (both pieces) from the front of the wing towards the back, and screw it into the shaft collar thread until the dowel is held in place. If there is extra space along the length of the screw, add some of the small nylon washers (P).
Step 6: More Hinges


Now you have two of the seven hinges complete. The rest of the hinges are of two types, balsa-to-balsa and balsa-to-dowel. Both kinds of hinges are easy to assemble, but you need to get the bones in the right order. Assuming the wings are lying with the front down and the back up, put them together like a sandwich, bottom to top, as follows:
balsa/balsa hinge 1:
- binding post shaft piece
- bone Y middle hole
- nylon washer
- bone X middle hole
- binding post screw
balsa/balsa hinge 2:
- binding post shaft piece
- bone Y upper hole
- nylon washer
- bone Z upper hole
- binding post screw
balsa/dowel hinge 1:
- machine screw
- bone Y lower hole
- shaft collar (put the remaining end of the lower shoulder dowel in it)
balsa/dowel hinge 2:
- machine screw
- bone X lower hole
- shaft collar (put one end of one of the 18" dowels through it)
balsa/dowel hinge 3:
- machine screw
- bone Z lower hole
- shaft collar with the other end of the 18" dowel
For the balsa/dowel hinges you may need to add some of the small nylon washers. Use your judgment.
UPDATE: for the balsa/balsa hinges, once you are satisfied with the wings, glue the screws into the binding posts. Otherwise they will unscrew as the wings move, and fall out. I was lucky not to lose any pieces the first time this happened, and after that I checked often to make sure they were screwed in enough until I had time to glue them.
Step 7: The Leather Bits


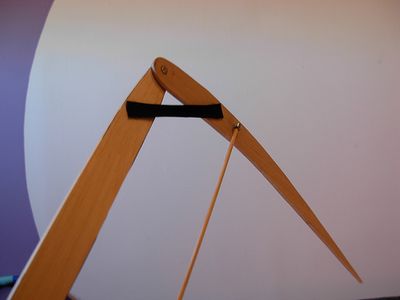


First leather bit: a strap to keep the wings from opening too far and collapsing. Cut 2 pieces of leather (or similar material) about 6 inches long and an inch wide. Lay each wing out with the dowels up, and open them as far as you want them to go. Using hot glue, attach one end of the leather strip to the bones Y and Z near balsa/balsa hinge 2. You might be tempted to use staples, but don't - the balsa is too soft to hold them, they just pull right out.
Er, if you want to paint the bones, a good time for this is before you glue the leather strap down. I didn't do this and had to paint them with the straps in place, which was annoying.
Second leather bit: a strap that attaches to your arms to make the wings extend! Make the armband by cutting some leather that goes mostly around your arm, and some velcro to make up the difference (with some overlap of course). Sew these together as in the picture.
Then cut a piece of leather about 12 or 15 inches and stitch one end to the armband in the shape of a T. The other end will attach to the wings at balsa/dowel hinge 2, but wait to cut the hole for the screw until you can put the wings on to make sure the length is good.
Step 8: Finishing Details

Almost done! You are ready to insert the wing base tubes into the frame. Place the nylon flanges into the frame and hot glue them in place. Then just insert the wing base tubes through them. To keep the bottom of the wing base tube from flopping, wrap a piece of wire in a figure eight around both tubes loosely enough that it will turn.
You may find that when the wings fold up fully, the edge of bone X hits the sharp edge of the strap on the lower shoulder hinge. I simply laid a small amount of hot glue along the edge of the hinge so it would not cut into the bone.
That's it. Decorate as desired. Fly and be free!
Participated in the
The Instructables Book Contest


