

Introduction: Asymmetrical Dress From Upcycled Tees


The little asymmetrical tops and dresses are all the rage for little girls right now. We've seen them everywhere and my daughter's been begging for one. That and a maxi dress, but that's another post for another time. We ended up with an abundance of white tee shirts, there was this end of season sale at the W and I picked up several of them for a dollar each, knowing I'd be embellishing them because there's no way the princess is wearing a plain, boring, white tee!! :) So I grabbed one and an old tee of mine that had become a little dingy, some lace that has been sitting in my stash for three years, some dye and set out to make a fabulous, trendy but age-appropriate, asymmetrical sundress!
You'll need:
2 tee shirts: I used one that fits my daughter, and an old one of mine (it was a large and not a fitted tee.)
Lace trim, that's optional on your part.
1/4" elastic, one inch shorter than the measurement that will follow the neckline (under one arm, across the chest and around the neck.) Goodness, does that even make sense??
1/4" elastic for the shoulder strap (ours was 6" long)
Step 1: Cutting Up!

Lay out the child's tee making sure it is flat and the side seams line up. Then cut from the neckline on one side, across the shirt to just under the arm on the other side see the shaky, photoshopped line on the picture below. ;)
Step 2: Still Cutting Up the Tees

Cut off the sleeve, just at the seam and cut off the bottom of the shirt about 2 inches below the waistline. (In the picture, I'd only cut the shirt at just above the hem and it ended up being too long, I had to go back and shorten it after I'd attached the skirt. Lesson learned; do not try and "eyeball" length when your daughter is at preschool!!!) At the exposed arm, fold the fabric under just about 1/4" with a narrow, zig-zag stitch. This finishes the arm and keeps the fabric from stretching out.
Step 3: Making the Skirt

To make the skirt, measure from just below your child's waist, where we cut off the top, to the desired length, add an inch for seams. Take the second tee and measure from the bottom going up and cut it. You're measuring from the bottom because then you don't have to hem the dress, its already done. :) Gather the top of the skirt to match the bottom of the bodice.
Step 4: Attach the Bodice to the Skirt

Now you'll sew the skirt to the bodice. I chose to do it backwards. Normally the seam is on the inside, but I wanted it exposed, to add a little ruffle to the waist. To do this, turn the bodice inside-out and place it inside the skirt so the wrong sides are together and the bottom of the bodice lines up with the top of the skirt and sew in your seam. Be sure to lineup your side seams! My picture for this turned out blurry, I'm sorry!!! (I need to quit taking pictures without my reading glasses!!!) I do have a picture after I sewed the two together. I did a double seam, because I wasn't putting in a top stitch and I wanted to make sure it was secure. The seams are right over my gathering stitch seams, so I eliminated that step of removing them!! :)
Step 5: Finishing the Neckline

Fold the edges of the neckline over towards the outside of the dress about 1/2 an inch. This will form the channel for the elastic to fit through. Pin into place.
Onto the ruffles! Cut strips of fabric from the leftover adult tee ( I cut them 3" wide) and stretch them out gently and ruffle them up using your favourite method. Then pin it to the neckline, using the pins already in the neckline. Be sure you are pinning where the folded over edge meets the tee, not at the fold. Otherwise you won't have a channel for your elastic!! I also pinned in the lace at this point, you can do several tee shirt ruffles or just one. Totally up to you. Once everything is pinned into place, I sewed them down with a narrow zig-zag stitch leaving an opening to insert the elastic. Insert the elastic and close off the stitch.
Step 6: Tie Dye!

At this point you'll dye the dress (if you made it from white tees and you don't want a white dress.) If you're happy with the colour of your dress, skip this step. :)
Step 7: The Strap

For the strap (if you want one, it isn't necessary to hold up the dress) cut two pieces of fabric, 1 1/2" wide by 10" long. With the wrong sides together I sewed a seam about 1/4" from each edge, I wanted the edges exposed, just like the waist. I inserted the elastic and sewed it secure at each end.
Then sew each end to the inside of the neckline. Make sure you don't sew over your elastic!
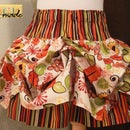
Step 8: Ta-Daaa!!


Enjoy your new dress!

Participated in the
Fashion Contest


