

Introduction: Autodesk Tinkercad Simulation of Arduino UNO Ping Pong Game V2.0:

More by the author:


About: I'm a B.E.Mechatronics Engineering Student. I love to make things with microcontroller development boards and single board computers.
Hello guys, in this instructable you are gonna learn how to simulate ping pong on Autodesk Tikercad website using Arduino UNO development board. Click on this YouTube link to view the simulation video.
Step 1: Requirements:
- A computer or a laptop with a good internet connection.
- Internet browser (I used Google Chrome).
- Autodesk Tinkercad account.
Step 2: Components Placement:


- Open your browser.
- Enter the Autodesk Tinkercad website.
- Login to your Autodesk Tinkercad account.
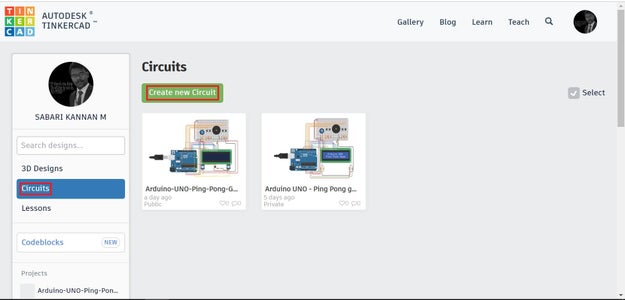
- On the left of the website, you can find a circuit button, click on it and then click on create new circuit to create a new circuit.
- You'll be taken to the next page where you have to make the circuit connections and program the game.
- On the left top near the Autodesk Tinkercad logo, you can enter a new name for the project.
- Now on the right side of the webpage under the components tab, drag and drop the following components.
- 1 x Arduino UNO board.
- 2 x NeoPixel LEDs.
- 1 x piezoelectric crystal.
- 6 x resistors.
- 5 x pushbuttons.
- 1 x potentiometer.
- 1 x LCD display 16x2.
- 1 x breadboard.
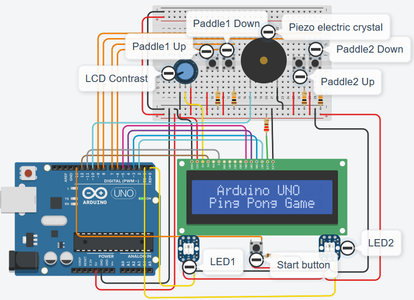
- Make the circuit connection as per the following circuit diagram.
Step 3: Circuit Diagrams and Connections:


Arduino UNO Connections:
- Arduino UNO 0 -> NeoPixel LED1 in
- Arduino UNO 1 -> NeoPixel LED2 in
- Arduino UNO 2 -> LCD DB 7
- Arduino UNO 3 -> LCD DB 6
- Arduino UNO 4 -> LCD DB 5
- Arduino UNO 5 -> LCD DB 4
- Arduino UNO 6 -> Paddle1 Up pushbutton terminal 2 and 10KΩ pulldown resistor
- Arduino UNO 7 -> Paddle1 Down pushbutton terminal 2 and 10KΩ pulldown resistor
- Arduino UNO 8 -> Paddle2 Up pushbutton terminal 2 and 10KΩ pulldown resistor
- Arduino UNO 9 -> Paddle2 Down pushbutton terminal 2 and 10KΩ pulldown resistor
- Arduino UNO 10 -> piezoelectric crystal positive.
- Arduino UNO 11 -> LCD Enable
- Arduino UNO 12 -> LCD Register select
- Arduino UNO 13 -> Start pushbutton terminal 2 and 10KΩ pulldown resistor
- Arduino UNO 5v -> LCD VCC, potentiometer terminal 2, NeoPixel LED1 + and NeoPixel LED2 +
- Arduino UNO GND -> LCD GND, potentiometer terminal 1, NeoPixel LED1 G and NeoPixel LED2 G
LCD connections:
- Contrast -> potentiometer wiper
- LCD LED Cathode -> 220Ω pullup resistor
- LCD LED Anode -> Arduino UNO GND
Pushbuttons:
- Connect all pushbutton's terminal 1 to Arduino UNO 5v.
Step 4: Coding:


- Now you have to code the Arduino UNO board.
- One the top right of the website, we can see a code button, click on it.
- Select text under the drop-down box.
- Now copy and paste the code in the text box from any one of the following links.
- At this time we have completed the connections and coding part and the project is ready to simulate.
Step 5: Simulation:
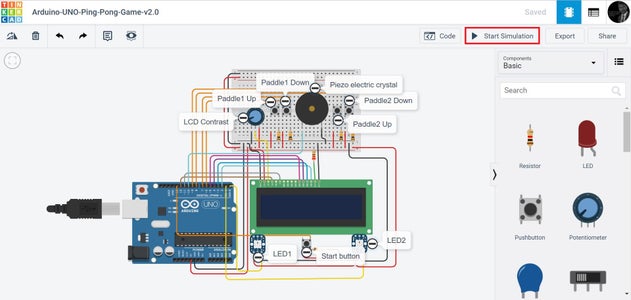
- To start the simulation, click on the simulation button on the top right of the website.
- Adjust the potentiometer until you get a clear view of the game on the LCD display.
- Use the start button to start the game and paddle1 UP, paddle 2 Down, paddle2 Up and paddle2 Down pushbuttons to control the paddle1 and paddle2.
- Simulation video link.
Enjoy the Arduino UNO Ping Pong Game!

Participated in the
Epilog X Contest


