

Introduction: Autonomous Arduino Car With Infrared Proximity Sensor

This Instructable shows how to modify an preloved RC car so it can be controlled by an Arduino. Then the Instructable will show you how to make the RC run a simple figure 8 code from there the Instructable will show you how to add a Infrared Proximity Sensor so it can interact with its environment.
Materials used in this Build
- RC Car
- Arduino
- Infrared Proximity Sensor - Sharp GP2Y0A21YK
- 9 Volt Battery with Cable
- Rainbow Cable
- 4 Pins
- Small amount of Heat Shrink
- 5x 10k Resistors
- Small amount of Solder
Tools used in this Build
- Soldiering Iron
- Wire Cutters
- A range of Screw Drivers
- Glue Gun
Step 1: Collect RC Car and Disassemble
You have to first take the car apart. First you need to clip off the antenna using a strong pair of cutters. Secondly you need to remove the screws that hold the body on the chassis. With the Body of the RC Car separate from the chassis and the antenna detached you are ready for the next step.
Step 2: Circuit Board (Remove Controller Chip)


Firstly you need to detach the printed circuit board (PCB) to the chassis. Secondly you need to use a small wire cutters, carefully clip each lead on the controller chip detaching the controller chip from the (PCB) and discarding it the controller chip. (Be careful not to damage the (PCB) while detaching the controller chip)
Step 3: Rainbow Cable Setup (Connecting Forward,Reverse,Right and Left)


Firstly Secondly flip the (PCB) back over and find which pins control the forward,reverse,left and right by creating a piece of rainbow wire with a 10k resistor and then attaching the wire end to the positive in then testing by placing the pin end in the holes of the left by the controller chip and figuring out which wires control left,right,forward and reverse. then use a solder sucker and unsolder and clean out the holes for pins the forward,reverse,left and right. Be careful not to use too much heat to avoid damaging the PCB. Create a 4 rainbow wire setup, firstly: Solder a 10K resistors to a 4 different rainbow wires with a total of four of these resistor/wire setups. After soldering slip a piece of Heat shrink over the end of the rainbow wire and shrink using a heat shrinker. Then Soldier the four wire rainbow cable setup to the left,right,forward and reverse and marking which one is which. Finally you must create a wire that will act as the ground wire that attaches to the ground on the PCB.
Step 4: Connecting Arduino

Firstly using hot glue, attach the Arduino to the roof of the car. Strip the ends of the wires and plug them in to the Arduino pins 9 right, 10 left, 11 reverse and 12 forward. Also hot glue a 9V battery and plug it into the Arduino.Next connect the ground wire into the GND pin on the Arduino. Then connect your Arduino to your computer and open the program Arduino and from there on the internet and copy and paste the Figure 8 Code and load the code onto your Arduino.(https://www.instructables.com/files/orig/F7E/B04X/GATU1TC5/F7EB04XGATU1TC5.pdf)
Step 5: Figure 8 Code (Testing)
Testing the Car
Firstly put the required batteries in your car. Secondly make sure the car is turned OFF. Thirdly connect the 9V battery to the Arduino. Fourthly make sure or upload the figure 8 code to your Arduino and then disconnect the programming cable. Lastly turn the car on and it should start running immediately.
Here is a video of my car running the figure 8 program.
Attachments

Step 6: Attaching Senors - Wiring and Coding
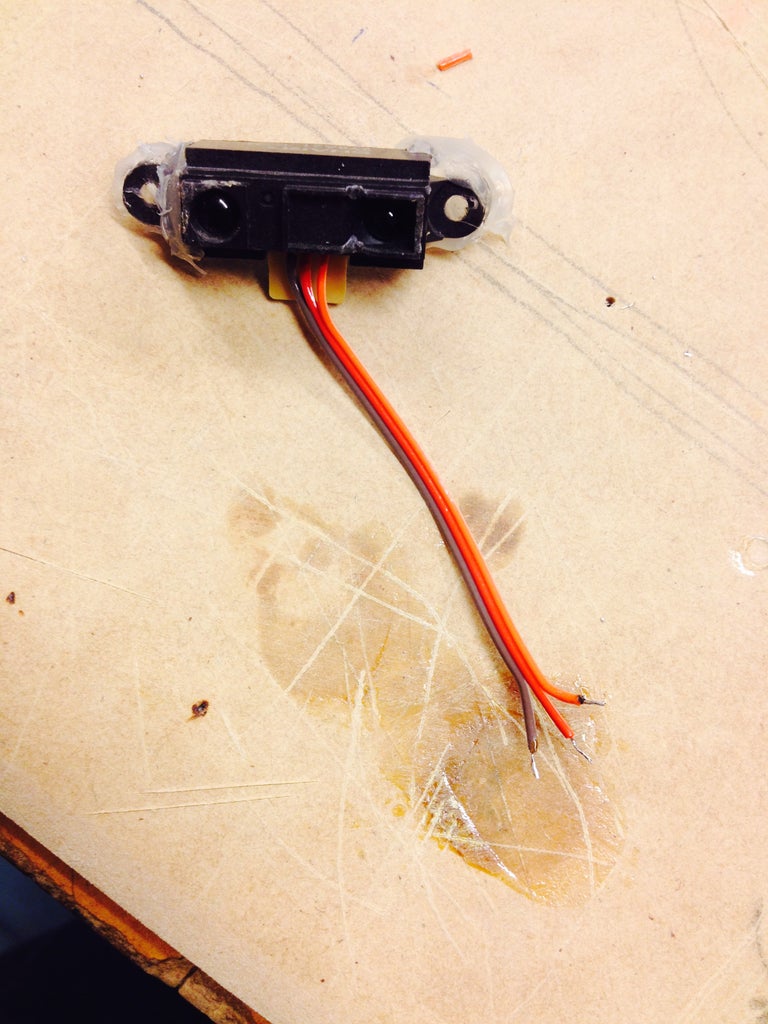
Firstly get the Infrared Proximity Sensor - Sharp GP2Y0A21YK and prepare three rainbow cable wires and solder them to the circuit board of the the Sensor. These three rainbow cables are 5volt, Ground and analog 1 mark which wires are which. Then attach the three rainbow wires to your Arduino, the 5volt wire into the 5 volt on the Arduino then the ground wire into the Ground the the Arduino then finally the Analog 1 into Analog one on the Arduino. Then attach the Sensor on to your car using some super glue.
Step 7: Senor Coding (Testing)
Ok now with the sensor on board the Arduino we must get the code onboard the Arduino. Connect your Arduino and open up and the Arduino Program. Then upload the code that is linked on this step to your Arduino. Firstly put the required batteries in your car. Secondly make sure the car is turned OFF. Thirdly connect the 9V battery to the Arduino. Fourthly make sure or upload the Sensor Code (may21) code to your Arduino and then disconnect the programming cable. Lastly turn the car on and it should start running immediately and reverse when it sensors >100 and it will go forward otherwise.
Have fun you have completed the Instructable and should now have autonomous Arduino RC car with a infrared proximity sensor.


