

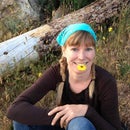
Introduction: B-Code Biological 3D Printer


Bees are the world's first 3D printers. They work in a material made from their own bodies, formed at body temperature, with a material that is safe to eat and is biodegradable and even recyclable.
I set out to create a 3D printing system that would allow me to generate collaborative sculptural objects that would use the best of nature's materials without harming the bees in the process.
Follow my progress as I explain how I developed B-code, the biopolymer, living printer.
Step 1: Additive and Subtractive Manufacturing


3D printing is what people call this process now, but Additive Manufacturing, as it is known in the engineering and prototyping industries where this technology was first conceived, has been around for more than 40 years.
The term "3D printing" simplifies the concept so that one can imagine a conventional printer, one that prints on a flat plane consisting of X and Y axis, then add to that a vertical, up and down motion, the Z axis, so that as the material prints, it adds layers one on top of the other, making it 3 dimensional. Simple as that.
Additive manufacturing is similar to how things are formed in nature, in that parts are built up rather than removed from a larger part as in more traditional, Subtractive Manufacturing techniques such as cutting, stamping, and chiseling. Think of heat, beat and treat as the methods of the industrial revolution, and you understand Subtractive Manufacturing.
The vast array of Additive Manufacturing systems are where it gets interesting. I'm not going to delve too deeply here for the sake of my readers, but know that there are print heads that deposit heated monofilament, printers that use lasers to direct heat and sinter powders into a solid form, extruders that deposit concrete and clay, and even systems that glue and cut reams of paper, sheet by sheet, to form their "prints".
Here at the Autodesk Pier 9 Workshops we have engineers, artists and designers working on all imaginable types of additive manufacturing systems.
Andreas Bastian is a former Artist in Residence at Pier 9 who joined a team to develop Autodesk's Ember system of printers, where the print plate is suspended in a liquid polymer and passes over uv lights that tell the polymer where to solidify.
Madeline Green is one of my fellow residents at the Artist in Residence program is working on 3D printing forms on people, live and on the spot, with huge robot arms that can "see" people and build around them.
Chei-Wei is working on a system that will allow people to print forms mid-air on the go, as a sort of 3D drawing system that lets people sketch forms in mid-air.
Luis Rodriguez has designed a 3D printer for printing food.
Alan and Clayton have developed a 3D printer that works in clay and concrete.
Step 2: Bees Are the World's First 3D Printers


The B-code Biopolymer Printer
I first became involved with Additive Manufacturing some ten years ago in the prototyping industry. At the time we called it "growing" a part, which is a great way to convey this concept, so similar to how nature builds its things. It was the idea of growing parts that became the basis for my development towards a biological 3D printer.
The 3D printer I have designed takes the principles of additive manufacturing and pushes the technology further, towards a more sustainable and ecologically friendly method of printing forms. B-code is revolutionary in that prints are made using a biopolymer that is fully edible, biodegradable, and completely sustainable, without dependency on petroleum, emitting no carbon, and producing no waste.
With the B-code printer, a biopolymer is extruded from a nozzle, in this case the bee's mouth, and is "drawn" in a long thread, one layer deposited atop another and air cured. The extruded biopolymer is made of beeswax, a long-chain alcohol plastic similar to ethylene, formed of esters of fatty acids secreted from the glands of young adult bees.
The chemical formula of beeswax is C15H31COOC30H6I, and contains over 300 individual chemical components, including palmitate, palmitoleate, oleate esters and of long chain aliphatic alcohols. This biopolymer is similar to other early thermoplastics used by humans before more toxic and persistent petroleum-based plastics came into use, including latex, shellac, gutta-percha, horn, and tortoiseshell. Bees print in hexagons with a 2mm deviation, those hexagons gradually deform into circles. The hexagon and circle shapes are no accident, but the result of millions of years of trial and error through evolution, those shapes being the most efficient and strongest use of any material due to its tensile strength and a reduced overall surface area. This allows honeycomb to hold more than 50 times its own weight in honey, pollen and bees.
Bees work using a simple logic similar to codes used in modern computing, including binary code, if-then statements, and go to statements. I call this set of instructions B-code.
The set of feedback signals that prompt bees to begin building comb include triggers such as a nectar flow, when the amount of available nectar exceeds the demand of the population, and that population begins to grow as a result of those extra resources. The first signal of a nectar flow is crowding, a binary yes or no output. A Yes output results in the next set of choices, and those are determined by a set of programs that are very deterministic and difficult to change. Distance to nearest comb, depth of cell and cell width are determined by algorithms generated by the dimensions of the bees themselves, a truly Vitruvian architecture. The space between combs equals the distance a bee can reach from where she is standing, known as Bee-space. Cell widths are determined by bees measuring with their forearms, and the depth of cells are determined by Queenlength, the length of the queen's abdomen.
Building comb is just one of many tasks performed by bees, who take on various tasks as guilds, these guilds malleable and determined by factors including age, resources available, and population.
Young bees whose job it is to form wax scales, consume copious amounts of honey to produce biopolymers from the long chain fatty acids of processed honey. Bee's wax glands are located under plates that form the ventral shield of a bee's abdominal exoskeleton, called sternites. Liquid wax is pushed out of these glands onto plates under the exoskeleton, and then stamped into scale shapes before air drying. These stamp plates are called mirrors.
Wax scales are clear and colorless, 3 mm across and 1 mm thick, and they become opaque after bees masticate the scales with their mandibles. Beeswax is workable at a temperature between 91 and 97 degrees Fahrenheit, and hives are generally kept at 92-93 degrees, particularly where brood are being raised. When bees need to make changes to the hive, they simply remasticate and reform old comb and generate new hive configurations as necessary.
Think about this: bees build their homes, nurseries, and factories from a biological plastic that is manufactured by their own bodies, using their own body temperature and body chemistry, with a material that is reusable and poses no demand on other ecological systems or resources. Honeycomb is nearly colorless when first formed, but over time it takes on more color with oxidation, bee life-cycle activity, and contact with pollen grains.
Step 3: Red Light Equals Go: Building the Lighting

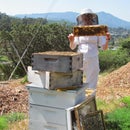
I wanted to document the comb-building process, so I built several prototypes which included a camera housed inside the hive cover.
Bees have a color spectrum as wide as humans, but their color range is between ultraviolet and orange, and they can't see far into the red spectrum. I wanted to document the comb-building process without disturbing the bees, so I chose to light it from within using red LED's in the 655 nm range.
Step 4: Early Prototypes


Early prototypes used cheap strip LEDs and used a clear acrylic box to contain the bees, plus a dark cover that housed the cameras and made the hive dark inside for the bees.
This system had many problems, the worst being that the lights were enough to heat up the hive. Since the hive must stay a constant 92-93 degrees, condensation began to build up and cause problems. Plus, the LEDs made a glare that was hard to eliminate. Finally, the focal length for the camera was too short to use anything but a gopro, and they proved a but problematic for what I wanted to achieve in terms of quality.
Step 5: Fun With Electricity


So I went back to the drawing board and redesigned the whole system using a better lighting setup. As a result, I developed the light tube, which lives in the center of the hive and allows documentation without the added heat, as the LEDs are located outside of the clear enclosure. The light is distributed evenly throughout the inner core, a material called "Endlighten".
The colors can vary according to the LED color, and for this project I chose a LED chip with both red and white LEDs. I also used a potentiometer to dim the lights, a 700mA buck so as not to blow them up, and an oversized heat sink to keep them cool. All were purchased from LuxeonStar online.
Step 6: Lighting the Comb


This light tube becomes part of the internal structure of the 3D print, and will glow white once the print is removed. A key feature here in addition to the color is that the heat from the lights will be vented outside the print space, so bees can go about their lives without needing to work hard to cool the place down.
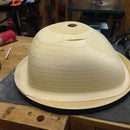
Step 7: Building the Base for the Printer


I wanted a base that was versatile, allowing for multiple forms and configurations for a more dynamic print platform. The base functions as a platform for the build, plus a landing strip, an enclosed entrance into the build bed, and a feeding station to supply honey to stimulate the wax building process.
I used cherry wood for this project, since it is a plant that it dependent of the pollination of honey bees for reproduction, and as a hardwood it can handle use as a printing platform. To cut the cherry I used a 400 watt laser cutter, and nested my parts so I could reduce waste. Then the gluing and sanding to laminate it and finish it.
Bees naturally prefer wood, and will coat the inner surfaces of the wood with propolis to seal it and to create a habitable biofilm that repels harmful funghi, viruses, and bacteria, and grows colonies of beneficial biota such as Lactobacillus.
To seal the outside of the wood base, I used a sealer made of mineral oil and beeswax.
Step 8: Create the Print Bed


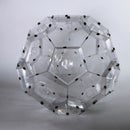
In this case the print bed is a shell that encloses the printer and confined to the bees to this space. The clear shell is made of petg, a somewhat slippery material that will discourage the bees to attach comb directly to the shell.
The petg was formed by heating in a vacuum former that drew the material down over a plug mold made of MDF and milled using a 5 axis CNC router. I developed a better milling technique in the process of milling the two molds for the shell, and wrote an Instructable for it, link here.
The shell has a few features I'd like to explain. A hive must maintain an equilibrium inside, roughly 92 degrees Fahrenheit, with a humidity between 50-60%. I've taken care of the temperature by having the shell in a temperature-controlled room, but as you can imagine, a plastic shell does not breath. To compensate for this I've vented the shell in several places with screened openings. I've started out with an abundance of vents, knowing that the bees will make their own adjustments to reduce ventilation as necessary with propolis, a plant-based resinous glue they collect for this purpose in the wild.
Step 9: Printing the Interfaces


Next, I designed special interfaces for the bees as they entered and exited the printer, which to them will be like a strange and yet familiar hive.
The printer will be housed in a storage room that vents to the outside world. A tube runs from the base of the printer to the outside, but this material poses a problem in that being water-tight, there isn't any ventilation. Bees release moisture when they exhale, similar to mammals though their organs for taking in oxygen are not lungs, nor do they breath through their mouths, but process air through four spiracles located along either side of their abdomens. Intense social activity takes place at a hive's entrance, where guard bees check each returning forager as she enters the hive, and as a result there is an increase in moisture released at this location.
I needed a solution to get a round tube into a flat opening at the base of the printer, and so I designed the interface to serve double-duty and ventilate air as well. A special gate can slide into the interface to keep bees in while I unplug the tubing and make adjustments, which allows me to work in the printer without getting stung.
Step 10: Harvesting the Print

A second set of interfaces allows for the gentle evacuation of the bees once the print has completed and is ready for harvesting. This interface is a one-way door, allowing bees to leave but not returning. Its a slow game of attrition, and as bees become hungry, they leave and can't come back. This ensures and honey and brood are completely removed before the print is harvested.
Bees will find that while they cannot return to their old home, a new one is within sensing distance. Bees will quickly give up and begin to use the new hive as their home. Once a sufficient number of bees have been evacuated from the 3D print, the print bed will be opened and the remaining bees will be manually reunited with their queen and brood in the new hive.


