

Introduction: Backdrop for a Parade Float


By Kalea Lockwood
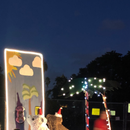
Hi my name is Kalea and I'm in 7th grade at High Tech Middle Media Arts. We made a float for the OB Christmas Parade. This part of the float was designed for the annual Ocean Beach (also known as OB) holiday parade. OB is a small community that comes together for the holidays and other fun events like the OB farmers market. For this parade, I was assigned into the backdrop committee. Myself and 3 other boys, Alex, Jaden and Leo wanted to represent OB and our non-profit (The Rescue Dog). The Rescue Dog is a company that saves dogs from high kill shelters. So, you can come and adopt one too. This is where we design the back of our float. We chose to make it a beachy theme to go along with OB. To put it all together it took about a week and a half. This project was super fun and easy but we did have are pitfalls.
This backdrop was made by the following materials:
- Rhino (A computer program)
- Wood Paint
- Christmas lights
- Butcher paper
- Nails and screws
- And a lot of drafts
Step 1: Sketch Your Idea Out on Butcher Paper

The first step of this project was to make a draft. It took a lot of tries but we finally figured one out, a final piece to share with you. This step was super easy and took a day or two. All we used was butcher and paint.
Step 2: Putting It on Wood

The second step was to find a piece of wood that was 7 feet by 5 feet. We couldn't find a piece of wood that big so it took a lot longer to put together. We managed to figure it out and to do that we took 2 pieces of wood. A long rectangle that was 6 by 1 feet. To make the exact measurements we had to add a small cube that was 1 by 1 at the end. We nailed them in using a few planks of extra wood. This step took longer than we expected because the planks kept falling out.
Once we got it all put together we spray painted the back so that it wouldn't show any of the stickers and messages that we on there. This part was the easiest because it didn't take much effort or time.
We flipped it over and painted the front side with a blue background. We added waves, a small island with a palm tree, clouds, sun and a big OB. This took most of the time because it was the main part.
Step 3: Finalize It!

For the last part to make the backdrop completed we added lights to make it glow. We also ended up adding the Rescue dog logo in the O to make it represent the Rescue The last step was super quick and easy because we used stick on ones and all we did was place them around the whole backdrop.
This project was super fun, easy and simple. If you would like you can add your own touch or follow are instructions:) Hope you have as much fun as we did!


