

Introduction: Basic 3D Carving With Fusion 360


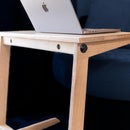

Hey guys! So a few weeks ago I posted on my Instagram on carving a 3D polymetric shape using my CNC. It was actually part of a proposal for a sponsored project, but I got a bunch of questions from people asking what software i used to design it and carve it. So I made a Youtube video getting into the details of everything from modeling in Fusion 360, to setting up the toolpaths in Fusion 360, my settings, the cutters I used, and how to finally carve this on my X-carve.
So for background, I'm a mechanical engineer and aerospace engineer. In school I've used Solidworks and AutoCAD extensively, and now I am a design engineer for an automotive company where I have been using CATIA for almost 10 years to design cars. Let me tell you, all CAD software operates the same way:
1) Two points create a line
2) A line can be extended into a surface/plane depending on the shape of the line and direction that it is swept in.
3) A surface becomes a 3D object once it is extruded.
Once you understand that this is how it works, those crazy buttons are just functions to help you obtain the final shape you want! The reason why I call this "basic" is because I really think it won't get easier than this! Ok so without further ado, let's get into it.
Materials
Total lumber used: (11"x6"x1") This is dependent on the model size you plan to make
Tools
1/4" Solid Carbide, Spektra™ Coated Downcut CNC Bit No. 46202-K: (https://amzn.to/39QZ7CX)
1/16" Solid Carbide Spektra™ Coated 3D Carving Ball Nose Bit No. 46282-K: (http://bit.ly/2WpaLCb)
Step 1: 3D Modeling in Fusion 360


1) Alright, so the first thing we want to do is fire up Fusion 360. Then make sure you are in the "Design" workbench and click on "Create Sketch". (Remember, a 3D shape starts with a sketch).
2) Since we'll be using a CNC to carve this, I like to envision my model laying flat in the design space, just like my workpiece would be on the CNC top. So I start my sketch by selecting the XY plane which takes us into the Sketch space.
3) First, we'll draw a rectangle, so pick that in the menu bar at the top and specify the size of the rectangle by either dragging the points or typing the values into the text box and click "Finish". You see now we have a rectangular surface.
4) Now that we're out of the sketch, select "Extrude" at the top menu so we can turn the rectangular surface into a rectangular cuboid.
5) Specify the thickness of the cuboid by either dragging on the arrow or typing in the value into the text box.
6) Now that we've got the 3D shape, it's time to make all those cool polymetric shapes on top! Start by creating another sketch, but instead of picking the XY plane, pick the top surface of the cuboid this time.
7) Select the "Line" option in the sketch menu and begin drawing random lines.
8) Click "finish" once you have a design you like.
9) On the top menu, click on "extrude" to begin extruding the individual polygons by either pulling up on the arrow or by typing in the value in the text box.
10) Next, adjust the draft angle of the extrusion by dragging the slider around the circle until the sides of the extruded polygon come to a point. Click "finish" to complete the operation.
11) After extruding the first polygon, the sketch may disappear. If that happens, go to the tree on the left and find the sketch that contains the polygon lines. Click on the eye to unhide the sketch.
12) Follow steps 9-11 for the rest of the polygons.
Step 2: Setting Up CAM in Fusion 360


With the model complete, it's time to set things up in CAM. To do this, navigate over to the Manufacture workbench. The first thing to do is to define the workpiece and the type of operation we'll be working with. Under the "Setup" menu, select "New Setup". Since we'll be using the CNC, select "Milling" under "Operation". Under the "Stock" tab, I chose to add 1 inch around the sides of the stock in order to have some extra material for clamping, as well as for calibrating the Z-axis later when I swap bits. Finally, back under the "Set Up" tab, I defined the origin of the cutter head by picking the lower-left corner on the top surface. This is just a personal preference. Feel free to define your origin wherever makes most sense to you.
Step 3: Define Cutting Operations (Roughing Step)


For the first cut, we'll use an "Adaptive Clearing" under the "3D" drop-down menu. The 3D Adaptive Clearing operation will efficiently allow our machine to clear out the bulk of the material. First, we'll define the tool for the operation. For me, I chose a 1/4" flat end mill (http://bit.ly/2WiFctH). I covered in the video how to find all the information you'll need for different cutter bits. Since nobody has the exact same bits, I won't cover that step in this Instructables.
Once you have the tool you want selected, I went over to the next tab, I defined the boundary for which I want the tool to cut within. Since I prefer to cut my workpiece to its final size at my table saw, I selected the outer edge of my piece to prevent the tool from cutting away the extra 1" material I added around the model. Then under this same tab, make sure the box next to "rest machining" is selected. Rest Machining is an operation telling the machine that this is one of multiple tool paths to get to the final shape. So the subsequent steps will only cut away what's left from the previous step. Since this is our first step, be sure to select the "From Stock" option in the drop down menu.
Finally, under the "Passes" tab we'll define the speed of the cutters. Since I'm running a hobby-level CNC, I like to keep the stepdown at 50% of the bit diameter, so in this case I set the stepdown to 0.125". While under this tab, make sure to select the "stock to leave" option. This will allow for some extra material for later operations.
Click "OK" and let the tool path generate!
Step 4: Define Cutting Operations (Finishing Step)


For the finishing pass, we'll use a "Parallel Pass" under the "3D" drop down menu. Since we'll be machining some tight corners where the polygons come together, I picked a 1/16" tapered ball nose bit (http://bit.ly/2WpaLCb). The smaller this diameter, the longer it will take to carve, but the result will speak for itself!
Under the tool setup, make sure to enable "Rest Machining" and select "From Previous Operations". This tells the machine to only clear away the material that was left from the previous step. Also, because the previous operation left stairstep shapes, be sure to change "Ignore Cusps" to "Use As Computed" under adjustments. Or else the machine will only clear away the bottom of the "valley" where the angle isn't 90-deg.
Under the "Passes" tab, change the "stepover" value. For a finishing pass, anything between 5%-9% is ideal, which will leave a surface that won't require any additional sanding. But the smaller this value is, the longer it will take to machine. For this project, I set it as 10% just to finish it quickly since this piece won't be used for anything other than this demonstration. Since this is the last operation, be sure to leave the "Stock to Leave" option unchecked.
Once again, click OK and let the tool paths generate!
Step 5: Post Process


Alright now that the tool paths have been set up, it's time to send all of this information over to the CNC. However, Fusion 360 cannot directly communicate with the CNC so we'll need to convert the directions to a language that the machine can understand, called "G-Code". To do this, right click on each tool path and select "Post Process" in the menu. Since I'll be using Easel to do the carving, I selected "Easel" under the "post processor" drop-down menu. Be sure to name the file something that is clear. For the roughing tool path, I saved it as "Rough", and for the finishing tool path I saved it as "Finish".
Once these files are saved, I opened up Easel and opened up a new project. Then I clicked on "Import G-Code" under the "File" dropdown menu to import the "Rough" .nc file. Then under that same project, I opened up a new "Workpiece" and imported the "Finish" .nc file.
All that's left to do is hook up the CNC machine and click "carve" to get started!
Step 6: Carve!


In the video you'll see me zeroing the Z axis using a probe. I did this first using the 1/4" flat end mill. By the time the roughing step is complete, you'll notice the "stairstep" shapes I referenced earlier. Also notice the 1" material left all around the workpiece. I forgot to film zeroing the 1/16" tapered ballnose bit, but you'll want to put the probe on the extra 1" material to zero out the Z axis. When Easel asks you about the XY zero point, just select "Use Previous". Then click "carve" and let the finishing pass run! This step will take a long time, but if you're curious how this step works, feel free to check out my video for a timelapse at 40x speed. The ballnose bit clearing up the stairsteps and revealing the final slopes of the polygons are mesmerizing to watch!
I hope you found value in this Instructables! I think the steps are quite basic for anyone who just wants to learn 3D carving or want to learn how to model in Fusion 360. Let me know if you have any questions! Thanks again for reading this and watching my video!

Second Prize in the
CNC Contest


