

Introduction: Basic Cigar Box Guitar Amp With Tripod Stand


This is the 2nd tripod guitar amp I have made. I will use a basic amp - but with a twist; using old and new parts.
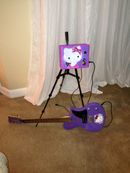
Step 1: Tripod Stand

Find a tripod stand, you can use a game system stand, camera stand, speaker stand, etc...
Step 2: Cigar Box

Look for a cigar box. I try it out first, will it hold all my parts? Will the speaker fit??
Step 3: Mount Your Tripod Stand to Your Cigar Box.


Un-screw the back of the tripod mount. Take the springs out & plastic pins that hold the stand onto the game system ( if you use a camera stand then look for a bolt/nut to hold it into place ). Mark the spot that you would like to mount the stand with a pencil ( you can erase the marks or light sand them off later ). Then drill out the holes - mark them with a screw setter. Drill out the plastic holder holes if you plan on using bigger screws to hold it into place...
Step 4: Continued - Mount Your Tripod Stand to Cigar Box.


I need this stand to hold the weight of the cigar box amp. Continue to mark all your holes & drill them out. I'm not taking off the plastic pins at the left or right side, so I need to drill out holes to hold them into place. Find some long screws ( 4 of them ) to hold the part into place. Then press down with your fingers. This will leave marks onto your cigar box on where to drill out your 4 holes for the plastic mounting pins. Then take off all stickers, and sand the plastic mount & the cigar box ( stay inside the holes for the screws ). Do not sand more than the top layer.
Step 5: Add Glue & Water.


Go ahead and erase all marks or light sand them off. Now mount the plastic plate to your cigar box. Use a glue that will bond to plastic and wood. Spread out the glue on one side and water onto the other side ( make sure not to use too much glue - It will leak over the sides and make a mess ). Use the screws to hold it Into place. And use a weight to help hold it tell the glue sets.
Step 6: Add Speaker Holes.


I don't want to make the same old breadboard amps - so I found some old mounts on eBay & will use them instead of the breadboard. I put them together with nuts and bolts ( backwards ). Placed them into the cigar box to see if they would fit with the large speaker - perfect fit...
Now mark off where you want your speaker holes. And drill the out. I need lots of holes for a large speaker. Then drill out your holes to mount the speaker from ( 4 of them ). Note one hole will be inside the tripod mount, but it will all fit inside. Now erase or light sand all marks off the bottom of the cigar box...
Step 7: Amp Parts List


These photo's have download from other web sites. It shows the basic outline of a guitar amp. I will use some of these parts in my amp, but will not use a breadboard.
Step 8: Adding a Computer Fan


Trace your pattern out where you want to place your computer fan. Then drill out on the inside of the hole. Touch it up by sanding around the hole. Then mount the fan with ca glue and nuts/bolts to hold it into place. Make sure to cut off the ends of the bolts. & sand them down. You can add ca glue to help hold them into place...
Step 9: Making the Amp.


Start with the LM-386 8 pin amp. I will not use the 8 pin holder shown in the photo. I will use some tester wire bought on eBay, but you can use bare copper wire if you want. Start by placing 2 wires parallel to each other, this is your positive wire and negative wire; solder them into place. Then take your LM-386 & count down the left side (from the top of the dot facing to the top) the third & forth pins. Place 2 pins on the 3rd & 4th pin or 1 pin between the two of them & solder them together. This will be soldered to the negative wire. Then solder the 3rd pin down on the right side of the dot. This is your positive wire - solder it to the positive strip below. Now solder pins 1&2 to the side of the left of the dot.. Then solder the pins to the right 1,2,&4. To the right side of the dot... Then you can add the other parts in the next step...
Step 10: Guitar Amp


I never finished this amp - might do it by next year, but wanted to up load the pictures in case someone wanted to make one. I just need to add the wires to the amp.
Step 11: Amp


You can use just about anything to make this amp.


