

Introduction: Beaded Huichol Peyote Flor (peyote Flower, Yes)


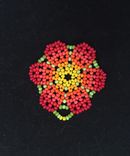
Hello! This is my first Instructable and I'm going to teach you how to make this peyote flower pendant.
From what I've seen outside of Mexico, this beading technique is confused with the technique "peyote" which is more similar to that used in the United States for beaded accessories, and is from the Native Americans. This is why I decided to share this basic Huichol handicrafts.
The Huichol are a Mexican indigenous people living mainly in the states of Jalisco, Nayarit, Durango, San Luis Potosi and Zacatecas. They call themselves as Wixarika that in their language, means soothsayer or shaman.
Huichol art and craftsmanship are known throughout Mexico as one of the most advanced and beautiful that exist in all native ethnic groups in our country. Their level of complexity is asombrozo and symbolism is also well advanced. Handle different techniques, not only beads or seeds: they do things with thread, yarn, woven beads, beads glued to objects, and painting, mainly.
The symbols used are many but the main ones are these types of "fire" flowers representing a peyote flower, deers, the eyes of God, and the leaves and flowers of corn. Hence other animals, other flowers, stars and, above all, colors and formats vary depending who make them. Apparently, each master craftsman or artist has their own patron, or at least its own way of making each figure.
If you want to know more, please start by visiting the article in Wikipedia here.

By AlejandroLinaresGarcia - Own work, GFDL, https://commons.wikimedia.org/w/index.php?curid=1...
Step 1: Materials Needed and VIDEO (UPDATE)


To make this pendant you will need:
- Czech glass beads, no. 10. You can use another measure, but I recommend they are Czech as the size of all beads is homogeneous and some others like the Chinese, are misshapen and that makes your design deformed.
- Nylon thread to sew. Some people use transparent nylon thread but I use white Omega no. 50.
- Needles for beadwork. Two needles to make a piece, each one threaded on each side of the thread as we'll see ahead. The needles I use are Eagle brand no. 15. There are others but the quality is not as good. The Eagle brand will not break or bend so easy.
- Embroidery hoop with a piece of tense fabric. Use a white cloth or black so beads contrast against it.
- Lighter. Used to burn and seal the edges of the thread when you finish the piece or when you need to cut the thread for some reason, such as changing it because it's over or knotted.
- Scissors.
- Thimble. To gather and store beads. You can use anything as a lid, a spoon...
**********
UPDATE
Now you can see the video master class for this flower. I'm sorry it's in Spanish only, I haven't got time to make the English audio version.
Step 2: The Pattern

First thing's first.
You need to download this pattern or scheme which is the one I use for coloring and to form flowers with the colors I want.
An important feature of the hiuchol craft, as I mentioned, are the colors. Using the highest number of steps to achieve a color gradient in one piece is what makes it look awesome but handle as many colors in a nonlinear pattern is complicated. Because of this I recommend you color before you start.
I leave the pattern in vector, PDF and jpg image to use the one that best fits your needs.


Step 3: The Secuence


The second important point to understand is that the beading structure is made in circular shaped from the inside out.
It really is a sequence that goes like this: 12/ 5-5-5-5-5-5/ 1-5-1-5-1-5-1-5-1-5-1-5/ 3-5-3-5-3-5-3-5-3-5-3-5// 3-3-5-3-3-5-3-3-5-3-3-5-3-3-5-3-3-5/ 3-1-3-5-3-1-3-5-3-1-3-5-3-1-3-5-3-1-3-5-3-1-3-5/ 3-3-3...3-3-3...3-3-3...3-3-3...3-3-3...3-3-3
In the last round of this pattern, the dots represent the three beads of the previous round where the thread is passed to make round petal and no peaked ones.
If it's no so clear for you right now, don't worry! The following steps explain each round so you'll understand.
It also should be noted that if you want, and following this mathematical pattern, you can continue to make the flower larger in size, or finish it before to make smaller flowers. You could even add beads at the end to close a circle instead of leaving overhanging flower petals.
Step 4: Coloring the Pattern


We've come to the fun part.
This way I colour the pattern when I design it. The first thing I colour is the centre and then go along with the beads between each petal to keep them separate.
In the end, when I have my coloured pattern, I choose the beads for each colour. You can do this at the beginning to be sure what colours are available to you.
Step 5: First Round


First, prepare your hoop by placing the beads of each separate colour in small piles. Take care not to mix them or place them too close because the colours are so similar it will be like hell trying to separate them apart. Believe me, I've been there.
Then let's cut a piece of nylon thread and go threading a needle on each side. To make this pendant, use about 120 cm / 47-50 in. DO NOT BURN THE ENDS, that's when you finish the pendant! If you do it now you will not be able to thread the fine needles.
Have the pattern at hand and start beading!
- Thread 12 beads to form the centre.
- Take the beads to the centre of the thread.
- Now, thread a needle through the first bead on the opposite side to close the circle, pull the thread on both sides to tighten and close the centre of the flower.
Step 6: Second Round


The sequence for this round is / 5-5-5-5-5-5 /
- Once you've finish the centre, as seen in the first image, locate on your pattern the next set of beads.
- Take the needle you've used to close the centre circle, the one that "went through the first bead on the other side", and thread the beads that you will use. In this case are 1 light yellow, three dark yellow, 1 light yellow again.
- Following the way your thread comes out of the centre bead, jump the following bead in the centre circle and insert the working needle with your strung beads into the second bead... Look at the picture.
- Thread the beads again as the previous step, jump a bead and insert the needle into the second one...
- This continues until the penultimate group (two more peaks). The last group is made differently in order to set the thread for the next round.
- Thread three beads on the working needle, then insert two beads into the inactive needle... Insert the working needle in the first bead of the inactive needle... Pull both threads and close the peak.
ALWAYS pull and keep your thread uptight as much as possible to keep the beads together. The thread between beads must be hidden so the piece you're making remains even all the time.
Step 7: Third Round


The sequence for this round is / 1-5-1-5-1-5-1-5-1-5-1-5 /
- Take the needle that closed the previous round and thread the bead that goes with the sequence. In this example is a light green one.
- Pass the needle through the second bead of the next "previous round" peak. Look at the picture to see how it is.
- Thread the next group of beads, that in this case are 1 light orange, 3 dark orange, 1 light orange.
- Pass the needle through the fourth bead onto the same peak you are working in.
- Keep going until you reach the last alone bead. To close the round you must work the last peak as the last one in the previous round: three beads threaded using the working needle, then two beads threaded using the inactive needle... Insert the working needle in the first bead of the inactive needle... Pull both threads and close the peak. Always remember to tighten your thread while working, do not try to do it at the end of the round, it ill not happen.
TIP: all peaks of 5 beads go one above another ;)
Step 8: Fourth Round


The sequence for this round is / 3-5-3-5-3-5-3-5-3-5-3-5 /
- Take the needle that closed the previous round and thread the next 3 beads: 1 dark orange, 1 light green, 1 dark orange one.
- Pass the needle through the second bead of the next "previous round" peak. Look at the image to see how it is.
- Thread the next group of beads, that in this case are 1 dark orange, 3 salmon orange, 1 dark orange.
- Pass the needle through the fourth bead onto the same peak you are working in. Keep going until you reach the last 3 beads before the closing peak.
- To close the round you must work the last peak as the previous round: three beads threaded using the working needle, then two beads threaded using the inactive needle... Insert the working needle in the first bead of the inactive needle... Pull both threads and close the peak.
Did I said you have to keep your thread tighten? ok...
Step 9: Fifth Round


The sequence for this round is / 3-3-5-3-3-5-3-3-5-3-3-5-3-3-5-3-3-5 /
- Take the needle that closed the previous round and thread the next 3 beads: 1 salmon orange, 2 dark orange.
- Pass the needle through the green bead in the middle of the next group of 3 beads, of the previous round. Look at the picture to see which is it!
- Thread the next group of beads, that in this case are 3: 2 dark orange, 1 salmon orange. Pass the needle through the second bead of the peak that follows from the previous round.
- Now, create the first peak of this round threading: 1 salmon orange, 3 light red, 1 salmon orange; now, thread the needle through the fourth bead of the peak below.
- Keep going until you reach the last 3 beads before the closing peak.
- To close the round you must work the last peak as the previous round: three beads threaded using the working needle, then two beads threaded using the inactive needle... Insert the working needle in the first bead of the inactive needle... Pull both threads and close the peak.
Uptight your work...
Step 10: Sixth Round


The sequence for this round is / 3-1-3-5-3-1-3-5-3-1-3-5-3-1-3-5-3-1-3-5-3-1 -3-5 /
- Take the needle that closed the previous round and thread the next 3 beads: 2 light red, 1 salmon orange.
- Pass the needle through the bead in the middle of the next group of 3 beads, of the previous round. Look at the picture to see which is it!
- Thread 1 light green bead and pass the needle through the middle bead from the next group of 3.
- Thread the next 3 beads: 1 salmon orange, 2 light red; and pass the needle through the second bead of the peak that follows, from the previous round.
- Now, the following beads to form the next peak are: 1 light red, 3 dark red, 1 light red. Pass the needle into the fourth bead of the peak below.
- Keep going until you reach the last 3 beads before the closing peak. To close the round you must work the last peak as the previous round: three beads threaded using the working needle, then two beads threaded using the inactive needle... Insert the working needle in the first bead of the inactive needle... Pull both threads and close the peak.
Uptight your work...
Step 11: Seventh and Last Round \o/


The sequence for this last round is /3-3-3...3-3-3...3-3-3...3-3-3...3-3-3...3-3-3 /
- Take the needle that closed the previous round and thread 3 dark read beads.
- Pass the needle through the second bead of the group below. Look at the picture to see how I did it wrong, ha!
- Thread 3 beads: 1 dark green, 1 light green, 1 dark green; and pass the needle through the middle bead in the next group of 3.
- Thread the next 3 dark red beads; and pass the needle through the second bead of the peak that follows, from the previous round.
- Now, we no longer have a closing peak because we finished this pattern. Instead of putting another 5 beads, you must pass the thread through the 3 beads below your peak.
- Continue until you reach the last three dark red beads. To close the round you must work the thread through the last petal to secure the round. Keep passing the thread through the beads to get away from the last beads you threaded.
Always remember to tight the thread while working, even now that you're almost finished.
Step 12: FInishing One of the Threads, Knotting and Burning It


To assure the thread from coming loose and the piece is lost, pass the thread into many beads as you can and then do a blind knot between two beads.
Cut the thread leaving about 3mm to burn the knot without breaking it. The trick is: the piece goes to the fire, not the fire to the piece.
Now, let's form a small bridge to add a ring, chain, key ring or earring hook to the piece if you want.
Step 13: Bridge to Hang Your Pendant


To do this, we will take the thread that was waiting inactive in the previous round to the bead in the middle of the three dark red and:
- Thread 8 beads of colour you want, in this case I used dark green, light green and yellow as the centre of the flower.
- Pass the needle through the middle bead of the following three dark red ones.
- Now, hide the thread and get it away as much as you want from the latest beads.
- Close with a blind knot between two beads... Leaving 3mm short thread...
- ...and burn the thread to close it.
NICE! We finished this flower! I hope you had fun!


