

Introduction: Beautility: an Eco, Easy and Elegant Beer Bottle Shelf.


Paper and beer bottles -- things that we often find stacking up at home. Well, what if you were given something to do with them, and made at the same time space for other things that are piled up and that you want to display?
Using waste paper, empty bottles, and some time and energy, here's an eco-friendly shelf. It's simplicity at it's best.
Who thought drinking beer could actually come in handy?
If you liked my shelf please vote for me!
Step 1: Gather Your Material


sunshine!
wild amounts of paper (could be newspaper, cardboard, magazines, etc.)
beer bottles
a scrubber
a plastic sheet
for mold:
pieces of wood
hammer
nails
Step 2: The Mold


You can chose your shape and dimensions.
I've chosen a regular rectangle.
Cut the pieces to size. Hammer in the nails.
Your mold is ready.
Step 3: The Paper Pulp


Soak the paper overnight in a bucket of water.
Shred into bits and make it a pulp.
You can add colouring at this point if you like.
Step 4: The Shelves


Squeeze out some of the water so that pulp is semi-dry (having it too wet will take longer and make your shelves shrink further, whereas it being too dry would make them crumbly).
Place your mold above the plastic sheet. Fill in the mold 1 and 1/2 inch high.
Make well spaced holes, not too close to the edge, in zigzag like in the picture. (make them larger than necessary, they shrink)
Remove the mold carefully and repeat process for the other shelves.
Leave them to dry. It should take 2 days in a bright tropical sun.
(I suggest you put weights over the shelves at night, they tend to warp)
Step 5: The Bottles


Scrub/peel the labels off. Of course, you can leave them on if you want to.
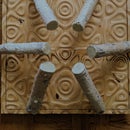
Step 6: Assembly


Slot them in the holes, like in the pictures.
Your basic shelf is done!
Step 7: Extra Features


If you want to spice it up, here are things i suggest:
grow creepers inside the bottles
light up the bottles with Christmas lights
You can also paint the shelves and bottles to your liking. I chose not to.
Step 8: The Finished Shelf!

Participated in the
Cardboard and Duct Tape Contest

Participated in the
Lamps & Lighting Contest

Participated in the
Furniture Contest

Participated in the
UP! Contest


