

Introduction: Blade Runner Spinner Cockpit Interface Lights


Hi! Here's an Instructable for my scale test of the cockpit interface lights that are in the corner of the cockpit in the Blade Runner spinner.
For just a scale test of the effect, which is what I made, you'll just need the following
- 1 Arduino
- 8 LEDs. I used 3mm yellow LEDs.
- 8 resistors, with a value of 220 ohms.
- Some short jumper cables
- 1 breadboard.
Step 1: Time to Do a Little Research!
Here's a youTube clip, starting at 0:56, which shows the light chase towards the right hand side. This is the effect that we are looking to try to replicate. Of particular interest to me is that this goes back and forth and changes speed. We'll be programming both of those options into our code.
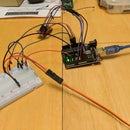
Step 2: Set Up Your Circuit

Here I have (8) yellow 3 mm LEDs set up in a row. Each has a 220 ohm resistor going to ground, and each is fed from a separate pin from my Arduino board. For my setup, I'm using pins 9 through 2.
Step 3: Write Your Code!

Now you're going to write your code in the Arduino IDE program! Here I've copied and pasted mine into the space below. You should be able to just copy and paste this into your program and have it work, and I've uploaded the file into here if you want to download it as well.
/*
8 LEDs set up in a row, for a chase sequence. Each LED is connected to a digital pin from 2-9, with
a 220 ohm resistor to ground.
cobbled together by Tim Nielsen 2/7/18
*/
int LEDoff = 0; //name my LEDons and my LEDoffs, so I can track them and step through them.
int LEDon = 2;
// the setup function runs once when you press reset or power the board
void setup() { // initialize the digital pins needed as outputs.
pinMode(2, OUTPUT);
pinMode(3, OUTPUT);
pinMode(4, OUTPUT);
pinMode(5, OUTPUT);
pinMode(6, OUTPUT);
pinMode(7, OUTPUT);
pinMode(8, OUTPUT);
pinMode(9, OUTPUT);
//turn off all the LEDs. Also, this doesn't do anything for this sequence.
for (int LEDon = 2; LEDon <11; LEDon++) {
digitalWrite(LEDon, LOW); }
}
/* hey, two different pieces of code used to accomplish pretty similar effects.
* just nice to have both as a reference. */
// the loop function runs over and over again forever
void loop() {
//lets start with a slow upwards chase, with two LEDs on and travelling
for (int i=0; i <= 2; i++) { //sets my count of this particular loop
for (int LEDon = 2; LEDon <10; LEDon++) { //begins at pin 2 and counts up to 10, changing pin number of LEDoff digitalWrite(LEDon, HIGH);
delay(350);
digitalWrite(LEDon + 1, HIGH);
delay(350);
digitalWrite(LEDon + 2, HIGH);
digitalWrite(LEDon, LOW);
}
}
// reverses direction, speeds up. Two LEDs on and travelling
for (int i=0; i <= 3; i++) { //sets my count of this particular loop
for (int LEDon = 10; LEDon >1; LEDon--) {
//begins at pin 2 and counts up to 10, changing pin number of LEDon
digitalWrite(LEDon, HIGH);
delay(150);
digitalWrite(LEDon - 1, HIGH);
delay(150);
digitalWrite(LEDon - 2, HIGH);
digitalWrite(LEDon, LOW);
}
}
}
Attachments

Step 4: Watch It Blink
You can see from the video I have the chase running in a slower pattern one way, and a faster pattern the other way. You can easily change the speed by adjusting the delay time inside the program.
I hope this helps and inspires you to create your own effects!


