

Introduction: Build a Soundproof Wall


Up until recently, the only thing between my room and the one adjoining was a set of double doors. I like living with people and do so by choice, but being able to hear someone's entire phone conversation word for word seemed a little much. So I set out to build a more proper wall between us, and in the process learned quite a bit about soundproofing. It worked out great, as now we can barely hear each other when talking at a normal volume. Success!
Step 1: Principles of Soundproofing

In planning what I was going to build, I needed to first understand more about soundproofing. I am by no means an expert, but just learning the basics went a long way. There are 5 basic principles of soundproofing: mass, absorption, conduction, mechanical decoupling and resonance. Read on for a brief overview of each principle and how I addressed it.
Mass: This one is pretty straightforward. More density = more sound absorption. Thing is, you need it to be REALLY dense to make a big difference, so simply adding a layer of drywall to an existing wall will only give you a slight decrease in sound transmission. To address this principle I used two layers of the thickest drywall readily available (5/8") vs the more common 1/2" thickness.
Absorption: Any kind of insulation within a wall's cavity will help absorb some sound, although it will not trap any low frequencies. This is most effective when the walls are decoupled, as if there are studs connecting the two walls the effect of the insulation will be minimal. Still, putting something in the wall is better than nothing, so I insulated my wall with standard R-13 fiberglass insulation.
Conduction: This is the transmission of sound through vibration of solid objects connected to each other. Conduction is a very efficient way to transmit sound, and as such any wall that has drywall directly connected to the studs on either side will never perform well. Sound will also travel through indirect routes largely via conduction, and this is called flanking noise. In my case I could do little to address this principle, as the nice solid doorway around my wall would always be a good conductor of sound and the weakest link between our two rooms.
Mechanical Decoupling/Isolation: This is one of the most effective ways to combat conduction, and is why the most effective soundproof walls are completely decoupled, so there is no direct path for the sound to travel. If not paired with other soundproofing principles, decoupling a wall will help with transmission of mid-high frequency sound but will increase resonance and sound transmission at lower frequencies (more on that below), so it must be done in combination with other principles to be truly effective. To address this I kept my wall detached from the double doors rather than attaching my framing directly to them, however I'm not sure if this made much of a difference considering the conduction of sound through the surrounding doorway would probably outweigh any effort made on this principle.
Resonance: Despite best efforts on all of the above principles, sound will still resonate a well insulated, decoupled wall if it hits the right frequency to vibrate the components of the wall. This isn't common in high frequencies, but is a challenge for low frequencies (imagine how strong bass rumbles certain objects at particular frequencies, therefore a decoupled wall will rumble x2 when the right frequency is hit for the mass of the wall). Not to fear, this is offset in two ways:
• Lowering the resonant frequency of the wall: one can lower the frequency at which the wall wants to resonate by making sure there is plenty of mass in each wall (tougher to vibrate), and by adding insulation / plenty of air in between (absorption). This can help push the resonance point low enough that only the deepest frequencies will vibrate through the wall. Sadly this is why your subwoofer will almost always annoy the neighbors, as these methods can only push the resonant frequency so low.
• Damping: this refers to any means of reducing resonance altogether by absorbing or redirecting sound, and can go a long way to combat resonance and conduction. By far the most effective damping agent out there is green glue, and from all the specs I've seen it's likely the single most effective soundproofing aspect of my wall. I used the compound to cover the area of my wall, and sealant to fill the seams.
Asleep yet? No? Great! If you're like me and found this all very interesting, here is some more reading on the principles, and how decoupling works. Moving along, let's build a wall!
Step 2: What You Need

I was filling a 5x7 space, so roughly the same square footage as one sheet of material. Adjust what is listed below according to the area of your wall.
- Framing supplies - enough to frame the outside of your "wall" and 1" struts every 16" to hold the insulation in place
- R-13 insulation
- Two tubes of green glue noiseproofing compound per 4x8 area of coverage *
- One tube of green glue sealant *
- Full sized caulk gun for green glue
- Drywall - enough for two layers (you will be making a green glue sandwich)
- 3" Drywall screws
- Basic building supplies (drill, rock knife, masking tape, ruler)
- Safety equipment (face mask, gloves, glasses)
* Green glue products are specialty building supplies, and are not available at standard building stores like home depot. I googled for a green glue distributor in my area and found one, but there is also this list of distributors on the green glue website, and this one sells them online. You can also get green glue on amazon, but only by the case.
Step 3: Frame the Wall


Build a frame for your wall, with studs 16" apart if you are using standard insulation. In order to add any potential decrease in sound transmission, I left a two inch gap between where my wall would be and the double doors as a means of decoupling (see step 1). One important thing I neglected when I framed it was that I could have used a stud along both seams of drywall to properly attach them down, which I figured I could get away without given the small size of the wall. It ended up looking OK, but the seams would have been much cleaner if I'd done this. Don't make the same mistake!
Once your frame is built, I put down a few layers of tape to protect the floor, and attached it to the doorway. Take care to keep the frame plumb as you go. This was achieved easily enough on the sides and top by wrangling it to a straight line as I screwed around the doorframe. However along the floor I had to get crafty and used some spacers to push out the warp in the wood to a straight line, as I didn't want to use any screws in the floor.
Step 4: Insulate the Wall


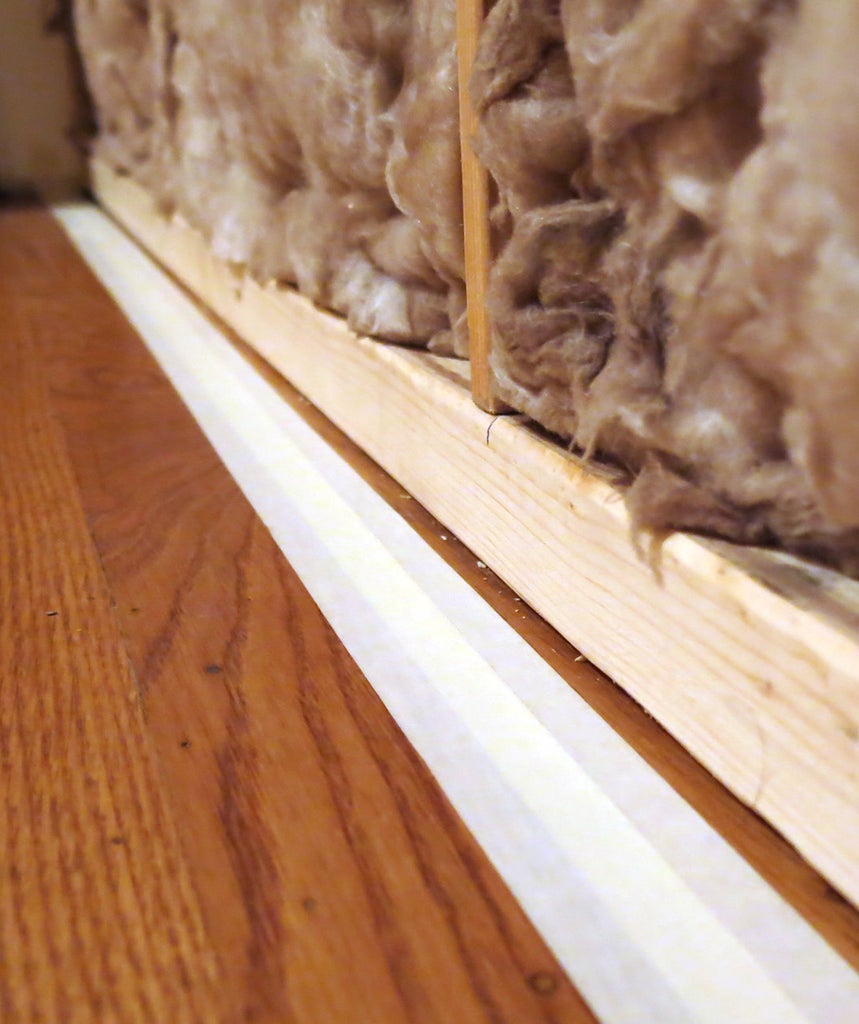
Next I added the insulation. I ended up taking it out of the casing because it stuck to the frame better. Wear all your protective gear! Fiberglass is nasty stuff that you don't want in your eyes, lungs, or skin.
Step 5: Cut Drywall to Size


As the main part of the wall is green glue sandwiched between two layers of drywall, I first cut two layers of drywall to size, being sure to stagger where the seam would be for more sound isolation and ease of construction.
To cut drywall, you can simply use a rock knife to score, then lay the board over a raised surface to break the seam. It can also be cut by any saw or power tool you have in your shop. I went for a tight fit, but you will be filling the seams with soundproof caulk, so anything up to a 1/4" gap is not a big deal.
This step was by far the most irritating for me as I live in an old house where none of the measurements are uniform. Measure your doorway thoroughly first, because it's much easier to make one cut in drywall than make small adjustments!
Step 6: First Layer of Drywall


Attach the first layer of drywall to the frame with drywall screws every 16" or so. When finished fill all of the seams with green glue sealant (might not be necessary to caulk both layers of drywall, but I figured I might as well).
Let the sealant dry for 24 hours.
Step 7: Green Glue!


Here's the fun part! Position your second layer of drywall for easy attachment to the wall, and squiggle two tubes of green glue onto them. Using a random pattern like this is the recommended method. Quickly lift and attach the drywall while the green glue is still wet, with screws around 16" apart.
Step 8: Caulk the Seams, and Done!


Caulk the final set of seams, and your wall is complete!
Well, at least from a soundproofing perspective :) At this point I was sick of construction and called myself done. However to really finish the wall, you will want to tape and mud the seams, add texture, then paint it. Details, details...
Visual appearance aside, this wall has performed amazingly well, despite the obvious conduction that I'd never fix from the doorway and the old walls that I did nothing about. Whereas we used to hear each other's every word, now quiet talking is barely audible, and medium to loud talking is audible but muffled and significantly quieter than it used to be. All in all, a big improvement.
Happy soundproofing!

Participated in the
Hand Tools Only Contest


