

Introduction: Build an R8 Collet Storage Box at TechShop

In my home shop I have a Smithy Granite 1324 3-in-1 machine. This machine uses standard R8 collets in the mill head. Over time I have collected a number of collets, but not as part of a boxed set.
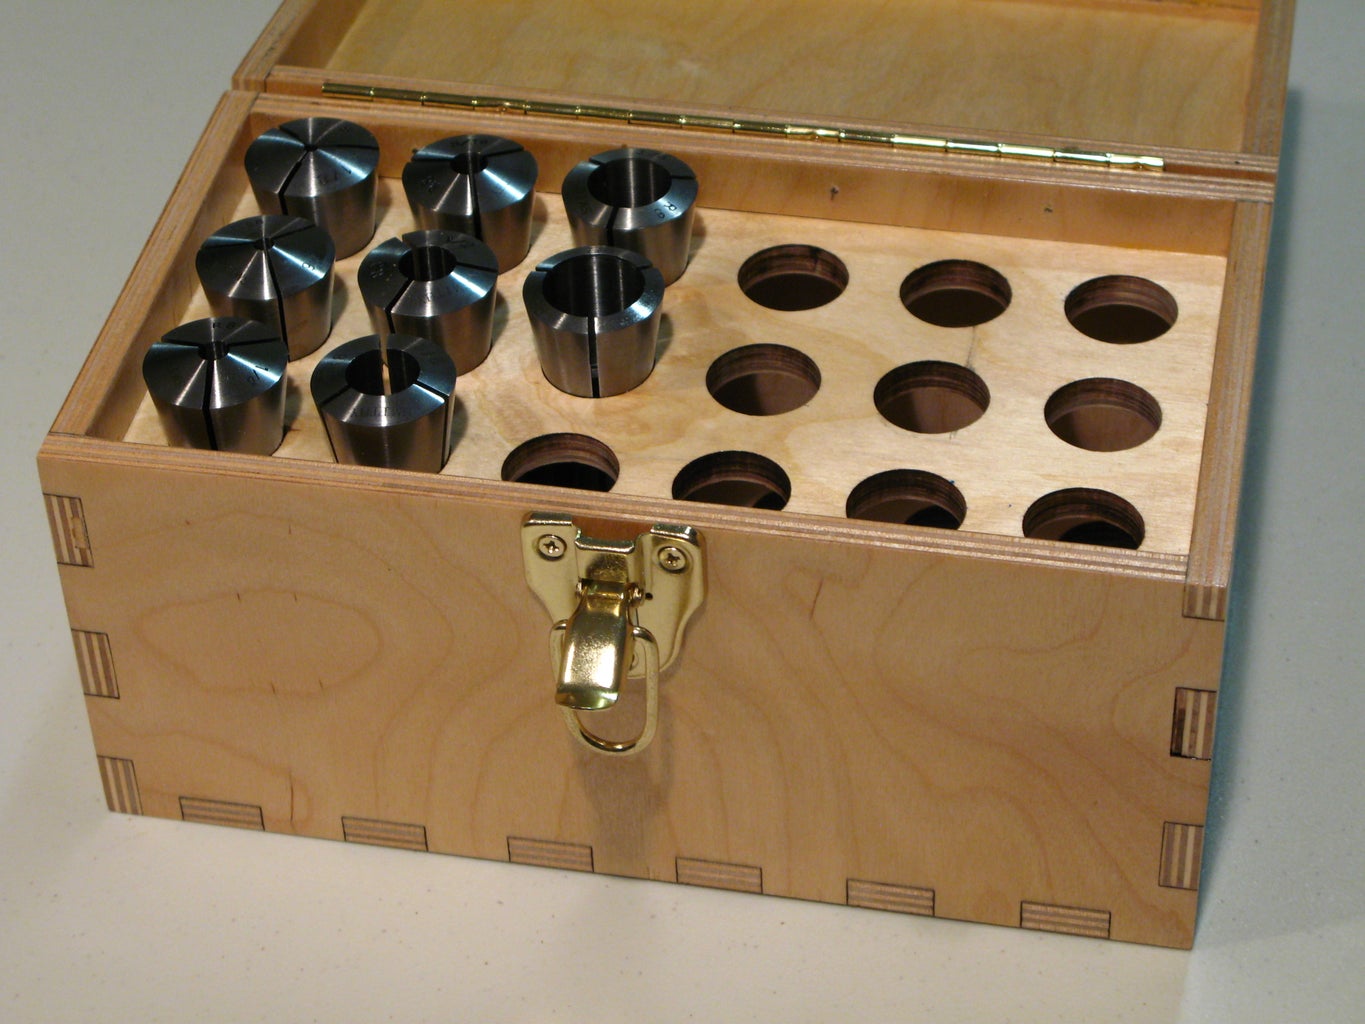
In this instructable I'll show how I used the laser cutter and some of the wood shop tools at Techshop to make a wooden case for 18 of these collets. Room for those I have and those I'll acquire in the future.
I made it at Techshop Detroit. http://www.techshop.ws/
Step 1: Tools and Materials
• 60 watt Epilog laser
• Disk/belt sander
• Table saw with dado blade
• Drill press with ¾” drum sanding tool
• Screwdriver
• Box material (3/8” Baltic birch plywood in my case)
• Wood glue of choice
• Finish of choice (polyurethane)
• Hinges, and latch, handle if desired
Step 2: Design the Box


The box must be designed from the inside out. How much space is need for what we want in the box and then what are the dimensions of a box which will contain that space.
For anyone whom doesn't know... an R8 collet looks like the drawing attached.
Use pencil and paper or a drafting tool to layout the number of collets wanted in the box – I chose 3 rows of 6 for a total of 18. Layout of the positioning of the collets is shown. I added a 1/8” border around the outside of the “space” to fit into a dado internal to the box later during assembly.
The overall outside dimensions of the box (top view) must be 1/2" each direction larger than the hole layout shown.
The front view of the box internals is also shown - a bit of space is needed at the top and bottom to accomodate the 4" long collets held vertical in the box.
Step 3: Choose a Box Material, Joinery Method and Cut Method
These two steps are linked because the method planned for cutting the pieces has a strong influence to the joinery method chosen and vice-versa.
Being intrigued by the capability of the Epilog laser and the synergy between designing easily on the computer and quickly turning design into finished product… I wanted to use the laser to cut the parts.
However, the laser cannot vector cut everything – most persons are making laser cut boxes out of 1/8” thick hardboard or other homogeneous sheet good material. This box needs to have some strength and the plan for an insert which separates the collets demands a dado… I needed a thicker material.
After some trial attempts using the laser – I found that 3/8” Baltic birch 7-ply sheet material could be cut in one pass with the 60 watt laser – that’s definitely at the maximum this laser can do. 3/8” is thick enough to accept a decent dado and retain good wall strength while not being too chunky for a box this size. The Baltic 7-ply is needed because it doesn’t have any voids like cheaper plywood often does. Voids cause lasers to stop cutting by scattering the beam (yep, learned that during testing).
The joinery method is then planned as a finger or box joint. Several computer programs and even free websites exist which will create the pieces for a 6 sided box or a 5 sided bottom and 5 side top in vector graphics. I leave it to the reader to choose where/how to draw the shapes.
Of course – this box could also be made with traditional methods only in the woodshop using dovetail, miter, rabbit, butt, or finger joinery.
Attachments

Step 4: Layout and Cut the Pieces

My material was purchased in a 5x5 ft sheet. I cut it down to 18x24” pieces using the table saw in the woodshop.
I set up the vector graphics file using Corel Draw. All the pieces fit in one 18x24” setup.
Note: I could have started with the 6 sided box and added a vector at the correct position of each of the 4 front/back/side panels to cut the top off the remainder using the laser. I chose not to do this because gluing a 6 sided box together is easier than two 5 sided top/bottoms. I'll cut the top off the box later with either the band saw or the table saw.
Use the laser to cut the pieces. This material required a rather high vector setting for the 60 watt laser to make the cuts in one pass - as I said earlier this material is at the maximum this laser can cut.
One trick to avoid the blackened pin look (if you wish) is to make the fingers a bit long to provide sanding stock to take the exposed burned surface back off with a sander. This can be done by telling the box making program your material is 1/32” (0.031”) thicker than it is – and then adding 1/16” to each of the overall dimensions of the box to compensate.
Step 5: Cut the Dado for the Shelf


Assemble the box to check for fit – don’t glue yet.
Layout the position of the dado slot to accept the shelf. (Thinking about it now – I could have marked this position with a raster mark in the laser!)
Cut the dado for the shelf on the table saw – this isn’t mission critical – it’s ok to set the dado blade for 3/8” wide even though the material is more like 0.350”. Depth of dado is 1/8”.
User may wish to stop the dado in order to avoid the breakout. I filled the exposed gap with a piece cutoff from the same plywood.
Dry fit together again to ensure success.
Step 6: Glue and Sand

Use your chosen wood glue to assemble the box again permanently. It may not be necessary to clamp together during drying but I felt it was prudent.
Once the glue is dry – sand the sides of the box to remove the excess length of the pins and the laser burning on their surface followed by a light overall sanding. Be careful not to sand too much with this type of plywood – the outer layer can be sanded through fairly easily and this may ruin the appearance of your box. A disc/belt sander can be used here if care is taken to square the table and not sand too deep.
Step 7: Cut Top Away From Bottom


Here's is where the method of having filled dado ends pays off... you can easily tell which end is up!
Carefully setup the bandsaw as if resawing a 6" wide board with a fence.
Slice the top off the box.
Step 8: Laser the Top With a Marking Label

I chose to place the top portion of the box back into the laser to raster the outer surface with a label/marking. Ran the laser a couple times to get a nice/deep engraving.
Step 9: Add Finish, Hinges, and Latch

I left the box natural – no stain and chose to polyurethane only the reachable surfaces as completed and assembled. Time will tell, but I believe leaving the inner wood surface porous/unsealed will allow the wood to soak up a bit of oil as collets are inserted and removed with some on them. I hope this will promote an atmosphere inside the box which deters corrosion.
The holes for a section of piano hinge and a latching mechanism were marked, predrilled, and screwed in place.
Insert collets – Done.
(Careful observers may note that the top in the final photograph looks different from that in the laser marking photo... This is due to an error on my part where I tried to fill the laser marking with spraypaint and then sand off the excess. Not a good idea. I ended up completely grinding the top surface through the first laser marking and the first layer of the plywood to clean it up. Then re-lasering etc. This brought out a previously unseen knot in the second layer of the plywood. Thankfully, it is only a cosmetic consequence here.)


