

Introduction: C-2 High Powered Lego Crossbow


This is the second crossbow I have made in the C series. It is very powerful, and has many improvements over the second one. Some improvements compared to the C-1 are:
-More Powerful
-More Accurate
-Weighs Less
-More difficult for ammo to fall off the gun
-Uses less pieces
-Easier to build
-Fires Lego 2x4 Studs
The C2 Firing:
The Mod- The C2.1
The C2.1 Firing At A Can
The crossbow has a 30 foot range when fired horizontally, and can go much further when fired in the air. I added a grove to the crossbow, so the Lego ammo won't fall off as easily. I lengthened the 'barrel', and moved the rubber band holder things in the top closer to the barrel, so technically the elastic is just as long as it was before, but now it stays with the bolt longer, giving it the power which this crossbow has. It can fire approx. one bolt every 6 seconds.
Check out my Website for all my Lego Guns
http://sites.google.com/site/bblegobrickworks/
Check out the C-2 Firing:
http://www.youtube.com/watch?v=BzYu4j-Ze5Y
Or check out the C-1 Firing:
http://www.youtube.com/watch?v=NF52U9_09ms
This crossbow is easier to build than my other one.
When I say something like "1/3 brick", I mean those flat slabs (because you need three of them to equal a whole brick.
Step 1: Underside Part 1


This is a pretty easy part. This is the underside of the crossbow, and ive divided it up into 3 parts, so dont put aside the finished product when you are done this step.
Step 2: Underside Part 2


This also includes the part with the thing that holds the ends of the rubber bands, and the 'wings' on the sides.
Step 3: Trigger Mechanism + Trigger


This step is the hardest step (but its still not that hard), because putting the trigger in the slot can be difficult.
Step 4: Underside Trigger Rubber Band


The rubber band more than counters then pull from the sling on the top, so that the trigger will not be pulled foward automatically, and so that the trigger will return to its usual position after firing. The rubber band is doubled over..
Step 5: The Overside + Firing Platform


Really easy.
Step 6: Ammo and Loading


The Ammo is just a 2x4 brick with a flat 2x4 on the bottom and top. Loading is easy, just put it in the firing slit closest to the trigger
Step 7: Stock+ Sight


This is the first part of the C-2.1, a group of add ons I made for the C-2. The stock on this crossbow is fairly easy to make, and can be adjusted to whatever size you want. The sight here is a better sight than the other one.
Step 8: Stand


This is a low profile stand, pretty easy to make.
Step 9: Ammo Holders


These are planks which hold onto ammo, placed on the side of the crossbow. The ones shown here can hold 14 pieces of ammo.
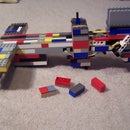
Step 10: This Is What It Looks Like in the End

This is the C-2.1 at the end.


