

Introduction: C-3PO the Master Teacher

Hello, in this guide I will show you how to build a robot that can be used for teaching. The name of the robot is "C-3PO the Master Teacher". The robot is built from a PEZ Candy Dispenser. It can understand speech and can talk. It is a great tool for children, who like the PEZ candy. The robot asks questsions, and if the answer is correct it gives a candy. The robot also gives the correct answer in case the answer was not right. Check out the following video to see it in action.
Step 1: Watch the Video
Check out the video to see the Arduino controlled PEZ dispenser in action. You can see that questions are asked using text to speech conversion, then answers are processed using speech to text. It is a fun and efficient way of teaching a younger brother for math. It can also be used for other subjects with a slight modification of the robot control software
Step 2: How Does It Work?

The robot is attached to a laptop via a USB cable. The laptop has a built in microphone and speaker. The speaker on the laptop is used to ask the questions. The microphone is used to record the results. If a result is correct, the robot is instructed through the USB cable to dispense a candy.
Step 3: What Do I Need to Build It?

In order to build this robot you only need a few parts. You need a PEZ candy dispenser, a small servo motor, a small wire, a paper clip, an arduino nano and an USB cable to connect the robot to your laptop.
All of these parts can be purchased from e-bay.co.uk. If you are lucky, you might find some of the parts in your own house. The budget for the robot is 7.67 pounds. You can find a breakdown of the costs in the following table.
Step 4: How Much Does It Cost?

Step 5: How Much Time Do I Need to Build It?
For me it took about 4 hours to build it, but if you are not that experienced I would say it will not take more than a day to make it work. For me it took about 1 hour to put the parts together, about 1 hour to setup the Arduino Nano, and about 2 hours to write the robot control program. If you follow the steps in this tutorial and you are experienced, maybe you can do it in a very short time.
Step 6: How Can I Build It?
To build the robot, follow these instructions. First you have to make the hardware, than you need to setup the software. Finally you will have to test it. Testing will be a lot of fun. Get started now!
Step 7: Create the Pull Wire

To create the pull wire, you must connect the servo horn to the paper clip, and you must attach the wire with a knot. Check out the picture above. make sure the wire has sufficient length. A length of 6-8cm is a good choice.
This pull wire is a key part. It will be connected to the head of the PEZ candy dispenser, and the servo horn end will be attached to the servo motor. When you will load candy into the dispenser the servo horn can be detached from the servo motor. The servo horn comes with the SG90 servo, so you don't have to worry if you don't have one at the moment.
Step 8: Attach the Pull Wire to the PEZ Dispenser

Once the pull wire is ready, you need to attach it to the PEZ candy dispenser. I have attached it using a hole. I have used a Dremel drill to drill the hole, and I have pushed the wire through, than I have tied a knot to the end, to make sure it stays where it is intended to stay.
If you want to build this robot from a different PEZ candy dispenser, make sure you choose one, where the head can be drilled, so you can attach the pull wire.
Step 9: Prepare the Servo Motor (1/2)

When you purchase an SG90 servo motor, the cable order is: black, red and orange. The black and red wires are used for supplying power to the robot, the orange wire is used for control. This cable order is not fit for our project, because the pinout of the Ardunio Nano has a different order. If we want to use the SG90 servo motor in our project we should change the cable order at the connector to the following: black, orange, red. In this order the orange control wire is in the middle.
Step 10: Prepare the Servo Motor (2/2)

In the picture above you can see the wiring diagram of the robot. You can see where the black (ground), the red (5V) and the orange control wire is attached.
The most important part in this wiring diagram is the orange wire. The orange wire in this diagram is attached to PIN 11 of the Arduino nano. You will have to use this pin number when you upload the Arduino control software.
Step 11: Glue It All Together (1/2)

The thing I enjoy the most, when I build a robot is the final assembly. When all the parts are ready, and I put everything together it is a great feeling. To assemble your robot, you have to glue the Arduino nano and the servo motor to your PEZ candy dispenser. Put the Arduino Nano at the bottom, and above it put the servo motor. Make sure the USB port of the Arduino Nano, and the motor head of the servo are facing the back side of the candy dispenser.
Step 12: Glue It All Together (2/2)
You can take a look at the video above to see how I glued my robot together. You might notice, that I have also attached an aluminium stand to the bottom to make it more stable.
Step 13: Setting Up the Software

You can install the software on any Windows 10 PC. I control my robot from my laptop. My laptop is an IBM Thinkpad t420. It has an English Windows 10 installed as the operating system. Note, that if you use another language, you might have to add the English language pack to Windows, to have speech recognition available. English speech recognition is not included in non-English versions of Windows.
To control your robot, you will need to setup two software: the Arduino software package, which can be downloaded from Arduino.cc. The exact link is
https://www.arduino.cc/download_handler.php?f=/arduino-1.8.5-windows.exe
and you will need to install Ozeki 10, which can do the text to speech and speech to text conversion. Ozeki 10 will allow you to write your robot control software in C#.Net, which is a great programming language. Ozeki 10 can be downloaded from the following URL:
http://www.ozeki.hu/index.php?owpn=231
Once the Arduino and the Ozeki software is installed, you can plug your Robot into the USB port of your PC. Your PC will recognize the robot as a serial port e.g.: COM6.
Step 14: Formatting the Arduino
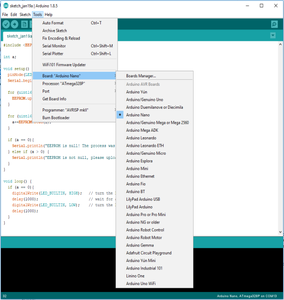
Once the Arduino IDE is installed, you need to do two things: first you must format the Arduino, then you must upload the servo control software. To format the Arduino you can use the code from the Ozeki website (http://www.ozeki.hu/index.php?owpn=3110) or from the Arduino website (https://www.arduino.cc/en/Tutorial/EEPROMClear). I prefer to use the Ozeki code, because it will blink the led on the Arduino when it is finished, so I know, that I can proceed with the next step.
To format the arduino you have to select the "Arduino Nano" board model, and the correct serial port from the tools menu.
Once the board model and Port is selected, upload the following code, and wait for the LED on the Arduino to blink:
#include <eeprom.h>

int a;

void setup() {
  pinMode(LED_BUILTIN, OUTPUT);
  Serial.begin(115200);

  for (uint16_t i = 0; i < EEPROM.length(); ++i) {
    EEPROM.update(i, 0);
  }

  for (uint16_t i = 0; i < EEPROM.length(); ++i) {
    a+=EEPROM.read(i);
  }

  if (a == 0){
    Serial.println("EEPROM is null! The process was successfull!");
  } else if (a > 0) {
    Serial.println("EEPROM is not null, please upload the code again!");
  }
}

void loop() {
  if (a == 0){
    digitalWrite(LED_BUILTIN, HIGH);   // turn the LED on (HIGH is the voltage level)
    delay(1000);                       // wait for a second
    digitalWrite(LED_BUILTIN, LOW);    // turn the LED off by making the voltage LOW
    delay(1000);
  }
}
Step 15: Installing the Servo Software on the Arduino
The servo motor controller software is responsible for opening and closing the PEZ candy dispenser. It uses the OzServoController.h module, that is installed, when you install Ozeki 10 on your computer. Note that port 11 is used when the servo motor controller configuration is added. You might also notice, that -45 degrees is set as the startup position for the servo motor.
#include <OzIDManager.h>
#include <OzServoController.h>


OzIDManager* manager;
OzServoController* servocontroller;

void setup()
{
  Serial.begin(115200);

  manager = new OzIDManager;
  manager->_sendACK = true;
  manager->_checksum = true;

  OzCommunication::setIDManager(manager);

  servocontroller = new OzServoController;
  servocontroller->AddMotorconfig(11, ServoMotors::SERVO_SG90,-45);

  int x=1;
  manager->sendLinkSetup();
  manager->PrintWelcomeLine(servocontroller, x++, "MyServoMotor");
  servocontroller->showMotorDetails();
}

void loop()
{
    OzCommunication::communicate();
}
Once the servo software is installed on your Arduino, your servo will be recognized by Ozeki 10. You can open the Ozeki 10 Robot Controller app and your servo will be visible in the right hand side in the controlled devices list.
Step 16: Setting Up Ozeki 10 (1/2)

Once the Arduino confguration is complete we are ready to finalize our robot. The robot will be controlled by Ozeki 10, a robot control software. Ozeki 10 will use the built in microphone and speaker of the PC, and it will control the servo motor through the arduino.
Step 17: Setting Up Ozeki 10 (2/2)

Ozeki 10 is a messaging system for Windows. It can be used to control robots using simple text messages. If you install Ozeki 10 in your Windows laptop, it will detect all your sensors and actuators. It is a very easy to use software for robot control. To start Ozeki 10 you need to navigate to it's graphical user interface (GUI) from your web browser. Enter the following URL: http://localhost:9505. After the GUI is started, you will be presented with a login form. Use admin as the login name, and the password you have supplied during installation. After sucessful login you can start the robot controller app.
Step 18: Installing Text to Speech in Ozeki 10

In the robot controller app, you need to install a text to speech connection to enable 3-CPO to read out instructions. To do this you need to select
Step 19: Installing Text to Speech From AV

AV stands for Audio/Video in Ozeki 10. To install the text to speech connection, you need to click on AV first. Once the Audio video connection selection form opens, you can select text to speech.
Step 20: Installing Speech to Text

Speech to text is similar to text to speech. The speech to text connection controlls the microphone, and when it detects an answer it converts it into text, than sends this text as a message to the robot control program. The speech to text connection can be setup the same way as text to speech.
Step 21: Add Words to Speech to Text

In order for the speech to text connection to operate correctly a set of words need to be defined. You can define individual words, or you can select a word set. Luckily there is a built in word set for detecting numbers.
Step 22: Run the Robot Control Code

In this robot there are three connections: a text to speech, a speech to text and a servo connection. The final step to make 3-CPO work, is to write the logic that controls the messages between these connections. The robot control logic is written in C#.NET. Once the code is ready, it can be executed using the RUN button on the toolbar.
Step 23: Understanding the Source Code
The robot source code has two important entry points: The Start and the Receive functions. When you press Run in the toolbar, the Start function is executed by the system. In this function you need to subscribe for messages coming from the text to speech and the speech to text connections.
The robot is started by sending a "Hello, please answer the question!" message to the text to speech connection. When the text to speech engine receives this message, it will read it out on the PC speaker. When it finishes, it will send a "Complete" message to the robot controller.
All incoming messages are received by the Receive function of the control code. In this function you can decide how you want to react to each message.
If you read the code, you will also notice, that 3 support functions were created, and 3 states are used to know what to do. The support function called "dispenseCandy" is called to open the 3-CPO candy dispenser using the servo. The askNextQuestion function is used to ask a question, and the evaluateResult function is used to evaluate the answer.
Please read the source code to understand how the robot works:
using System;
using System.Media;
using System.Threading;
using System.Threading.Tasks;

namespace Ozeki
{
    public class Program
    {
        enum StateType {WaitingForQuestionToComplete, WaitingForAnswer, WaitingForResultToComplete}
        StateType State;

        public void Start()
        {
            SystemSounds.Beep.Play();
            Subscribe("My_text_to_Speech_1@localhost");
            State = StateType.WaitingForResultToComplete;
            Send("My_text_to_Speech_1@localhost","Hello, please answer the question!");
        }

        public void Receive(Message msg)
        {
            if(msg.FromConnection=="My_speech_to_Text_1@localhost")
            {
                if (State != StateType.WaitingForAnswer) return;
                Unsubscribe("My_speech_to_Text_1@localhost");
                evaluateResult(msg.Text);
            }

            if(msg.FromConnection=="My_text_to_Speech_1@localhost" && msg.Text=="Complete")
            {
               if (State == StateType.WaitingForQuestionToComplete)
               {
		  Thread.Sleep(1000);
                  State = StateType.WaitingForAnswer;
                  Subscribe("My_speech_to_Text_1@localhost");
               }
               else if (State == StateType.WaitingForResultToComplete)
               {
                  askNextQuestion();
               }
            }
        }

        int expectedResult;
        void askNextQuestion()
        {
            State = StateType.WaitingForQuestionToComplete;
            Random random = new Random();
            int a = random.Next(0, 10);
            int b = random.Next(0, 10);
            expectedResult = a+b;
            Send("My_text_to_Speech_1@localhost","What is "+a+" plus "+b);
        }

        void evaluateResult(string text)
        {
            State = StateType.WaitingForResultToComplete;
            var result = OzCommonStrings.ToInt(text);
            if (result==expectedResult) {
                Send("My_text_to_Speech_1@localhost","Very good! The answer was "+result+". "+
                    "You can take your candy.");
                dispenseCandy();
            } else {
                Send("My_text_to_Speech_1@localhost","No way! The result is not "+result+". "+
                     "The correct answer is "+expectedResult.ToString());
            }
        }

        void dispenseCandy()
        {
           Send("MyServoMotor@localhost","+45");
           Thread.Sleep(6000);
           Send("MyServoMotor@localhost","-45");
        }
    }
};
Step 24: Testing the Robot

Before you want to test the robot it is a good idea to load some PEZ into it. To load the candy, you need to disconnect the servo horn from the servo motor, and load the dispenser as you normally would. Once you have loaded the dispenser, you need to attach the servo horn again.
Finally, when all the candy is loaded, call your little brother over to test the system, he will love it, he will have lots of fun, while he learns a lot.

Grand Prize in the
Voice Activated Challenge

Participated in the
First Time Author Contest 2018


