

Introduction: COTS Air Muscles and How Not to Do Internal Position Feedback


Air muscles are great because they are inherently shielded from dirt and moisture. However, they are normally controlled with exposed position sensors (potentiometers). You also can't use a potentiometer if you have a compliant joint. My goal was to create an inexpensive, position feedback system that would be just as waterproof as the muscle itself and was compatible with compliant joints.
The air muscles I built here a sort of a hybrid of cheewee2000's project and Honus'.
They were part of an investigation to see if I could get position feedback from an internal LED and photo-transistor. I learned that is not a very reliable way to get position feedback. At least not in my setup. My purpose in publishing this Instructable is so that you can be more wise than I have been.
Maybe this can be a crowd-sourced problem.
Step 1: Concept of LED Diffusion
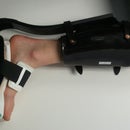
The idea was to create end pieces that held either a red LED or a photo-transistor. I poked holes in a rigid tube and attached that to the inside diameter of a a barbed fitting I got of McmasterCarr. The holes let the air flow into the muscle even with the end of the tube topped of with the diode. Really you just need holes on the side that has the air supply.
I connected the photo-transistor to a Wheatstone bridge to measure the the variation as the muscle contracted. Despite the silicone tubing (but probably because of my translucent fitting) I had lots of interference from ambient light. The readings were all over the place. I suspect that this was due to misalignment of the LED and photo-transistor.
In the future, I want to try position feedback with internal capacitance instead.
What do you think? leave a comment below
Step 2: Building the Air Muscles
The parts you'll want (to just make a regular ol', blind-to-position air muscle) are listed below:
What cheewee2000 told me to get:
High-Temperature Silicone Rubber Tubing Soft, 3/8" ID, 1/2" OD, 1/16" Wall
mcmaster.com # 5236K15 | $1.31 per foot
Heavy Duty Polyester Expandable Mesh Sleeving 1-1/2" ID, 3/4" to 2" Bundle Dia, 3'L, Black
mcmaster.com # 9142K34 | $5.83 each
Though I think the mesh is too big, one of my muscles popped after about 50 contractions (see picture below). I also wasn't using a pressure regulator.
Other fittings you might find helpful: (also from mcmaster carr)
44705K36 Low-Pressure Aluminum Threaded Pipe Fitting, 1/8 Pipe Size, Coupling 2.13
2 2808K25 White Polyethylene Single-Barb Tube Fitting, Adapter for 3/8" Tube ID X 1/8" NPT Male Pipe, Packs of 10, 5.53 Per Pack
5116K114 FDA White Nylon Single-Barbed Tube Fitting, Plug for 3/8" Tube ID, Packs of 10, 2.55 Per Pack
And some hose clamps.
I used dental floss for tendons. It's super strong and it makes your air muscles smell minty fresh.
Step 3: Valves and Air
I used solenoid valves available at BYU's EAAL lab.
Because they required AC, I chose to trigger them with a solid state relay.
Thanks to pdf below I was able to figure out how to use the valves.
I used two valves one to open pressure and one to open exhaust.;


