

Introduction: Cheap Laser Tripwire Home Security Alarm System


This is a simple and cheap home security system that costs only $ 15, to ward off nosy siblings and burglars alike. It comprises of a laser used as a 'tripwire' and a photosensor to detect whether this laser beam is blocked or not. If it is blocked an intruder, an 'alarm' will sound off using the piezo buzzer. The alarm I chose is the beautiful sounds of Pachelbel's Canon in D major.
I was inspired to make this from spy movies with high-end home laser security systems where the protagonists sprays aerosol and navigate around a complex laser setup.
Step 1: BoM


- Arduino 101 or Arduino Uno -- $7
- Photoresistor or LDR -- $1
- 10kΩ resistor -- $0.2
- Breadboard -- $4
- Laser -- $2
- Jumper Wire $1
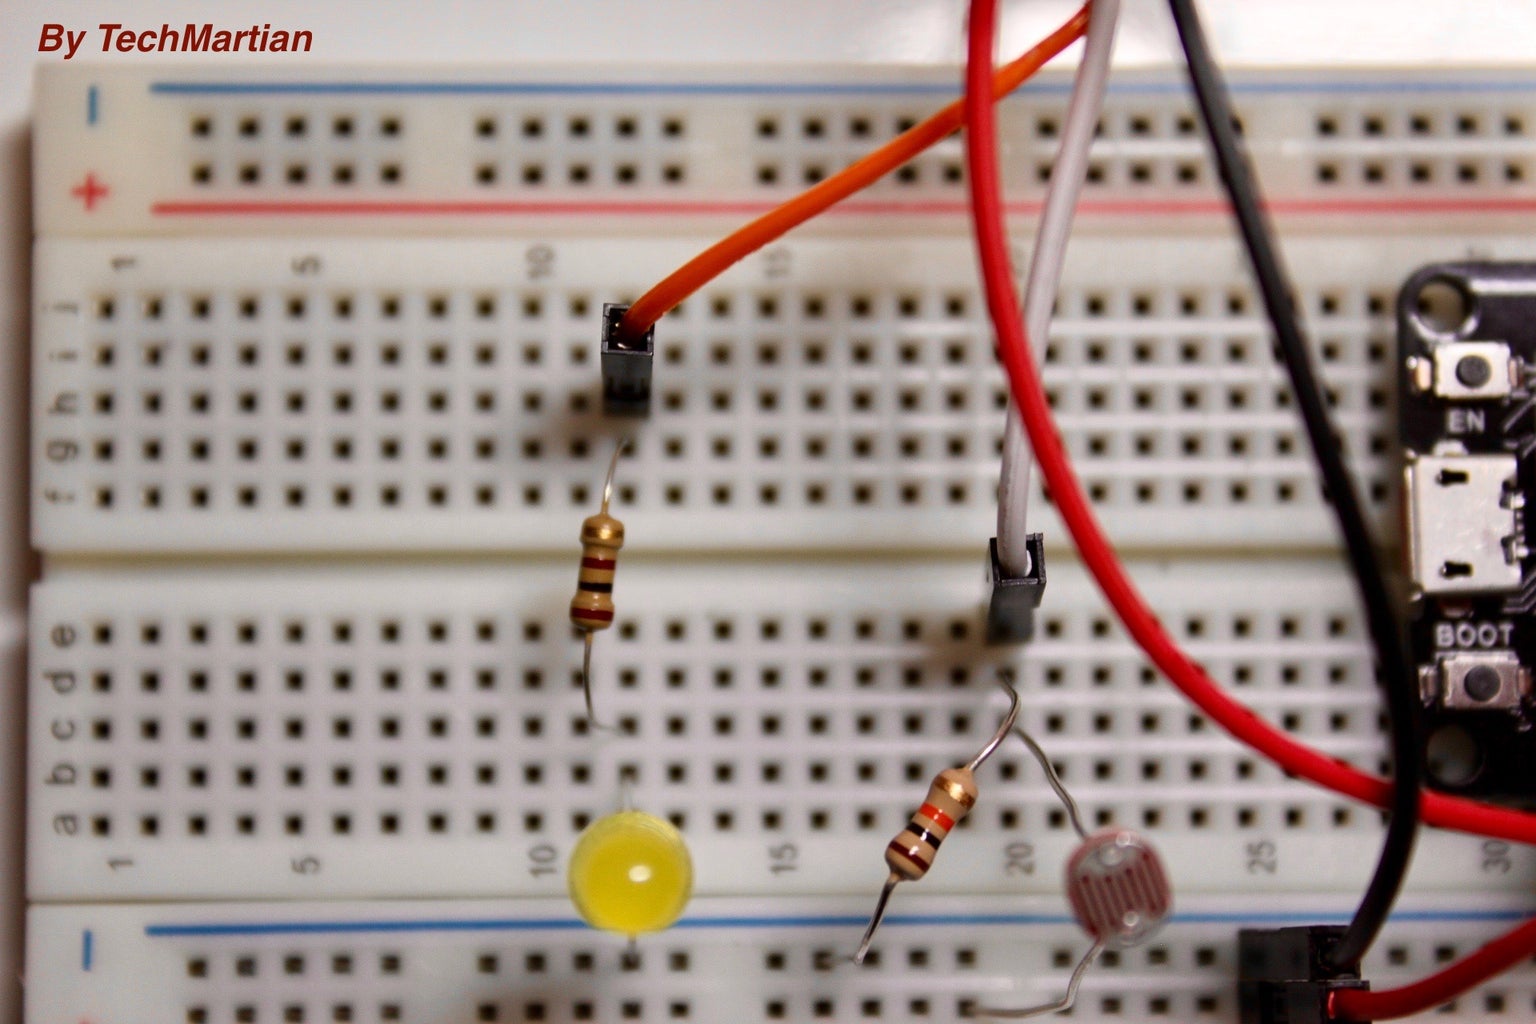
Step 2: Circuitry


- Connect the LED to the Arduino by connecting the positive pin of the LED to the 3.3V pin Arduino in series through a 100Ω resistor. This is shown as the red wire.
- Connect the flat edge pin of the LED to ground, shown as the pin connected to the blue rail on the breadboard. This blue rail is then connected to the Arduino's common GND pin.
- Connect one of the pins on the LDR to VCC using the red rail of the breadboard. Then, connect this red rail to the 3.3V pin on the Arduino.
- Wire the LDR signal to the Arduino by connecting the other pin to A0 on the Arduino. This is the white wire is on the board.
- Connect the other LDR pin to a 10kΩ resistor through to ground shown as the blue rail on the breadboard.
Step 3: Music Header File

The header file defines all the constants needed for the tone and the music that will be planes when the alarm rings.
/*************************************************<br> * Public Constants *************************************************/
#define B0 31 #define C1 33 #define CS1 35 #define D1 37 #define DS1 39 #define E1 41 #define F1 44 #define FS1 46 #define G1 49 #define GS1 52 #define A1 55 #define AS1 58 #define B1 62 #define C2 65 #define CS2 69 #define D2 73 #define DS2 78 #define E2 82 #define F2 87 #define FS2 93 #define G2 98 #define GS2 104 #define A2 110 #define AS2 117 #define B2 123 #define C3 131 #define CS3 139 #define D3 147 #define DS3 156 #define E3 165 #define F3 175 #define FS3 185 #define G3 196 #define GS3 208 #define A3 220 #define AS3 233 #define B3 247 #define C4 262 #define CS4 277 #define D4 294 #define DS4 311 #define E4 330 #define F4 349 #define FS4 370 #define G4 392 #define GS4 415 #define A4 440 #define AS4 466 #define B4 494 #define C5 523 #define CS5 554 #define D5 587 #define DS5 622 #define E5 659 #define F5 698 #define FS5 740 #define G5 784 #define GS5 831 #define A5 880 #define AS5 932 #define B5 988 #define C6 1047 #define CS6 1109 #define D6 1175 #define DS6 1245 #define E6 1319 #define F6 1397 #define FS6 1480 #define G6 1568 #define GS6 1661 #define A6 1760 #define AS6 1865 #define B6 1976 #define C7 2093 #define CS7 2217 #define D7 2349 #define DS7 2489 #define E7 2637 #define F7 2794 #define FS7 2960 #define G7 3136 #define GS7 3322 #define A7 3520 #define AS7 3729 #define B7 3951 #define C8 4186 #define CS8 4435 #define D8 4699 #define DS8 4978
Step 4: Arduino Code

# include "pitches.h"
int melody[] = {A6, FS6, G6, A6, FS6, G6, A6, A5, B5, CS6, D6, E6, FS6, G6, FS6, D6, E6, FS6, FS5, G5, A5, B5, A5, G5, A5, FS5, G5, A5, G5, B5, A5, G5, FS5, E5, FS5, E5, D5, E5, FS5, G5, A5, B5, G5, B5, A5, B5, CS6, D6, A5, B5, CS6, D6, E6, FS6, G6, A6};//int melody[] = {'A6', 'FS6', 'G6', 'A6', 'FS6', 'G6', 'A6', 'A5', 'B5', 'CS6', 'D6', 'ES6', 'FS6', 'G6', 'FS6', 'D6', 'E6', 'FS6', 'FS5', 'G5', 'A5', 'B5', 'A5', 'G5', 'A5', 'FS5', 'G5', 'A5', 'G5', 'B5', 'A5', 'G5', 'FS5', 'E5', 'FS5', 'E5', 'D5', 'E5', 'FS5', 'G5', 'A5', 'B5', 'G5', 'B5', 'A5', 'B5', 'CS6', 'D6', 'A5', 'B5', 'CS6', 'D6', 'E6', 'FS6', 'G6', 'A6'};int noteDurations[] = {8, 16, 16, 8, 16, 16, 16, 16, 16, 16, 16, 16, 16, 16, 8, 16, 16, 8, 16, 16, 16, 16, 16, 16, 16, 16, 16, 16, 8, 16, 16, 8, 16, 16, 16, 16, 16, 16, 16, 16, 16, 16, 8, 16, 16, 8, 16, 16, 16, 16, 16, 16, 16, 16, 16, 16};const int sensorPin = 0; int lightCal; int lightVal;
void setup() { // iterate over the notes of the melody: pinMode (9, OUTPUT); lightCal = analogRead(sensorPin);}
void loop() { lightVal = analogRead(sensorPin); //if lightVal is less than our initial reading (lightCal) minus 50 it is dark and //turn pin 9 HIGH. The (-50) part of the statement sets the sensitivity. The smaller //the number the more sensitive the circuit will be to variances in light. if(lightVal < 800){ for (int i = 0; i < 56; i++) { // to calculate the note duration, take one second // divided by the note type. //e.g. quarter note = 1000 / 4, eighth note = 1000/8, etc. int noteDuration = 2500 / noteDurations[i]; tone(9, melody[i], noteDuration); // to distinguish the notes, set a minimum time between them. // the note's duration + 30% seems to work well: int pauseBetweenNotes = noteDuration * 1.30; delay(pauseBetweenNotes); } } }
Step 5: Demo
When the laser is 'tripped', the alarm will play, in this case is the beautiful composition of Pachelbel's Canon in D.

Participated in the
Makerspace Contest 2017


