

Introduction: Check Valve From Bottles and a Table Tennis Ball


ever wanted to presurize your water bottle rocket and couldn't find anything to stop the air from going out? ever wanted to transfer water or air from one place to another the easy way ? well you better try this !
Step 1: The Idea + Materials

the whole idea behind it is to easiely transfre air or water to one direction While stopping them from going to another, that way you can have a brake in the middle of the transfer without having to hold a folded hose or stick your thumb up some hole (:p).
how does it work ?
well it's quite simple, when transferring the air (or water) pushes the ball up (thats why we use a really light ball), passes around it and gets out the other end. when air (or water) tries to go the other way the ball is pressed to the bottle creating a seal.
notice : the air (or water) flow can move only in one direction - upwards, and the system works only when held in an up-right position with the O-ring at the bottom side ( you can put O-rings on both sides so it won't matter which is bottom ) !
so, to make this you will need these materials :
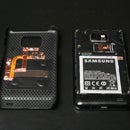
1. 2x plastic bottles ( without any paterns near the cap )
2. 1x table tennis ball
3. cutting tool
5. epoxy glue ( super or crazy glue arn't meant to seal stuff )
6. optinal : for maximum sealing use an O-ring (*)
(*) to know what diameter to use - after cutting the bottle (accotding to the next steps) put the ball in the top side of the bottle and see where the ball toutches the bottle, then measure the diameter of the bottle at that line (asumin that the inner diameter is clise to the outer diameter) and that is the diameter you need - it doesn't have to be exact becaause the O-ring itself had defferent inner and outer diameters.
Step 2: Preparing


first thing you need to do is cut the bottles.
it is preferred thar the edge is straight. ( see picturs )
cut the bottles at the straight part and try to cut as straight as possible.
the part you will need is the top.
take one top and make a crack ( as shown in the pictures )( we do this so the bottles would fit inside each other ).
Step 3: Assembly

prepare some epoxy mixture.
now, take the O-ring ( of you chose to use one ) and glue it ti the inside of one bottlr top. you can press it down with the table tennis ball. ( make sure you dont have any epoxy glue on the inside of the O-ring )
wait for the glue to dry.
test the seal byholding the bottle top with the cap on the bottom, placing the ball on the O-ring and trying to suck air from the cap side.
Step 4: Assembly 2


after the O-ring is held in place and is perfectly sealed it's time to glue the two bottlr tops.
take the top without the crack and insert the dtreight part of that bottle in the streight part of the cracked bottle, glue and seal them.
dont forget to put the ball inside before gluing !!!
wait for the glue to dry.
Step 5: Test

take a baloon and strech it over the top cap, inflate in from the boottom cap and hold it in an up-right position. if the baloon stays as it is the system works ! if it shrinks there's a broken seal or a hole in the baloon.
Participated in the
The Instructables Book Contest


