

Introduction: Cheese Made Easy - Colby


Cheese making is easy and fun! Enjoy another cheese, with this Colby tutorial.
If you have never made cheese, check out my cheddar cheese tutorial. This covers many basics of cheese making. https://www.instructables.com/id/Easy-Marbled-Cheddar-How-to-preserve-milk-the-fun-/
Step 1: Preperations

Prep time. Grab your utensils and ingredients:
Ingredients:
1/32 tsp MA001 Mesophilic culture (pasteurized milk uses up to 1/2tsp. More on that later.)
1 Gallon of milk. Pasteurized with low heat if store bought.
8 drops rennet diluted in 1/4c cold water (Up to 16 drops for pasteurized milk.)
3-6 drops of Annatto coloring, diluted in 1/4c water. Optional (makes a cream colored to yellow cheese)
Utensils:
Slotted spoon
Colander
Butter muslin (sanitized by boiling)
2 large pots, each able to hold a little over 1 gallon
Measuring spoons
Small bowls to hold ingredients
Remember, this cheese process can take anywhere from 3-5 hours to complete (pressing time is not included as you don't have to babysit a cheese as often when it is being pressed.) Most of this time is spent waiting and doing things around the house, but be prepared to be unable to leave the house during this process.
Don't let the time it takes stop you from making cheese! Cheese making is a very rewarding experience (and you can eat the result...How cool is that?)
Step 2: Heat Milk
Heat your milk to 86 degrees f. Add coloring during this process if using.
At 86f, turn off the stove and remove the pot from the stove top. This keeps the temperature from climbing.
Add the culture, let sit 2 minutes to rehydrate, and stir up and down. This culture works best between 80-100 degrees F.
If you have not made a successful cheese before, make a few batches using various amounts of culture. If you have too much culture, your curd will be rubbery and have a high acidity. Too little and your cheese will not have much flavor.
The same applies to to your rennet (refer to next step.)
Step 3: Add Rennet

Add your rennet and stir. Let sit at 86 degrees F for 45 minutes to 2 hours. This time depends on how much rennet you used. You will know the rennet has done its job when the milk has gelled to a custard or jelly consistency, and a thin layer of liquid (whey) covers the top. This curd should have a clean break (photo 1).
Ideally, curds should form in under 60 minutes. If it takes longer, you didn't add enough rennet (do not add more. Let it set until curds form, then proceed.) If it takes less than 40 minutes, you used too much rennet.
Play around with amounts until you get the correct results.
Continuing:
Cut the curds with a whisk by sliding a whisk through the curds, using an up and down motion.
When done, set your timer for 5 minutes and walk away. This will give the curds time to 'heal'.
Step 4: The Colby Process
Forgive my lack of photos. It is a dreary early afternoon, full of rain and dark clouds. My camera refuses to take reasonable photos (tablet camera...to be expected.) The lack of photos should not make it hard to follow, though.
Colby is different than cheddar and soft cheeses because it is a washed curd. Instead of stirring it with its whey at a temperature of 102, this washed curds temp drops to around 70-80 before being brought back up. It results in a creamy, moist cheese.
Let's continue!
Stir slowly while heating the curds to 102 F. This heating process should take 30 minutes to go from your current temp to the 102F.
Hold the temperature at 102°F for 30 more minutes, gently stirring every 5 minutes or so during this period so that the curds do not mat together. Be gentle.
Cover the pot and allow the curds to settle for five minutes.
Pour off the whey until it is level with the curds. Add cold water until the temp reaches 80 F. Colder will produce a moister cheese, hotter will make a dry cheese.
***If you plan to age this cheese 3+ months, aim to keep the temp between 80-86 degrees F for best aging results.***
Hold the temperature for 15 minutes, stirring every 5 to keep the curds from matting.
Line the colander with a cheesecloth and drain the whey and curds. Don't let the whey go down the drain! Use it for baking, gardening, or feeding to your pets/livestock.
Mix in 1tbs salt. Do not use salt with iodine in it. Let this salt sit for 10 minutes, and then stir again. When you do not feel any more salt crystals.
Put the cheese curds in your cheese press and fold the cheese cloth over the top. Press with 20 pounds of weight for 20 minutes. Turn the cheese over and press again with 30 pounds for 20 minutes. Turn the cheese a third time and press with 50 pounds for 12-24 hours.
Step 5: Dry or Store
At this point, you can eat you cheese, or prepare it for waxing and aging.
To prepare for waxing, allow your cheese to dry in a 70-80 degree F environment for 1-3 days, turning twice a day. Don't worry if mold forms, this is normal. Wipe it off with a salt brine (equal parts non iodine salt and water). If the mold is really out of hand, cut off the bad areas and make those places smooth (aka, no crevices), and then wipe with a brine. Let air dry before waxing.
Heat your wax with boiling water. As soon as it is liquid, turn off the heat. Dip the cheese in, and cover it 2-3 times. Label, and place in your cheese in a cave. Let age for 1-5 months, turning every day for the first 2 weeks, and then once a week for the rest.
Also, freezing cheese is another way to keep it from going bad! Just pack it into a freezer bag, vacuum sealer, or double wrap it in cheese wrap and store.
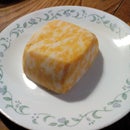
Step 6: Done!

And you are done! :) Enjoy your cheese.


