

Introduction: Compact Disk (CD) Golf


So I was looking through the endless incredible instructables, when I found one by SEAMSTER, who made an indoor disk golf hole. Here is the link to his:
https://www.instructables.com/id/Play-Disc-Golf-indoors-reusing-plastic-bottles-an/
I thought it was awesome and would make a great gift for my brother this christmas. I'm posting this because, as cool as his was, there were a few changes i wanted to make. I wanted it to be a little more substantial and I wanted it to be portable. To that end, the following steps will take you through how I made this one. Although I credit Seamster for the idea, I'm submitting mine to the Toys 2 contest. I would love to hear your opinions.
So, on with the show.
Step 1: Supplies and Tools


Ok, you will need a few things first:
- An extendable tripod, I used a sheet music stand from way, way back in school. (don't worry if you don't have one or can't find one to buy, i'll show you an alternitave)
- a plastic planter and its water tray (again, i'll show you some alternatives)
- 1/4 - 1/2 inch plywood
- nylon rope
- bailing wire
- 3/4 inch tubular foam insulation
- some unwanted CDs
- glue (my preferance is aquarium glue)
Tools you will need include:
- a drill, with a variety of hole saw sizes and drill bits
- a jigsaw
- a utility knife
- a lighter
- a sharpie
- a ruler
- optional, some stick-on velcro
Step 2: The Stand


I highly recommend making an effort to aquire a sheet music stand or something similar. They're light weight, compact and they look pretty nice.
That being said, if you don't have one, we'll just have to do the best we can. I'm sure there would be a multitude of ways to do this depending on your available supplies, but this is a super simple and cheap way to make a stand that will still be somewhat portable.
You will need a cheap extendable painters roller pole (found in any hardware store or wallmart), and a block of wood.
Quite simply, you will use your drill and a holesaw aproximately the same diameter as the pole, to put a hole in the block of wood.
Presto, a simple stand. Not as attractive as the music stand but it will work.
Step 3: The Basket


The basket will be made from the plastic planter of your choice. It doesn't have to be a planter, an oil pan would work, or maybe a wicker basket. It all depends on how hard you want this game to be, what you want it to look like, or simply what you have laying around. You could even use a square cardboard box and its lid.
Whatever your choice, you will want to cut two or three disks from the plywood roughly the same size as the bottom of your basket. Take your glue and secure them to the bottom of your basket. You can glue the to the inside or the outside, I chose the inside. When its dry, drill a hole, the diameter of your stand, through the center of the planter and wood. The wood disks will add stability to the basket as it sits on its stand.
Now, if you're using the painters pole, make sure the diameter of the hole is the same as the thinner section of the pole. the reason for this is that the basket will now slide down the thin section and rest on the wider section.
Step 4: The Chains


On to the chains, or in this case, nylon rope. For this part we will start with the water tray, or box top or what ever you choose. Just like the basket, we'll cut a plywood disk and glue it to the center of the water tray. And again, when its dry, drill a hole through the center. try to make this hole as small as possible for the tightest fit possible. we want it to sit at the top of your stand.
Now, you need to decide how many chains you want, mine is a ten chain. Take your sharpie and mark out where your chains will hang from. Trust me it doesn't need to be perfect, you'll never notice when its finished, but try to space them evenly. Now take your drill with a bit thats the same diameter as your rope, and drill out all the holes.
For the chains you will want to cut as many chains as you need, about 2 1/2 feet long and tie a knot on the end of each one. Insert all the chains from the top down. Take all the chains in one hand and trim them to the lenght you will need, mine came out to be about 18 inches. You can measure yours by actually putting the basket and chaintray on your stand. This will allow you to get a good idea of how long they should be. After you trim the chains to length, take your lighter and melt the ends, this will keep then from fraying. OK, BE VERY, VERY CAREFUL WITH YOUR LIGHTER. We don't want to start any fires.
When your chains have cooled down, grab the bailing wire. We're going to push it through each rope end, Make sure you start with one chain and go in order around your chaintray. When you're through all the ropes, cut the bailing wire and twist the two ends together. Be sure to leave enough room for your stand to fit through them.
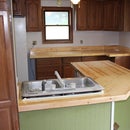
Step 5: It All Comes Together in the End


At this point you should have all the components ready to go. So, go ahead and check the fit. Looks cool, huh? Clyde thinks so! (my cat)
Oh, you know, I did mention stick-on velcro. You probably noticed in my intro how nicely this is all packed together (by the way, the disks fit inside). As I have left a lot of room in this instructable for personal flare or cost, it is up to you and your design to find the right way to consolodate your new toy. It should be fairly straight forward though. Have Fun.
Step 6: Your Disks


Ok, we have an indoor disk golf basket, but it's not much good without some good indoor safe disks to use. Its finally time you got some use out of those 80's Hair Band CDs that have been collecting dust. Or maybe some outdated software you still have. Either way, they're going to become your new indoor Compact Frisbee Disks.
First we'll take the utility knife and cut a slit about half way through your foam insulation, and long enough for it to encompass a CD. Squeeze a beed of glue around the outer edge of the CD. Now slide the edge of the CD and the glue into the slit in your insulation. Wrap the foam all the way around the CD and cut to length. Use a piece of tape to secure the foam while the glue dries.
When its dry you're ready to play eighteen holes. Try placing your basket in different spots around the house. Down a hallway and into a room for a par5 dogleg. Or over the sink water hazard. Maybe even up the stairs for a mountainous course. Theres still a lot of winter time left, ENJOY IT!

Participated in the
Toy Challenge 2

Participated in the
ShopBot Challenge


