

Introduction: Computer Monitor Decoration


Nothing is classier than a mini mounted pigs head on your computer monitor! This is a 3D model my friend designed in ZBrush and I printed in ABS plastic on the Up! 3D printer at the techshop (http://techshop.ws). It is mounted with double sided tape. (Note: the hole in the ear is unintensional)
You will need:
-ZBrush (or any other 3D modeling program)
-Up! (software that communicates with the Up! 3D printer)
-Up! 3D printer (or any other 3D printer)
-ABS plastic
-heat protective gloves
-safety glasses
-chisel (or another instrument for prying up final piece)
Step 1: The Design
Here is the .STL file I used to print the mounted pig head (http://dl.dropbox.com/u/67332093/pig.STL). Feel free to use it or design your own in ZBrush or some other 3D modeling program.
Step 2: Set Up Your Print Job

You should be familiar with the Up! program (if you are using the Up! 3D printer) or whatever software communicates with the 3D printer you are using. I scaled my model down to be about 3.5 x 2.5 x 3 cm (length, width, height).
Step 3: Set Up Your 3D Printer

Before you begin the project, make sure to familiarize yourself with the basic operation of your 3D printer and the general safety precautions recommended by the equipment manufacturer.
When sending the print job, under the support structure options I chose the minimum (10 degrees) but the ears drooped and ended up with holes. If you don't mind the holes go ahead and use this setting; there was no messy support structure I had to cut away after printing.
Note: I printed my piece on a raft but It is really not necessary since the peice has a nice flat bottom.
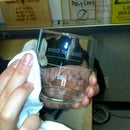
Step 4: Remove Your Piece

When removing your piece, follow appropriate safety procedures to avoid hurting the machine, your part, or yourself. You will need gloves, safety glasses, and a chisel or something to pry your piece off the glass.
Step 5: Mount Your Piece

Note: This would be a good time to paint your piece if you are so inclined. Otherwise, you can move on and mount your piece. I used double sided tape, but you can also use the loop at the top of the plaque if you got it to print.


