

Introduction: Computer Monitor Riser


My office desk has two monitors, unfortunately they have limited ability to raise and lower. Therefore I would either be slouching in my chair or looking down all day. I am a tall guy so I needed something more than just putting a book under the monitors. I took some dimensions to determine how big the monitor riser would need to be. There is a shelf behind the computer monitors so I had to bring the monitors out a little to account for raising the monitors. To determine the height to build the monitors I sat up straight and measured from the center of the monitors to eye level.
I decided to used reclaimed wood from my parent's barn for this project. I built this in two mirrored sections so it would be easier to transport. A Sketchup model is included for dimensions. Be sure to check your own space to determine the appropriate dimensions.
Attachments

Step 1: Build


The boards I had available were about 6" wide but I needed about 17" wide. I used 3/8" dowels. I drilled 3/8" diameter holes about every 4" along the side of the board. I cut 3/8" dowels to about 2" and inserted them into the holes with wood glue. Wipe away any excess glue. Once the glue has dried, insert spacer blocks and line up the next piece against the spacer blocks. Mark the dowels to be cut so they are even. Once the dowels are cut, push the pieces against each other and mark the circumference of the dowels on the next board. If you weren't able to mark all the way around the dowel, use an extra dowel to mark the rest of the way around. Drill holes in the marked spots. I used a spade bit and enlarged the hole slightly by rotating the drill bit around. Clear sawdust out of the holes and line up the pieces. Fill the holes with wood glue and spread along the board. Clamp the pieces together while the glue dries to ensure for a tight bond. Since I was working with reclaimed wood, there was some slightly warped/bent pieces. I put some weight on top of each board to hold them down while the glue dried.
Step 2: Build


Once the pieces are glued together, I marked out the dimensions to be cut. I used a jigsaw for rough cuts, and a table saw to finalize the cuts. The triangle at the end is intentional. A square section will be cut out for a pen/pencil holder. I sanded down the boards to help hide the joints and finish up rough edges. I cut boards for the sides. I left the back open to allow for cords.
Step 3: Build


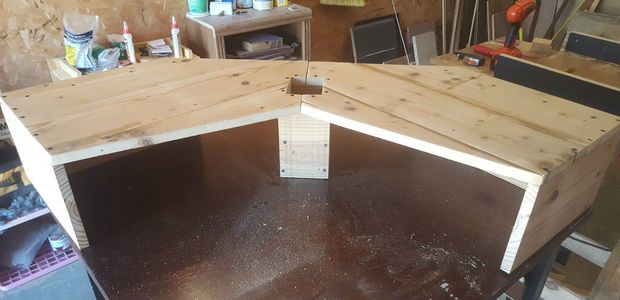
I used 2" long wood screws and countersink bits so screws are flush. I used clamps and a square board to ensure the sides are square with the top. The back piece is about 1" away from the back side. Stack some boards to support the back piece while screwing in place. Use scrap boards of the same thickness to mark where to drill holes.
I cut the pieces for the pen/pencil holder. I cut a scrap piece in the middle so pens and pencils are supported and just sticking out the top. I assembled the pen/pencil holder with screws, then trimmed the edges and sanded the sides. I assembled the three pieces together and did a final sanding on everything.
Step 4: Finish


I finished by staining everything once and the top and sides twice. Wipe off any excess stain and let dry. If need be disassemble into 3 pieces for transport. I found it wasn't too big too transport and left it all in one piece.
I included before and after pictures again to show the completed project. I've used it a few days already and can tell it's helping to keep me from slouching or bending my neck down all day.

Participated in the
Reclaimed Wood Contest 2016


