

Introduction: Browse Google Earth With Touch-less Hand Gestures

Hover can be combined with an Arduino to make a gesture controller for any computer. In this example, we're going to create a sketch to browse Google Earth by hand gestures. Spin the globe with a simple hand swipe and tap to zoom in/out.
When using Google Earth, the keyboard shortcuts can used to rotate/pan/tilt planet earth. We're going to map certain Hover gestures and tap events to keyboard shortcuts using the Arduino Keyboard library.
Let's get started!
Step 1: WHAT YOU NEED

- Arduino: You can use any Arduino board with Hover.
- Hover: The magical board that lets you control your hardware projects with gestures. Hover is available here: www.justhover.com
- Breadboard: Hover will need to be connected to a breadboard using the 7-pin header.
- Jumper wires: You need 7 of these to connect Hover.
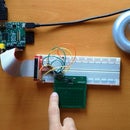
Step 2: BUILD THE CIRCUIT

Use the diagram below to connect Hover to your Arduino board. Here's a description of all the relevant pins:
- HOST_V+: If you're using a 5V Arduino like the UNO, Leonardo, etc, connect the HOST_V+ pin on Hover to the 5V pin on Arduino. If you're using a 3V3 Arduino like some versions of the Lilypad, connect the HOST_V+ pin to the 3V3 pin on Arduino.
- RESET and TS: These pins are used by the library to configure Hover. These can be connected to any GPIO pins of the Arduino but the default library uses D5 for RESET and D6 for TS.
- SCL and SDA: The I2C pins are used to read data from Hover. If using the Arduino Uno, connect SDA to A4 on the Uno and SCL to A5 on the Uno. If using other boards like the Leonardo, connect SCL/SDA on Hover directly to the pins labeled SCL/SDA on Leonardo. Hover has on board logic level shifting so you can use it with 5V or 3.3V platforms without needing additional logic converters in between.
- 3V3 and GND: The 3.3V power supply and ground pins used to power Hover. Connect these to the 3.3V and GND pins on Arduino.
Step 3: INSTALL HOVER LIBRARY
With the hardware setup, we'll need to install the library before we can start hovering. The Hover library lets you easily incorporate gesture and touch events into your projects. We've added the library and example code on Github. Hit the link to grab the latest version:
Step 4: ARDUINO SKETCH
First, let's run the sketch before we dig into the code. In the /examples folder of the Hover library, you'll find a Hover_GoogleEarth_example.ino sketch. Upload this sketch to your Arduino and then load Google Earth either in the web or desktop app from here. Wait a few seconds for Hover to initialize and get ready.
Next, make sure the window focus is on the Google Earth window (left click on the window to keep focus on it). Now start browsing planet earth with gestures!
Try the following:
- Swipe your hand in the right or left direction to spin the earth.
- Tap the center pad to stop spinning.
- Tap the north and south electrode to zoom in and out.
Step 5: UNDERSTANDING THE CODE
The first change required is to add Keyboard.begin() in setup() as shown here. This line initializes the keyboard library and allows the Arduino to essentially act like a keyboard.
void setup() {
Serial.begin(9600);
delay(4000);
Serial.println("Initializing Hover...please wait.");
hover.begin(ts, reset);
Keyboard.begin();
}
Next, we need to capture all the events that we need. For this example, we need the up/down/left/right arrow keys and page up/down.
So we added a few if statements to map each gesture to a specific key press. For example, the event B00100010 is a right swipe. We map that to the right arrow key followed by a small delay. The longer the delay, the longer that you'll see earth rotate. After that, we do a Keyboard.releaseAll() to simulate a release of the right arrow key.
if (event == B00100010) {
Keyboard.press(KEY_RIGHT_ARROW); delay(500); Keyboard.releaseAll();
} else if (event == B00100100) {
Keyboard.press(KEY_LEFT_ARROW);
delay(500);
Keyboard.releaseAll();
} else if (event == B00101000) {
Keyboard.press(KEY_UP_ARROW);
delay(500);
Keyboard.releaseAll();
} else if (event == B00110000) {
Keyboard.press(KEY_DOWN_ARROW);
delay(500);
Keyboard.releaseAll();
} else if (event == B01000001) {
Keyboard.press(KEY_PAGE_DOWN);
delay(200);
Keyboard.releaseAll();
} else if (event == B01000100) {
Keyboard.press(KEY_PAGE_UP);
delay(200);
Keyboard.releaseAll();
}
And that's it!
This example can be expanded easily to control anything with Hover on the PC. The mouse and keyboard libraries for Arduino can be customized to work with any application.


