

Introduction: Controlling a MIDI CC in Ableton Live With an Arduino Uno


In this instructable we will use a potentiometer on an Arduino Uno to control a MIDI CC in Ableton Live. A MIDI CC stands for Continuous Controller, i.e. a number in the range from 0 to 127 inclusive to modulate something with. In the youtube I made for this intro you can see and hear that we modulate the filter frequency with the potentiometer. A potentiometer is an electronics component that lets you dial in a value of resistance. This instructable deals with the Apple OSX operating system, but you can hopefully read between the lines and implement a modified version on your operating system of choice.
Step 1: What Do We Need?


We need several pieces of hardware and software to recreate this entire instructable. Let's go over them first. We'll start with the hardware:
- An Arduino Uno.
- An Arduino ethernet shield.
- A wall power mains USB connector.
- A USB cable that will connect to the Arduino Uno.
- A LAN cable that will connect to the ethernet shield.
- A home network modem that lets you connect an ethernet cable to it.
- A breadboard. The one that comes with the Arduino Starter kit will do fine.
- A potentiometer. 10K 1/4 watt will do.
- Cables to connect the potentiometer to the Arduino Uno.
- A Mac running OSX on the same home network.
Now for the software:
- A stable version of OSX. I used 10.10.3 for this instructable.
- Ableton Live. I used Ableton Live suite 9.1.9 for this instructable.
- The Arduino IDE. I used 1.6.2 for this instructable.
- OSCulator.
- Max (also known as Max/Msp). I used version 7 for this instructable.
- The CNMAT OSC library for the Arduino.
Step 2: Why OSC? Why Not a Direct Connection?

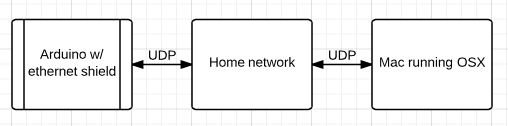
You can certainly connect an Arduino Uno directly to Ableton Live. But this is just a very small example of controlling one MIDI CC with one potentiometer. What if you want to expand the project and send chords from the Arduino to Ableton Live? Or maybe you want to be able to adjust several parameters in Ableton Live with a dozen or so potentiometers. At that point a direct connection becomes cumbersome and breaks apart. OSC (Open Sound Control) is an elegant solution for just these DIY type of projects.
OSC is a content format developed at CNMAT by Adrian Freed and Matt Wright comparable to XML, WDDX, or JSON. It was originally intended for sharing music performance data (gestures, parameters and note sequences) between musical instruments (especially electronic musical instruments such as synthesizers), computers, and other multimedia devices. OSC is sometimes used as an alternative to the 1983 MIDI standard, where higher resolution and a richer musical parameter space is desired. OSC messages are commonly transported across the internet and within home and studio subnets using (UDP/IP, Ethernet). OSC messages between gestural controllers are usually transmitted over serial endpoints of USB by being wrapped in the SLIP protocol.
OSC gives musicians and developers more flexibility in the kinds of data they can send over the wire, enabling new applications that can communicate with each other at a high level.
(from http://en.wikipedia.org/wiki/Open_Sound_Control)
Although it may feel strange to use UDP networking between your Arduino Uno and Ableton Live, remember that this solution is still several times faster than your vanilla MIDI cable, you know, the thing with the DIN connector.
Another beautiful feature of using UDP is that it's just a network protocol. Any device can start sending UDP packages and any device is free to listen to UDP packages and use them. No process is monopolizing a serial port and it doesn't really matter that much in which order you start your different programs. Think about it.
Step 3: Hooking Up the Arduino


Add the Arduino ethernet shield to your Arduino Uno. It's been described here. Before you do this, make a note of the Mac address that's probably on the bottom of your ethernet shield. You will need this number later and it's pretty difficult to read once the ethernet shield is piggy backed on the Arduino Uno.
Assemble the Arduino Uno + ethernet shield with the breadboard. The Arduino Starter Kit explains how to install everything on the wooden board that's supplied with it. But any breadboard will do. Sparkfun and AdaFruit have great ones too.
The 10K potentiometer goes onto the breadboard. All three pins of the potentiometer should have their own row of breadboard holes. It's quite common that breadboards have rows of 5 holes (a1b1c1d1e1 or f2g2h2i2j2 for example) that are electronically connected. In fact, that's the whole fun and ease of breadboards.
Connect the three wires from the potentiometer to the Arduino Uno. The first goes from one of the outer pins of the potentiometer to Arduino ground. The second goes from the other outer pin of the potentiometer to Arduino 5 volts. The third goes from the middle pin of the potentiometer to Arduino analog in 0 (A0). It helps to use colored cables for your wiring.
Step 4: The Electronics Behind What Goes on Here.


If you need to understand what happens between the potentiometer and the Arduino, you can read the article Analog Read Serial on the Arduino website. The images in this step are also from that article.
Step 5: Install the CNMAT OSC Library


In this step we assume you have the Arduino IDE installed. If not, follow these instructions. Make sure it is able to upload code to your Arduino. It is easy to forget to assign the right port and board in the Arduino IDE settings (see pictures in this step).
Download the free OSC zip package from CNMAT's github OSC page. It says "Download Zip" in the bottom right. You don't need to unzip it. Simply choose Sketch - Include Library - Add .ZIP library... from the Arduino IDE menu and point it to the OSC zip package you just downloaded. From then on you will see "OSC" or "OSC master" in the Contributed Libraries menu item in that same menu.
Step 6: Figure Out the Local IP Address of Your Computer Running OSX
The Arduino Uno will send OSC (UDP) messages to this machine, and we will hardcode that IP address in the Arduino Code.
You can run ifconfig in the OSX Terminal to see the IP address of your machine. Another option is to login to the admin pages of your modem. There might be a "local network" page there that lists all the machines connected to your local network. If you're very sure the IP address begins with 192 (as is often the case), you can run:
ifconfig | grep 192
Step 7: Arduino Code

// Arduino to MIDI CC via OSC.
// Arduino IDE 1.6.2.
// Hens Zimmerman, June 8, 2015.

#include <Ethernet.h>
#include <EthernetUdp.h>
#include <OSCMessage.h>
#include <SPI.h>

// MAC address from the bottom of the Ethernet shield. YMMV.
byte Mac[] = {0x91, 0xB2, 0xDA, 0x0D, 0x32, 0xB0};

// An EthernetUDP instance to let us send packets over UDP.
EthernetUDP Udp;

void setup()
{
  // DHCP assigns an IP address.
  Ethernet.begin(Mac);

  // We will only send here, so use an arbitrary listen port.
  Udp.begin(1234);
}

void loop()
{
  // Create an OSC message.
  OSCMessage Msg("/analog/0");
  // As a value, add the current value of analog 0 input.
  Msg.add(analogRead(0));

  // Send to Max, [udpreceive 5678] listening to port 5678.
  // Change the IP address to the one of your computer running Max.
  Udp.beginPacket("192.168.178.42", 5678);
  Msg.send(Udp);

  // Clean up.
  Udp.endPacket();
  Msg.empty();

  // Give ADC (analog to digital converter) some time to settle down.
  delay(20);
}
Step 8: Connect Your Arduino Uno and Ethernet Shield to the Home Network

The Arduino needs power from the wall socket. A USB charger will do fine, because the Arduino/ethernet shield combo draws so little current.
A LAN cable goes from the ethernet shield to your modem.
Step 9: Let Max Listen to Incoming OSC Messages and Send Them Onwards


Now we can easily leave out the whole Max step here (because we use OSCulator), but I'm guessing you are a Max head and there are a zillion other things you can do with Arduino OSC messages that are fun in Max.
For one thing, we have left the range of the Arduino analog read to [0 .. 1023], while a MIDI CC is a 7 bit number in the range [0 .. 127]. If you plan to skip the whole Max middle-man approach, you might want to scale the analog number in the Arduino code before you turn it into an OSC package. That's simply a matter of using these lines of code:
int sensorValue = analogRead(A0);
int outputValue = map(sensorValue, 0, 1023, 0, 127);
OSCMessage Msg("/analog/0");
Msg.add(outputValue);
But if you follow this instructable, we will let Max do the scaling instead. As you can see in the image, we send two udp packages. The left one sends to a machine with yet another ip address that also listens to port 5678, while the right one sends to the same machine but to port 5679. So what's the deal? If you want to keep things simple, just use the right part. That's where Max sends a scaled version of the OSC data to OSCulator (in the next step). A simplified Max patch which does just that is pasted here:
----------begin_max5_patcher----------
677.3ocuV8uaaBCD9uIOEVVZRaprTaiAi2qRyTEAbothXPfIKUU8ce9Gg1jT
ZCoh1HEr8wcm+tye2geZQ.bc8NQGD7GvMfffmVDD3DYEDrec.bS1t7prNmZv
MhttrRALz+NsXm1IOhOHpISmeuTUdaqHW6ccRBeIJDPhY1AZraAYIB7281T2
qqDZ8iMBuAP3KupS+XkSJbXCjEtk0qe3233Agp9MRkwGNTRdUn2yNo3Cvbdc
UcqeuPKoQbBNIzLiQ4HhcBI1OCe.HWWdjUQrDJCaUNJkFgo1YzQsfbAlT1lU
HEJ8g.dc4cxpJmqtcHGA8XYDMbOwWDJOw3WvKgivbWhIBwSQT+LiH7Y7vfCP
VKPL6N6rkfiS3uusYpR+YMgYs8sJzzV2T2pk0JqVFGxGyK855CSiFWYU54EK
rOBmHQWI9mgg8FddWSqTouCrBd8FYgLOmR.+nXE7CX+wj3CX+XRx7Q+oiR+w
iS+mwjPdVk.f.XDIxNPXSH7wN5.FSlsvmOZzm7UG88EMcBUA.yIKwIoKwrzk
FVPbBie9zPDh5RCo72jF9vXM9BNomQ5d98lZRw4CKbh6XMwzBM9rmtg.noFZ
XXZwe5ED+QyW72JJE6ZrU6Yprp5xqQfetx7q3pe8g07TN0kIvXeQOEMAVe3I
+mVlgbAYl3YsJvDtB4Vgk4mNgbAyyTvnYqA.6S19y4cXkTc5cebn2J+37QWc
ea9.1124A7J7KDcZoJa3yR275cS.3WT5dYQgv+YqAyjcYqqDEueI6rBG5QJ8
UBmzI.G92FZXS.MjuMzPNhTLNZR+1PyIjhwgS7mDN9prrllsh1t8tzgDS+kG
72QjE5VJU9kNOZ54tUNnejSRVqomh1zPou02KXWh+lOvM0EhVUubeEtYmedw
+8s4tuB
-----------end_max5_patcher-----------
You still need to change the IP address in the [udpsend] object to the one of your machine running OSX. The more complicated patch with the two [udpsend] objects demonstrates how you can easily use Max to send the same OSC message to different receivers. In fact, the left [udpsend] was for my iPad running TouchOSC.
A few notes about the Max patch:
- The [regexp] object parsed out the parameter from the OSC message. Basically we ignore the whole /analog/0 part of the message and are only interested in the actual value. But you can see how one Max patch might be bombarded with several OSC messages with different names. This way you can decide what to do with which message, or differentiate between different potentiometers, etc.
- The [change] object will keep the amount of data down. The loop in the Arduino code just sends the OSC message over and over and over again to all the listening devices. You only want to react to the data when someone turns the potentiometer, which is where the [change] object comes in.
- [scale] obviously does the same as the map() function in the Arduino code could have done earlier. It brings the parameter value back from [0 .. 1023] to the common MIDI CC value range of [0 .. 127].
- [sprintf "/midicc42 %d"] turns the incoming data into a whole new OSC message. This is just to demonstrate how powerful Max can be as a middle man between all your OSC needs.
Step 10: OSCulator


OSCulator, once installed, runs on your OSX machine as well. It listens to port 5679 in this case (you set the port in the OSCulator window top left), so it will receive messages from Max 7. By now, if you have connected the Arduino to your home network, turning the potentiometer should generate the proper OSC messages. If all goes well, OSCulator will immediately pick up our /midicc42 message and add it to its list. It's then up to us set the Event Type to MIDI CC and the Value to 42. The latter is of course more or less arbitrary.
Why do we use OSCulator? Because Ableton Live currently doesn't listen to OSC data. But OSCulator acts as a bridge between OSC and MIDI. Ableton Live simply sees OSCulator as a MIDI input device. And that's the beauty of it!
Be sure to get everything working before moving on to the next steps. The checkbox next to /midicc42 in OSCulator should light up if you rotate the potentiometer. If not, here are some things to check:
- Is the Arduino Uno turned on? You have to connect it to the mains via a USB cable. Because the Arduino used very little power, you can use it with an USB phone charger with a USB cable.
- Can you see the Ethernet Shield on your home network? Again, check the modem's admin pages to see if DHCP assigned an IP address to the ethernet shield. For this instructable we don't need to know the actual IP address of the ethernet shield. It's only to check if it's alive and well.
Step 11: MIDI Learn a Knob in Ableton Live


Ableton Live needs to see OSCulator as a MIDI input device. This usually happens automagically, but it never hurts to check. In Live's Preferences dialog, check if OSCulator Out is available and Track and Remote are checked under the MIDI/Sync tab.
If all is well, you can now MIDI learn a control in Ableton Live. Anything in Live that rotates will do, but for nice effect create a synthesizer with a filter cutoff/frequency control and use that one. To MIDI learn, simply click the word MIDI next to KEY top right in the Ableton Live interface. All kinds of controls turn blue then. Select the dial you want to automate and rotate the potentiometer on your Arduino Uno breadboard. If you managed to do everything right, the dial in Ableton Live will now say 1/42 in small print, meaning it received MIDI CC number 42 on channel 1. In the top left of the Ableton Live interface there is a nice list of MIDI mappings that tells you which control is MIDI mapped to which message. If you make a mistake, simply select the line that has the wrong mapping and press backspace. You can easily have multiple mappings here. When you're done, click MIDI (top right) again and all goes back to normal.
Your 10K potentiometer is now a MIDI controller. Have fun!


