

Introduction: Convertible Backpack / Tote Bag


Whew, I just uploaded A LOT of pictures for this 'ible, so I hope this will help everyone to follow along better. Pictures describe it much better than my mumble jumble. :)
This bag was a surprise for a very good friend of mine. I've gotten into leatherwork a while back and had been thinking of what to get/make her until I figured a bag would be perfect; she likes unique stuff.
A few things I'd like to mention beforehand:
1. This was a prototype, meaning I had never sewn this bag before and discovered new ways to do things as I went. Afterwards you're always smarter, so please excuse any steps that seem unnecessary to the trained eye. I hope you will learn from my mistakes, that I am purposefully pointing out along the way.
2. Also, the way I am writing this, I'm following the steps I actually took to make it, so there might be some forth and back between items, i.e. there was glue drying and then continued work later etc. I organized it as much as possible, so I hope you can follow along. Let me know if you have ANY questions.
3. There's a 3-month pro membership giveaway in here somewhere, but you must read through this fantastic Instructable to know what you have to do to get it. This is NOT a bribe. :D
Step 1: Pattern Making


I started by making little sketches and notes in my notebook. Most importantly, I wanted it to be convertible as well. Somehow I'm obsessed with anything having more than just one function. The idea for this bag was to be worn three different ways - as a tote/shoulder bag, backpack and a cross body. Eventually the cross body didn't work the way I intended and I'll get into that later (steps 15 & 16).
Everything started with a sketch. I could attach a PDF with exact measurements for the bag I made, however, I prefer that anyone that reads this just takes away what they can and come up with their own unique project. If anyone is truly interested in a file, contact me and I will be able to provide that.
Overall, I prefer to draw my patterns by hand first, but I also have a drafting background.
Step 2: Materials and Tools

Amongst all the pictures I took for this, I didn't do a "flat lay" or whatever that's called, so here goes a boring old list:
Materials
Canvas
Wax
Leather (thin ~2mm)
Sewing Thread (for sewing machine)
Leather Thread (for hand stitching leather)
Glue (E6000 works well)
Rope (cheapest from the hardware store really)
Small amount of card stock
Hardware
(I didn't actually buy my hardware where the links will lead you, I have a local place, but I think this could be helpful for those that don't know exactly what those items are or where to find them elsewhere)
- Magnetic Snap (1, small)
- Double Cap Rivets (12, small)
- Double Cap Rivets (2, large)
- Buckles (2 @ ¾")
- Studs (1, medium)
- Feet (4)
- Double Loop (2 @ ¾")
- D-Rings (4 @ ¾")
Tools
Sewing Machine
Universal Needles for Machine (sew through canvas and thin leather)
Mallet and Hammer
"Leather" Needles (for hand stitching leather)
Binder Clips
Wooden "Tongue Depressors" (got mine from the dollar store)
X-acto Knife and Fabric Scissors
Rivet Setter
Hole Punch
Scratch Awl (or another type of marking tools i.e. needle)
Diagonal Cutting Pliers (I had to shorten the rivets I had)
Stitching Chisel Set
Heat Source (to melt wax into canvas - heat gun, oven, heater; get creative, just no open fire, be smart, people!)
Plastic Cutting Board
Step 3: Most Fun Part First *Sarcasm Alert*


My friend lives in Germany and I know the weather there pretty well, so it was a no brainer that I wanted this bag to have a small barrier against a little rain. She'll be smart enough to not use this bag when it comes pouring down...
For this you could use beeswax or paraffin wax (which is more readily available at a craft store and more affordable as well). Since I had both, I used some of both, meh, why not...
So once the canvas was cut (FYI, I added ½" seem allowance all around to be safe), I pulled out the front exterior and back exterior ones and started rubbing the wax in, all over the place. This took some time and serious elbow grease. You want it to be even all over, so that just adds to all the fun!
Once that is finished, I secured the pieces at a safe distance to our wall heater. You could see the wax melting within seconds and the canvas turned a little dark once it did. I did not let this out of site ever, FYI. I let it hang there for a bit until it was evenly molten. Since once wasn't enough for this smart girl, I applied another coat of wax. Not sure that's necessary, by the way.
Afterwards I had a lot of fun actually testing the water resistance! Oh what fun, like a kid in a candy store, I probably spent a minute or more rolling little water droplets around on the canvas. Swooosh!
Step 4: Thinking Ahead - Part 1


Before sewing the actual bag, always consider what has to go on first, that can't be done after you went too far. I've designed this bag to include two decent sized interior pockets, which need to be sewn first before anything else gets put together.
For those I planned a small leather detail, that is so small, it's easier to glue it down first before trying to sew it together. That's where the tongue depressors come in handy. Apply a little glue and fold the leather lengthwise over the top of the pocket. When folded neatly in half, use the depressors and binder clips to secure them. This allows for even pressure on the leather and omits unnecessary marks left over by the clips. Let this dry for some time.
Step 5: Meanwhile...


While the pockets are on hold, set up the shoulder strap as there is glue involved as well that need time to dry.
Here is some hand sewing involved and it's just so much easier to glue the leather around the rope before attempting to hole punch and sew anything, TRUST me.
ALERT!!!! What I did next caused me not to be able to make the strap adjustable anymore. I realized too late that the strap needed to be shorter so that the adjustable part had room. So, first mistake made!
Here is what I did instead:
For the strap length I just tested it on myself with a measuring tape. Whatever feels comfortable. Always give yourself some extra room, so I added a few inches to its width and length just to be safe. Also, each end will have to hold a double loop so it needs material to hold that.
Always think a few steps ahead before making major cuts, I've learned the hard way many times...
Additionally, prepare the d-rings that will be attached at the bottom of the bag (excuse my limited backpack vernacular). For that leather straps (¾") are folded in half with the d-ring in it, glued and clamped together.
Let this all dry together with the pockets.
Step 6: Finishing Pockets


Now that the leather is secured, punch holes using a chisel and mallet. This is best done on a plastic cutting board to protect your work surface!
Then fold the corners over, eliminating some bulginess on them by cutting some leather away.
The leather thread I used isn't waxed so I alway run it through some before using. It just makes things a bit easier/smoother. Check out the VERY quick video for how it's sewn. This technique is no rocket science and also referred to as "saddle stitching". Look at this Instructable for clarification.
The pockets are stay-stitched so it's easier when sewing with the machine later.
For this I really should have used matching thread. I was too greedy and used the big spool of white I had instead of the little grey one.
Step 7: Thinking Ahead - Part 2


So we did the pockets, now on to the magnet, since it's in the lining and the surface fabric will cover it. See picture #1 of the final bag for a clearer idea.
I purposefully didn't cut the canvas to keep it in tact and not set it up for ripping over time.
Next and last, the feet. I had marked their location, like anything else on my pattern, and used my scratching awl to puncture its location.
The leather piece that would become an exterior pocket was first laid down on the waxed canvasFinal before attaching the feet. Also, I made little circles from card stock to give some extra support. Simply cut small slits using an x-acto knife and hammer the feet down carefully.
Step 8: Finishing Up the Shoulder Strap


So after the strap has dried, remove the clips and use the chisel and hammer to make holes as close as possible to the rope. This part will be hand sewn as well, but if you've done any sort of leather work, you'll be used to this. Same saddle stitching technique as before.
ALERT! I realized too late that what I did next was premature! I should not have attached the double loop yet (more in step 14). Also I cut a bit too much away at the ends for the leather to fully wrap around the way I wanted. See drawing.
Here is what I did instead:
To finish off the ends, I cut down the leather and wrapped it through the double loop. I used a dab of glue and twine to secure it while drying. Eventually, I used a really long rived to go through the sides and secure the leather I wrapped around. Picture #4 describes it best, as always.
Step 9: Sewing Lining and Face Together


Now that pockets, magnets and feet are attached, we can finally connect the lining (regular, unwaxed canvas) with waxed canvas. For that just align the pieces, right sides together, and start sewing.
Step 10: Assembling the Actual Bag


It's finally time for this bag to take some shape. Took long enough...
Start by doing the sides as well as the bottom of the waxed exterior canvas. Before sewing the bottom, let's not forget to include the 2 d-ring straps. See picture #4.
Next, we'll sew the lining the same way, EXCEPT, DO NOT sew all the way across the bottom. The bottom is where we will leave an opening to turn the bag inside out. Leave a big enough gap for material to fit through and I suggest to backstitch so the seam doesn't rip when pushing everything through.
It's starting to look like a legit bag, guys!!
FYI: my standard Singer easily tackled the leather, only when it got a bit thinker, like over the d-ring straps, did I slow down and did it "by hand", using the balance wheel.
Step 11: The Big Reveal!


Oh man, this is IT! Now we'll see if it actually worked!
Carefully turn the bag inside out and see what you got yourself into. Carefully examine and when you found that everything fell into place moved on. Cut a few more corners off and then close the hole in the lining by hand sewing it shut. I used the "slip stitch" or "blind stitch" technique for that.
Fold your lining inside and straighten your bag out. Now the top rim has to be stitched down. I used the machine for this.
Step 12: Attaching Hardware


The small rivets I had still were a little too long for the thin material I was working with. If it's too long and you try to secure it, the shaft will bend sideways and not give you the security and visual result you had hoped for. I used some diagonal pliers to clip a bit off the shaft. Using the same pliers to carefully bend the flattened end of the shaft back into a roundish shape, so the cap will fit back on.
I also attached a stud in the center of the leather to close the exterior pocket. See picture #4 for details. A stud like this comes in two pieces: the head or button (female) and the back post (male) that screws into the head. I put the back post through the lining and exterior canvas to secure the two together and have the lining move less. I am doing the same with the rivets for the d-rings next. When screwing the back post into the head I used a dab of glue for added strength.
The d-ring straps needed some rivets as well to secure them to the canvas. Same procedure (...as every year, James!) If you can tell me from where this quote is, I'll give the first person to comment with the correct answer a 3-month pro membership!!! Please, no cheating, you're better than that. ;)
Step 13: Shoulder Strap and Such


Next up: how to secure the shoulder strap. These leather strips are also ¾" wide. I folded them in half, included a d-ring and put a rivet in. Then I marked where I would be making holes with my chisel.
The location of those straps was in line with the sides of the interior pocket on that side, which you can obviously not see from your view point. Those are hand sewn, but not from the top down. See picture # 6. At this point I had played with the idea of adding some sort of cover and if it slid right between the canvas and strap, that would have been neat, buuuut I decided against that.
Step 14: Miss Know It All

So here is where I almost smacked myself in the head at the time, because I didn't follow my own rule. AGAIN. That is to think ahead. I had attached those double loops at the end of the shoulder strap before putting the strap through the d-rings. Almost didn't fit and I had to work pretty hard to make it fit. BEWARE fellow makers! ;)
Step 15: Do Some Testing Before Finalizing


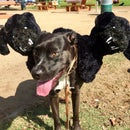
This is where I discovered some additional problems to those I already described. I know, this is just ridden with issues. For instance, when worn as a cross body, the canvas would just collapse, since it's such thin material. I filled the bag with stuff, but even then it did it. It also did it when worn as a shoulder bag and at this point I was incredibly frustrated, since I didn't foresee this happening and almost gave up. I hated the bag immediately, haha. Though, then I had an idea that stemmed from a Mendota leash I use for our dog. This type of leash is a slip and has a piece of leather attached that will slide up and down (picture #2). So I was able to use that idea and put it towards making the bag work in the end. Not what I wanted, but better than wasting it.
Step 16: So This Also Never Happened...


The initial plan was for the strap to be adjustable, but after I had gotten this far, I realized that it just wouldn't work so well for this bag, since I made the shoulder strap too long. But since I already sewed everything and attached the double loops etc to it, I was at a point of no return (that's why you prototype). So, I ended up not doing the buckle at all and just secured the strap to the d-ring.
Step 17: OMG!!!! IT'S FINALLY DONE!


And this Instructable has finally come to an end. It was a long journey, but I hope you were able to stick around and enjoyed seeing how this bag came together.
I'm not sure I will make this bag again in the same way, maybe using leather only? That would give it some more stability. My friend loved the bag and she even wore it as a cross body!! What a good friend she is ;) She said that it added extra security, now that it folded down, no-one can get into it.
I feel like we've been through so much together - this long ass Instructable, my many, many mistakes, GREAT jokes and a of course a giveaway, so while I have you here, would you vote for this here and/or here (again, still NOT a bribe, haha)? Thank you so much and now tell me how much you loved or hated this bag! :D No. Seriously.
Happy making everyone!

First Prize in the
Bag Contest

Participated in the
Epilog Contest 8


