

Introduction: Corner Radius Router Jig + Full Box Set


A woodworking friend of mine, Tim, wanted to see if we could create a corner radius router jig for him. I know what a router is but what in the world is a corner radius jig? Apparently it's a template that a router table can follow to make curves on the corner of a piece of wood ... who knew?! Well that brings me back to the project itself. Since I'm barely familiar with what this jig was -- research! Off to Google to find some of these things in action. Found some great ones out there but this was the one I liked the most.
Each of these puppies don't come cheap but are probably much better engineered than anything we could come up with so after some discussion with Tim and Tim's over-exaggerated description of his lint filed billfold ... challenge accepted! Time to put some reverse engineering into action.
What You'll Need:
- Access to a Laser Cutter
If you're patient enough you could probably do this on a table/band saw combo too, just account for the saw blade kerf and you're good to go.
- Paper mask to reduce laser burn (blue painters tape works too)
- Clamps (books or anything flat and heavy could replace them)
- Water & some paper towels for cleaning up the excess wood glue
- Wood Glue (we used Titebond III but any wood glue should work)
Step 1: Design
Tim's suggestion was something 3D printed and that's where we started brainstorming first, but we quickly realized it probably wouldn't be as accurate. Besides, we had just purchased an Epilog Laser, so time to put it through its paces.
Most of the design was created with CorelDraw x6 but I'm sure you can use just about any CAD program out there.
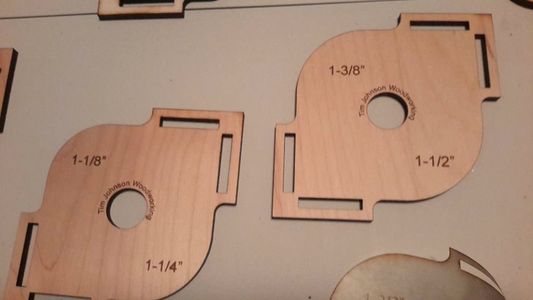
The design seemed simple. The user had to be able to switch from one side of the jig to the other fairly easily to make use of both radii. There also needed to be a vertical component to the jig that would hug the edges of the piece and allow the router to follow a path.
Easy enough! Right?
We had a few things going for us. The knowledge that the final piece would have to be 1/4" thick so the router table bearing could follow the radius of the jig. Secondly, there was a hole in the center of the jig where the user could pull against the jig and rest the jig snugly against the sides of the piece to be cut.
We could get plywood that was 1/4" thick at the local big chain lumber store so we started there.
Step 2: Iterations


This was the first project for us on the Epilog so it was a bit of trial and error. We quickly learned about laser kerf, accounting for the correct material thickness, (1/4" doesn't really mean 1/4") and checking for spelling three times before you let a dyslexic person send text to a laser cutter ... apparently Johnson isn't spelled Jhonson, hrmph. Looks the same to me. Anyway, lots of learning on this project.
We used scrap plywood on these first iterations and it worked out great.
FYI - 1/4" plywood is not all made the same thickness! Scrap plywood of one type may not have the same thickness of your final plywood piece.
So, our first iterations were very simple just to make sure we had the sizes right. We then created a slotted jig with some side inserts that would be notched. Then we moved on to wedging the notched inserts so they wouldn't be forced out and adding a key so that everything stayed together. Perfect! Now that we had a good working template down. Time for bulk creating.
Learning CorelDraw is a whole different animal but here are some tips when working with a laser:
- The vertical and horizontal guidelines are your friends use them -- they're free. They come in handy when getting into thousandths of a mm.
- Set up your work piece in CorelDraw in inches i.e. 15"x11" but switch your units to mm to do fine detail work.
- Remember to add any laser kerf your laser machine may produce to get exact fitting pieces.
- "Hairline" is the perfect line size. Use this for your vector cutout pieces and you don't have to worry about line thickness.
Final Material Measurements:
- 1/4" Hardwood Plywood = 4.95 mm.
- Laser Kerf = a little under 2 thousandths of an inch 0.002" or 0.05 mm (good ol' American engineering)
Step 3: Mass Production


So this part was fairly simple. We had our kerf identified, the thickness of the wood identified and all the different components ready. We just plopped as many as we could on a single sheet and sent them to the laser. We used 1/4" hardwood plywood (4.95mm) and a paper mask to reduce laser burn on the finished pieces (blue painters tape should work too).
Once the laser was finished doing its thing we went ahead and removed the pieces and the mask.
FYI - We have since learned to "share" the same cutout lines as it saves laser cut time, so my initial thought of putting these guys separate wasn't the most efficient. Just remember to delete overlapping lines so the laser doesn't make two passes over the same line.
Laser Settings: Epilog 40w Zing 16
Raster Engraving:
- Speed: 60%
- Power: 100%
- 500 dpi
Vector Cutting:
- Speed: 20%
- Power: 100%
- Frequency: 500
Step 4: Storage Container


So every good tool needs a storage container and this tool has a bunch of small pieces so we wanted them to all fit together nicely. Could we make a box of some sort? Well if you haven't heard of MakerCase and you're considering making boxes on a laser you should check it out. We didn't use any of the presets but we did use the custom material thickness as the hardwood plywood we used was a bit special. We liked Epilog's living hinges so we decided to make a play on them and add two hinged backs on the box. We tested them out first to see how much flex and play they had and adjusted accordingly prior to adding them to the finished product.
Here's what we did: Two different sized boxes plus an additional drawer that would fit in the bottom box:
- 5 1/8" W x 5 1/2" D x 1 3/4" H (bottom box)
- 5 1/8" W x 5 1/2" D x 3 3/8" H (top box)
- 3 6/8" W x 1 1/2" D x 3/4" H (drawer)
Stacking the 5 1/8" x 5 1/2" boxes would make a perfect container for the jigs. So we went ahead and created those two boxes using MakerCase, then threw them into CorelDraw to make modifications.
- We joined the two backs of the boxes with hinges.
- We cutout the bottom boxes front piece for a drawer to fit individual jig pieces.
- We cutout slots in the bottom boxes top for slotted jig inserts.
- We cutout the top boxes bottom piece to allow the jigs to fit inside.
- We engraved sizes above the slots for easier selection.
The drawer insert was also modified in CorelDraw to have a flat open top. We just removed the box finger joints and connected one solid line to make the top.
We learned our lesson and shared cut lines. Things went rather quickly this time around.
Step 5: Sand Your Heart Out


Now comes the fun part, well at least what I consider the fun part. Sanding! We used 220 grit sand paper and went to town. All the excess laser burn marks magically disappear. We hardly had any burn marks on the jigs themselves, they were more pronounced on the pieces for the box, so make sure to sand any parts that you'd like to touch up. It's like erasing all the mistakes! Probably why I didn't have any erasers left on my pencils when I was in school. I was preparing for all the sanding I was going to do later in life. For the hinged wood piece we used an air compressor to clear the dust and make life easier.
FYI - We like the "fresh off the laser" look and keep the burnt ends. If you'd like a different look you can sand these guys down too but it may take a bit longer with 220 grit.
Step 6: Gluing Fun!


Gluing was the messy yet fun part of the project, I'd suggest keeping a few paper towels and a bowl of water on hand. You can wet the towels and remove any access glue as needed. We use Titebond III waterproof wood glue because it has held up incredibly well from a previous kitchen island/butcher block top build.
We used books and clamps to keep most of the project together ... just be patient and work slowly. Make sure to put glue on the ends and the middle of each of the box joints. We used the cutout pieces of the bottom box as our glue applicators ... they fit well in the notches.
Everything is reversible but only fits one way so it shouldn't be too difficult to put together. The only hard part to see in the final product are the drawer rails and stopper. The three extra small cutouts of the box go in the front of the bottom box detailed above. Once the drawer is glued to the front piece of the bottom box you can inset it flush into the box and see where the stopper should be glued.
Make sure when gluing around the hinges that you're careful not to glue them together, they should be free to move.
Step 7: Finished Product


Well our first laser project was a success. Tim was blown away, and I don't think it came out half bad. I hope you guys enjoyed it. We're getting back to it, and making more fun stuff!
Attached are the dxf files for the Jig and the Box. Enjoy!


Participated in the
Epilog Contest VII

Participated in the
Shelving Contest


