

Introduction: DHT22 Humidity Sensor Tutorial


Description
DHT22 output calibrated digital signal. It utilizes exclusive digital-signal-collecting-technique and humidity sensing technology, assuring its reliability and stability. Its sensing elements is connected with 8-bit single-chip computer. Every sensor of this model is temperature compensated and calibrated in accurate calibration chamber and the calibration-coefficient is saved in type of programme in OTP memory, when the sensor is detecting, it will cite coefficient from memory. Small size & low consumption & long transmission distance(20m) enable DHT22 to be suited in all kinds of harsh application occasions. Single-row packaged with four pins, making the connection very convenient.
Specification
- Power supply : 3.3-6V DC
- Output signal : digital signal via single-bus
- Sensing element : Polymer capacitor
- Operating range humidity : 0-100%RH, temperature -40~80Celsius
- Accuracy humidity : +-2%RH(Max +-5%RH), temperature <+-0.5Celsius
- Resolution or sensitivity : humidity 0.1%RH, temperature 0.1Celsius
- Repeatability : humidity +-1%RH, temperature +-0.2Celsius
- Humidity hysteresis : +-0.3%RH Long-term
- Stability : +-0.5%RH/year
- Sensing period Average : 2s
- Interchangeability : fully interchangeable
- Dimensions : small size 14*18*5.5mm, big size 22*28*5mm
Step 1: Material Preparation

In this tutorial, we are using:
1. DHT22 Humidity Sensor
2. Arduino Uno Board and USB
3. Jumpers
4. Arduino IDE
Step 2: DHT22 Pinout

We are using Arduino UNO microcontroller in this tutorial.
+ve- for power supply
DATA - to be connected to your input data pin on your microcontroller.
-ve - Connect to GND (0V) on your microcontroller.
Step 3: Connection


We are using Arduino UNO microcontroller in this tutorial.
+ (YELLOW WIRE) - Connect to 3.3V or 5V of your Arduino Uno Board. We use 3.3V.
DATA (BROWN WIRE) - Connect to a digital I/O line on your Arduino Uno Board. We use Digital Pin number 3.
- (GREEN WIRE) - Connect to GND of your Arduino Uno Board.
Connect your Arduino UNO Board to your Computer (REFER IMAGE).
Step 4: DHT Library


Communicating with the Humidity / Temperature Sensor Module requires a driver for the DHT22 sensor. The simplest way to install the driver is to download the DHT library. Download the ZIP file below > Open Zip File > Extract to your Arduino Uno Library folder. Refer the image above for your references.
Attachments

Step 5: Sample Source Code


Download the sample source code below, open and upload this sample source code into your Arduino IDE. Make sure you have connected your Arduino Uno Board to your computer.
Attachments
Step 6: DHT Library Source Code
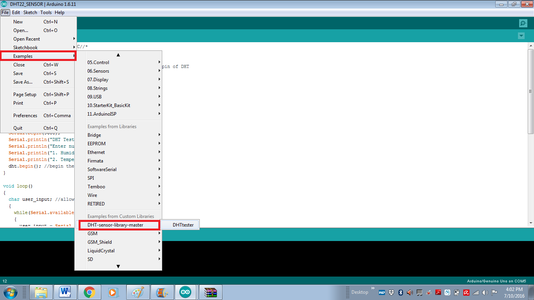
Once the library is installed in the IDE, you will find a new example. Open your Arduino IDE, go to File > Example > DHT-sensor-library- master > DHTtester. You can refer image above.
NOTE : However, we are using our own sample source code in this tutorial.
Step 7: Serial Monitor

After you has succesfully uploaded the sample source code into your Arduino Uno Board. Open your Serial Monitor and it will print as shown in the image above.
Step 8: Result


As the result :
1. when you key-in number '1', serial monitor will print the humidity value.
2. When you key-in number '2', serial monitor will print the temperature value.
3. When you key-in other than '1' and '2', serial monitor will print "Failed. Invalid option entered".
4. If they are NaN (not a number), serial monitor will print "Failed to read from DHT". OR it could be that you did not declare the correct pin for DHTPIN in the code.
NOTE : Make sure to declare the same data pin number you connect on your Arduino Uno Board in your Arduino IDE. If you connect it on Digital pin 3, declare DHTPIN 3.


