

Introduction: DIY Buttons With the Tecre Button Machine


Full Disclosure: Yes, I design and sell my own line of buttons on the side.
As I pulled out my button machine and began creating stock for this year's Valentine's Day rush, I remembered how only a few years ago I didn't realize buttons could be made in the comfort of your own home/ shop. I always thought that vendors had to have them sent away for production, and had been deterred from doing so by the cost, the quantity required, and the idea of less control over quality.
Then a friend introduced me to the Tecre Button Assembly Machine, and a whole world of creativity and business opportunity opened up! This Ible will walk you through the design parameter basics, where to find supplies, machine part names, and how to use the machine itself. You'll be making custom merch, gifts, and flair in no time, with the flexibility of making small batch designs and having total quality control of your end product.
Step 1: You Will Need....


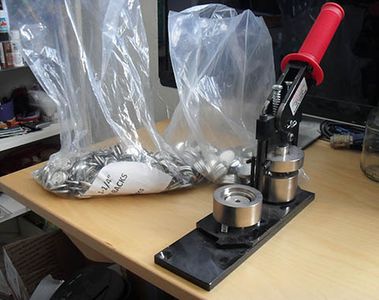
A Tecre Button Assembly Machine --I bought mine here several years ago and got sort of a "starter pack" bundle that included the machine, all the button parts, and a cutter. As I recall, this saved a bit of money.
The size of your button machine is really up to you and what you plan to do with it. I bought a 1.25 inch machine because I feel that's a very wearable size, while also being large enough to see the graphic on it. Just remember that once you choose a size, you have to use parts made for that same size for all your projects.
Tecre Button Parts --These include Shells, Pin Backs, and Mylars. The supplier I buy from typically bundles them all together and you can buy in varying quantities. Again, remember to buy the right size for your machine.
Tecre Rotary Button Cutter --This is my preferred type of cutter, though there are other designs that are more of a punch system. When I borrowed my friend's punch cutter, I found that my hands got totally worn out every dozen or so buttons. Once again, make sure to purchase a cutter of the same size as your other button components, or one that is adjustable.
Design Template for Buttons of your chosen size
Photoshop or your preferred design software
Access to a printer/ print service
Step 2: Designing and Printing


Start by acquiring a button template in the size you need. A simple google search of "(insert size here) inch button template" will get you a number of links to choose from. The one I use for 1.25 inch can be found here.
Bring the template into Photoshop
Design on a separate layer on top of the template, keeping all important information within the inner most circle. The outer ring of the template is the area that will wrap underneath and be crimped, so think of this as a "bleed" area. Turn your design layer opacity down occasionally as you work, to make sure everything is fitting within the bounds of the button.
Copy and paste designs as needed, covering the button spaces indicated on your template. This will ensure all your art falls within the printable page area.
When you are satisfied with your designs, turn the design layer up to full opacity.
Turn your bottom template layer visibility OFF.
Make sure your file is in CMYK mode for print.
Print from your home printer, or take it to a print shop like Kinko's. If you go to a shop, I suggest asking for 32 lb paper. It has a nice weight, ensuring areas of heavy saturation will not bleed through, and is less likely to bend/ tear during cutting than regular paper.
* Note: Whenever you see a nice head on shot of my original designs used in this demo, you'll notice they are watermarked. I highly recommend ALL artists watermark in some form or other when you post work publicly. It may not be totally bullet proof, but it will make it harder for someone to use the work or deny stealing later. There are a lot of dishonest people and companies out there, and having design work stolen is more common than we'd like to think. Having had a garment design stolen by a large company in the past, I've learned you can never be too careful. Any lawyers out there want to collaborate on an Ible for how to protect intellectual property??
Step 3: Cutting


Your rotary cutter will come with a small metal plate. This is essentially your cutting board; to protect your work surface from the blade.
*You may think you can save some money by not buying a button cutter/ punch, but you'll hate yourself for that choice. Trying to cut these accurately with scissors or an X-Acto is a fool's journey. Spring for the cutter --it will save you time and hand pain!
Lay your sheet of button prints on top of the metal plate. For this Ible, let's use Skeletor. Keep the graphic you are cutting out reasonably centered on your plate. Working too close to the edge risks slipping.
Place the rotary cutter on top of your graphic. Try to center it, so that the amount of white edge area is even all the way around. This will ensure that your final button does not appear biased to one side.
Secure the base with one hand. Press DOWN and rotate the handle with the other.
When you have made a steady, full circle, your graphic will pop right out!
Step 4: Button Front Assembly


I've included the parts diagram that came with my machine for easy reference. You really only need to know a few parts before you'll have it down and be assembling like a pro.
1) Lay a "shell" into the "Pickup Die". If you've chosen correctly, it will sit in there comfortably and flush. If the fit seems off, you've got the shell in the wrong side. Flip the Die Table around and try again.
2) Lay your graphics piece on top of your shell. If your graphic is directional, make sure it is oriented correctly in the Pickup Die.
3) Lay a mylar disc on top of your graphic.Mylars tend to stick together, so flex the disc and look at it in the light to make sure you don't have more than one. An easy way to spot doubled up mylars is that they have a rainbow reflective look to them, like the surface of a soap bubble. Use a cotton cloth to gently wipe away any really obvious fingerprints before placing in the Pickup Die.
4) Spin the Die Table so that your stack of pieces is now underneath the "Upper Die" (the piece that will come down and press into your lower die parts)
5) Grab the handle and pull all the way down to press. Your mylar/graphic/shell stack will have disappeared -- Do not be worried as this is NORMAL. It is tucked in the Upper Die, waiting to be pressed onto the Pin back in the next step.
Step 5: Button Back Assembly


1) Load your Pin Back piece into the "Crimp Die" basin, which should be the one nearest to you now.Remember to load it wrong side up, as shown (the physical pin side is recessed into the basin). If your pin design is directional, consider this when placing the Pin back. I try to position my pins horizontal and as level as possible.
2) Spin the Die Table back around, so that your Pin Back is now beneath the Upper Die.
3) Grab the handle and push all the way down again. Your Upper Die will press into the Crimp Die, bonding the two button halves together.
Step 6: Ta-Da! BUTTONS!


Turn your Die Table to reveal the finished button. It will lift right out of the Crimp Die, ready to be used! Once you get familiar with your button machine it becomes easy to churn out dozens in a sitting.
Button machines are a bit of an investment, but if you see yourself making lots of buttons over time it is worthwhile. Buttons are great for business promotion, fundraising events, band merchandise, or creating your own art works for sale.
If you're curious about my button brand, Boyfriend Badges, take a peek here. They're pretty big around Valentine's Day, so if you see something you like use promo code IBLE10 at checkout for 10% off. I've been so thrilled with all the support and good vibes I've found here at Instructables, and this is a good opportunity to give a little "thank you" back.
Have fun getting all buttoned up!


