

Introduction: DIY Calorimeter and 'Leslie Can'


I'm a huge fan of DIY things :) When I was a school technician a while ago I always tried to come up with cheap DIY equipment to save money.
I will show you how to make DIY calorimeter and home version of 'Leslie cube'. Both pieces of equipment are necessary to complete GCSE practicals in UK, but even if you from different country and it's not required it's still cool to make this apparatus and use in in your lesson.
Supplies
For Calorimeter:
- Thick aluminium can (you can use cans after beans, fruits or meatballs etc)
- Thin aluminum can (you can use cans after energy drinks)
- 2.2 Ohm 5 Watt resistor (3.3 Ohm will work nicely too)
- Small thermometer (mercury free ideally for safety reasons)
- 0.5m of copper wire about 1mm diameter
- Foam or cotton for insulation
- PLA for 3D printing
- Cable for connecting resistor with 4mm terminals
Tools:
- Solder and soldering iron
- 3D printer
- Wire cutters
- Scissors
---------------------------------------------------------------------------------------------
For 'Leslie can':
- Aluminium can (can be any size)
- Steel wool
- Black acrylic spray paint mat
Tools:
- gloves
Step 1: 3D Printing and Soldering

- 3D print both pieces and depending on what can you use, you might have to scale the model slightly.
- Mount two 4mm terminals into the holes on printed lid
- Solder 2.2 Ohm 5W resistor to the 4mm terminals (make sure to measure the length of wire you use so the resistor will be at the bottom of the can but not touching it)


Step 2: Assembly

- Cut the smaller thing can with scissors at about 2/3 of it's height
- Glue the 3D printed ring (this is to prevent from cut injuries; as an alternative you can use insulating tape)
- Make stirrer from copper wire by twisting it few times (see picture)
- Put insulation at the bottom of larger can and put smaller one inside
- Add insulation between cans
- Put top lid on and insert stirrer and thermometer into holes between two terminals (see picture)
Step 3: Performance


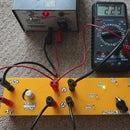
To test your calorimeter you have to connect it to the power supply (don't exceed 8 Volts), voltmeter and ammeter according the diagram above.
For this particular experiment I used 20ml of water and as you can see from the table above, calculated specific heat capacity of water was pretty close to the true value.
You can experiment with polystyrene cups/lids if you don't have access to 3D printer, but I'm not sure how accurate results you would get.
Step 4: Leslie Can


Now I will tell you how to make cheaper version of Leslie cube.
- Buy a drink in aluminium can (any drink) and don't open it just yet
- Spray one side of aluminium can with black acrylic paint and wait until it's dry
- Use steel wool and scrape the original paint from the other side of the can (remember to wear gloves)
- Now you can open you can and drink it (we wait until now because it's easier to remove paint while the can is full)
Step 5: Leslie Can Performance

- boil water and pour hot water inside the can (fill at least 80% of the can)
- Switch your IR thermometer and measure apparent temperature of shiny side and black side
- Compare reading and discuss observation with students
With IR detector you are measuring apparent temperature from the distance which is function of true temperature and emissivity. In case of Leslie cube/can, true temperature remain constant, but emissivity for each side is slightly different so IR detector would read different apparent temperature (black side has emissivity factor e~1 and shiny side has emissivity factor e~0.2 - 0.4, but both side will have same true temperature).


