

Introduction: DIY Masquerade Mask Pink Butterfly


This is the second mask. Thank you to my daughters friend for modeling it!
Step 1: Supplies
You will need:
- mask
- pearly pink paper
- mod podge
- decorative ribbon trim
- ribbon
- package of pink and white feathers
- butterfly floral stem
- pink glitter
- felt
- hot glue
Step 2: Applying Paper


Remove the elastic strap from the mask.
Start ripping your paper into pieces and mod podging them onto the mask as seen in photo 1
Keep going and going until it is covered.
Do a nice coat of mod podge over the entire mask and allow to dry.
Step 3: Embellishing, Ribbon and Glitter

What we are going for on this mask is a cracked porcelain look.
Using the mod podge generously paint it on around the edges of the mask and apply the glitter.
Now randomly choose spots around the mask and add mod podge (as seen in photo) and apply the glitter.
Once dry you can choose to mod podge over the entire mask again. If you choose to be sure to allow it to dry before continuing.
Once that is dry glue the trim around the eyes and up the mask to give it a cat eye look. Refer to image.
Next poke out the holes where you removed the elastic and attach the ribbon.
Step 4: Feathers and Butterfly

Take your butterfly and bend and work the metal to look like the one in the picture.
The bottom half of the wire needs to run along the side and bottom of the mask.
This is a tough part (getting the glue to hold)
Prop the mask and the butterfly so the metal sits where you want it to on the back of the mask take care not to glue over the ribbon. Once you have it propped so it rests on it start adding hot glue.
To make this step easier you can use clothes pins to hold the metal to the mask and hot glue spots in between the clips, once dry remove the clips and add more hot glue where the clips were.
Once the glue is dry start pulling out the lighter pink colored feathers from your bag. Start gluing them around the side of the mask over the metal stick and around the top of the mask as seen in photo.
Once those are all glued on to your liking using large white feathers glue a few on around the top side and bottom side.
Turn the mask around and using the darker pink feathers and small white feathers start gluing them in kinda going between the mask and the metal wire as seen in the photo.
Step 5: Finishing Up
Once all the feathers are on you can cut a piece of felt to cover over the feathers and glue on the inside of the mask. You can either just go over the glued feathers or the entire back of the mask, taking care not to glue the ribbon for tying the mask on.
And you are done!
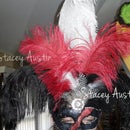
Step 6: Another Mask

And here is the final mask I've made so far. You can follow the instructions here and on my first mask instructable for this one.
I used a blue water color looking filigree paper, gold glitter, large feathers (dotted, white and black) 2 yoyo's in a cream filigree fabric, and blue gems. I simply used the elastic that came with the mask instead of ribbon because this is a light weight design.
I hope you've enjoyed this DIY!
Thank you for reading it!

Participated in the
Makerlympics Contest

Participated in the
Papercraft Contest


